 LTS Connecti abikeskus
VCA Event Alarm
Configure VCA smart event alarms on the Turbo HD DVR GUI 4.0, including human body, face, vehicle, line crossing, intrusion, region entrance/exiting, unattended baggage, object removal, audio exception, sudden scene change, defocus, and PIR detection.
The device supports receiving the VCA detections sent by connected IP cameras. Enable and configure the VCA detection on the IP camera settings interface first.
- VCA detections must be supported by the connected IP camera.
- Refer to the User Manual of Network Camera for the detailed instructions for the VCA detection.
Human Body Detection
The human body detection is used to detect the human body appearing in the monitoring scene, and capture the human body pictures.
This feature is available only when the connected camera supports the human body detection.
Go to Smart Event
Go to System > Event > Smart Event.
Open Human Body
Click Human Body.
Select camera
Select the camera to configure the human body detection.
Enable picture saving
Check Save VCA Picture to save the captured pictures of human body detection.
Enable target of interest
Check Target of Interest (Human Body) to discard non-human body pictures and videos which are not triggered by human body detection.
Set detection area
Set detection area.
- Select the detection area to configure from the Area drop-down list. Up to 8 detection areas are selectable.
- Check the checkbox of Enable Area to enable the selected detection area.
- Edit the area name in the Scene Name. The scene name can contain up to 32 characters.
- Click Draw Area to draw a quadrilateral in the preview window and then click Stop Drawing.
Related Operation: You can click Clear to clear the existing virtual line and re-draw it.
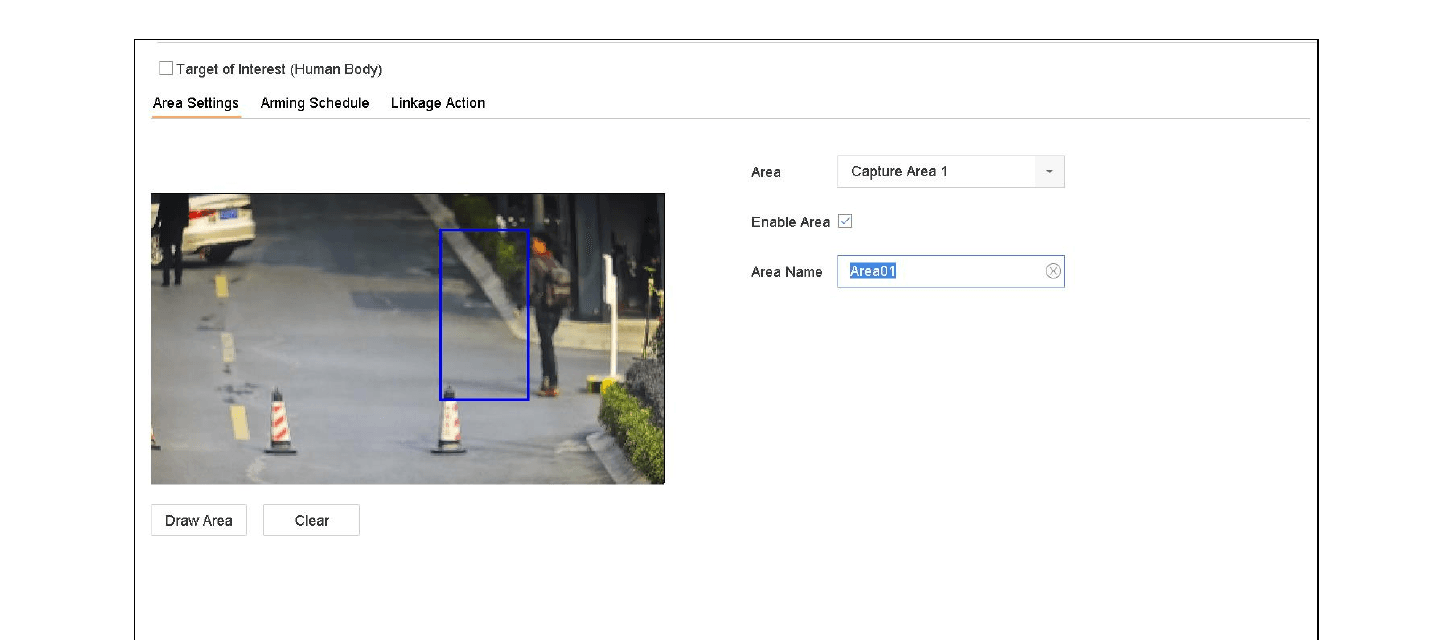
Figure 13-1 Human Body Detection
Set arming schedule
Set the arming schedule. Refer to Chapter 11.1 Configure Arming Schedule.
Set linkage actions
Set the linkage actions. Refer to Chapter 11.2 Configure Alarm Linkage Actions.
Apply
Click Apply to activate the settings.
Face Detection
Purpose:
Face detection function detects the face appears in the surveillance scene. Linkage actions will be triggered when a human face is detected.
Go to Smart Event
Go to System > Event > Smart Event.
Open Face Detection
Click Face Detection.
Select camera
Select a camera to configure.
Enable Face Detection
Check Enable Face Detection.
Enable picture saving
Optionally, check Save VCA Picture to save the captured pictures of face detection.
Set sensitivity
Drag the Sensitivity slider to set the detection sensitivity. Sensitivity range: [1-5]. The higher the value is, the more easily the face can be detected.
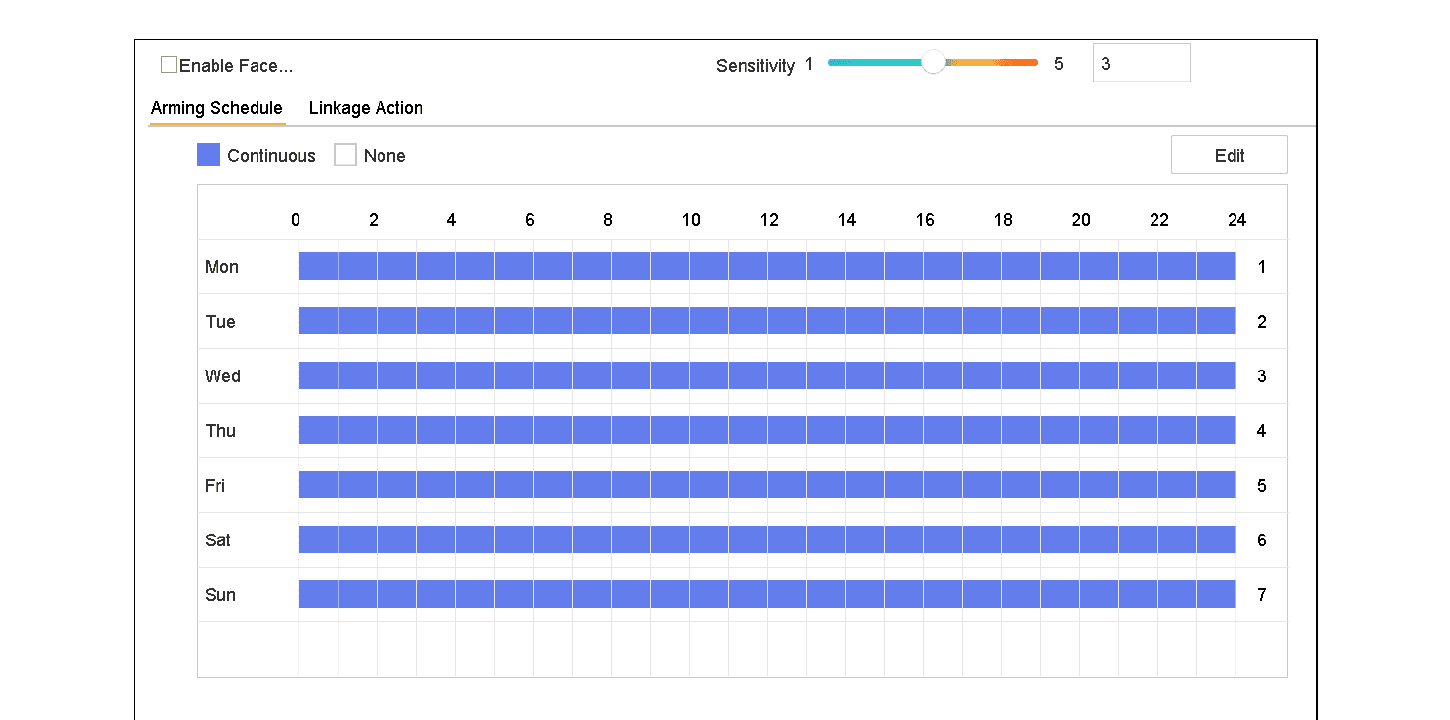
Figure 13-2 Face Detection
Set arming schedule
Set the arming schedule. Refer to Chapter 11.1 Configure Arming Schedule.
Set linkage actions
Set the linkage actions. Refer to Chapter 11.2 Configure Alarm Linkage Actions.
Apply
Click Apply.
Vehicle Detection
Purpose:
Vehicle Detection is available for the road traffic monitoring. In Vehicle Detection, the passed vehicle can be detected and the picture of its license plate can be captured. You can send alarm signal to notify the surveillance center and upload the captured picture to FTP server.
Go to Smart Event
Go to System > Event > Smart Event.
Open Vehicle
Click Vehicle.
Select camera
Select a camera to configure.
Enable Vehicle Detection
Check Enable Vehicle Detection.
Enable picture saving
Optionally, check Save VCA Picture to save the captured pictures of vehicle detection.
Set arming schedule
Set the arming schedule. Refer to Chapter 11.1 Configure Arming Schedule.
Set linkage actions
Set the linkage actions. Refer to Chapter 11.2 Configure Alarm Linkage Actions.
Configure rules
Configure rules, including Area Settings, Picture, Overlay Content, and Blacklist and Whitelist. Area Settings: Up to 4 lanes are selectable.
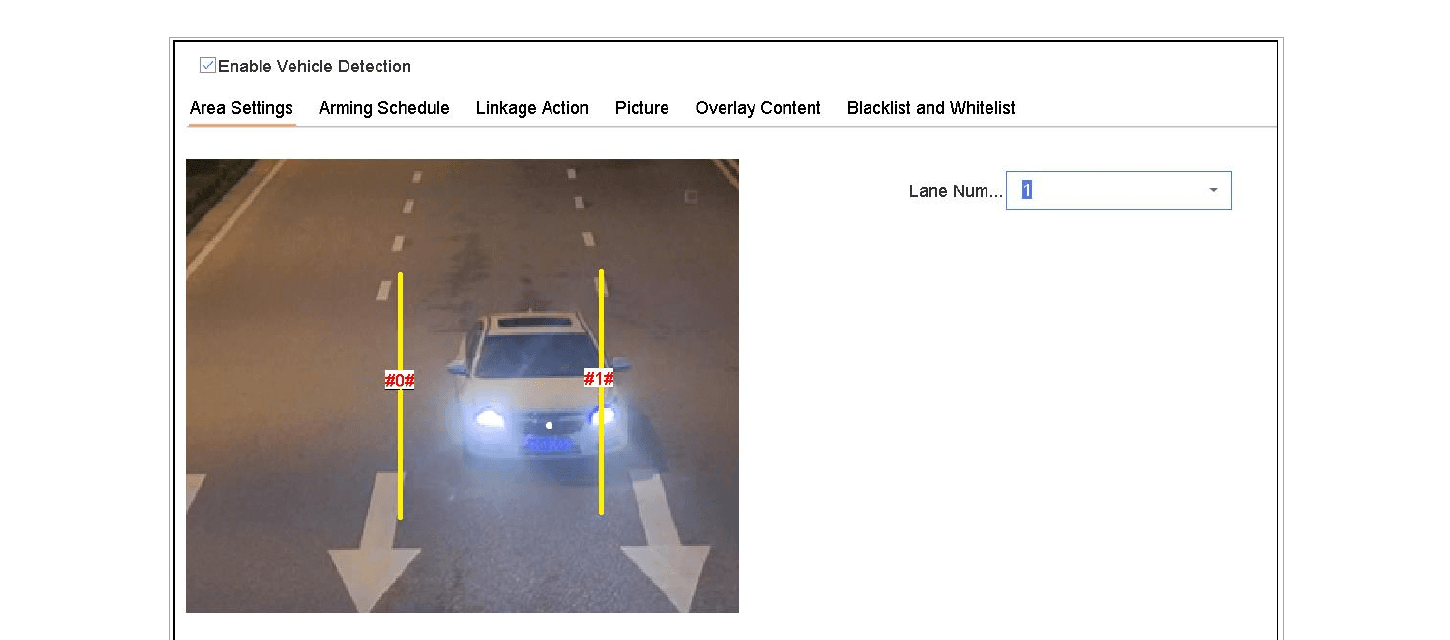
Figure 13-3 Vehicle Detection
Save
Click Save.
Refer to the User Manual of Network Camera for the detailed instructions for the vehicle detection.
Line Crossing Detection
Purpose:
Line crossing detection detects people, vehicles, and objects crossing a set virtual line. The detection direction can be set as bidirectional, from left to right or from right to left.
Go to Smart Event
Go to System > Event > Smart Event.
Open Line Crossing
Click Line Crossing.
Select camera
Select a camera to configure.
Enable Line Crossing Detection
Check Enable Line Crossing Detection checkbox.
Enable picture saving
Optionally, check Save VCA Picture to save the captured pictures of line crossing detection.
Configure detection rules
Follow the steps to set the line crossing detection rules and detection areas.
- Select an Arming Region to configure. Up to 4 arming regions are selectable.
- Select the Direction as A<->B, A->B, or A<-B.
- A<->B: Only the arrow on the B side shows. When an object goes across the configured line with both directions can be detected and alarms are triggered.
- A->B: Only the object crossing the configured line from the A side to the B side can be detected.
- B->A: Only the object crossing the configured line from the B side to the A side can be detected.
- Drag the Sensitivity slider to set the detection sensitivity. Sensitivity range: [1-100]. The higher the value is, the more easily the detection alarm can be triggered.
- Click Draw Region and set two points in the preview window to draw a virtual line.
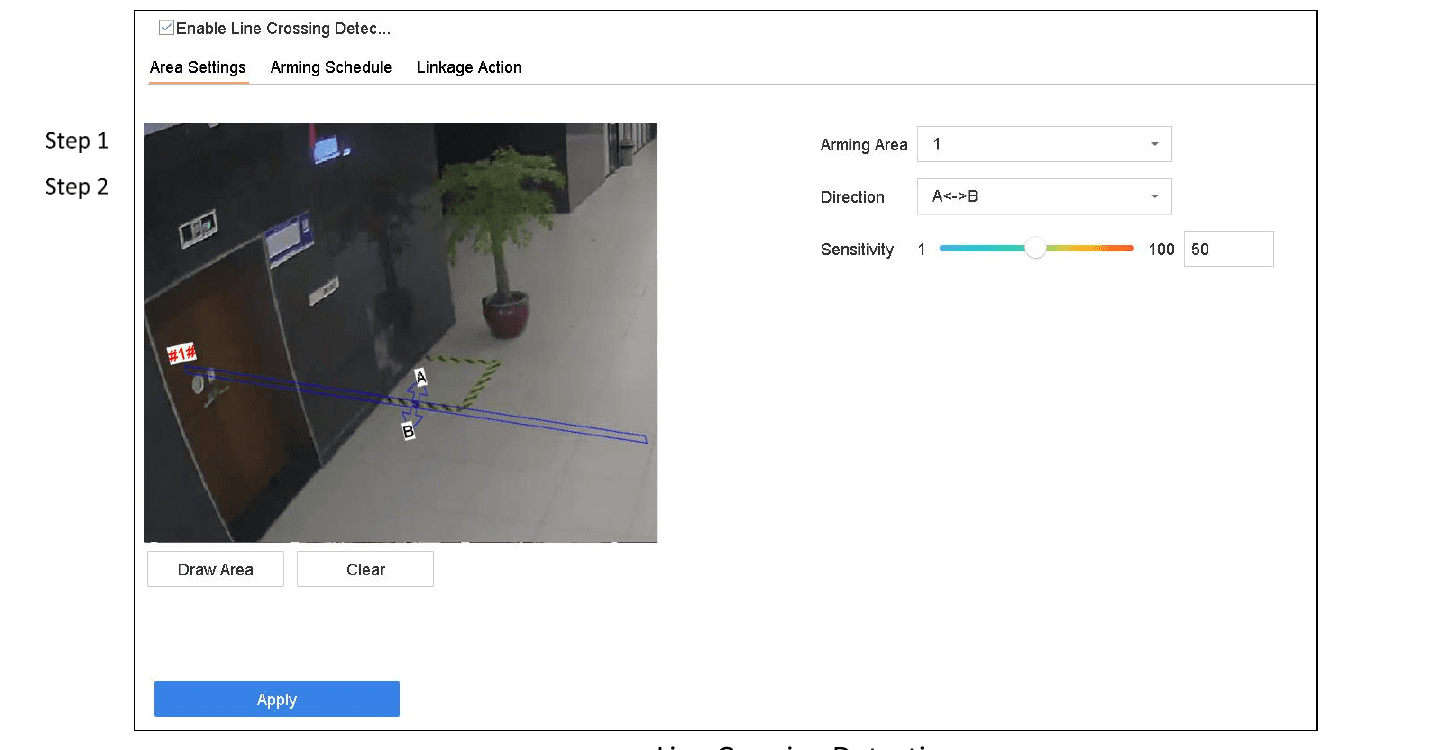
Figure 13-4 Line Crossing Detection
Set arming schedule
Set the arming schedule. Refer to Chapter 11.1 Configure Arming Schedule.
Set linkage actions
Set the linkage actions. Refer to Chapter 11.2 Configure Alarm Linkage Actions.
Apply
Click Apply.
For iDS-7200HQHI-K/S and iDS-7200HUHI-K/S series, you can check to enable human body and vehicle detection.
Intrusion Detection
Purpose:
Intrusion detection function detects people, vehicle or other objects which enter and loiter in a pre-defined virtual region, and some certain actions can be taken when the alarm is triggered.
Go to Smart Event
Go to System > Event > Smart Event.
Open Intrusion
Click Intrusion.
Select camera
Select a camera to configure.
Enable Intrusion Detection
Check Enable Intrusion Detection.
Enable picture saving
Optionally, check Save VCA Picture to save the captured pictures of intrusion detection.
Configure detection rules
Follow the steps to set the detection rules and detection areas.
- Select a Virtual Panel to configure. Up to 4 virtual panels are selectable.
- Drag the sliders to set Time Threshold, Sensitivity, and Percentage.
- Time Threshold: The threshold for the time of the object loitering in the region. When the duration of the object in the defined detection area is longer than the threshold, device will trigger an alarm. Its range is [1s-10s].
- Sensitivity: The size of the object that can trigger the alarm. The higher the value is, the more easily the detection alarm can be triggered. Its range is [1-100].
- Percentage: The ratio of the in-region part of the object that can trigger the alarm. For example, if the percentage is 50%, when the object enters the region and occupies half of the whole region, device will trigger an alarm. Its range is [1-100].
- Click Draw Region and draw a quadrilateral in the preview window by specifying four vertexes of the detection region.
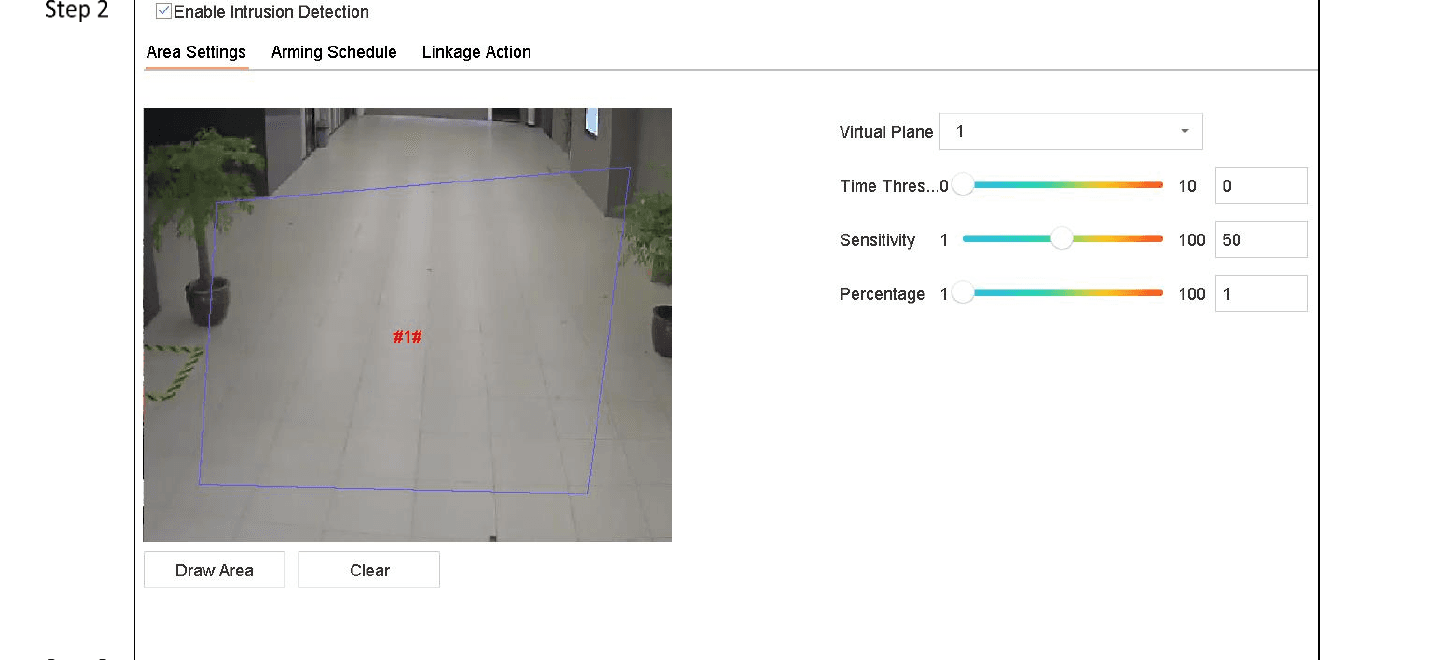
Figure 13-5 Intrusion Detection
Set arming schedule
Set the arming schedule. Refer to Chapter 11.1 Configure Arming Schedule.
Set linkage actions
Set the linkage actions. Refer to Chapter 11.2 Configure Alarm Linkage Actions.
Apply
Click Apply.
For iDS-7200HQHI-K/S and iDS-7200HUHI-K/S series, you can check to enable human body and vehicle detection.
Region Entrance Detection
Purpose:
Region entrance detection function detects objects that enter a pre-defined virtual region from the outside place.
Go to Smart Event
Go to System Management > Event Settings > Smart Event.
Open Region Entrance Detection
Click the Region Entrance Detection item.
Select camera
Select a camera to configure.
Enable Region Entrance Detection
Check Enable Region Entrance Detection checkbox.
Enable picture saving
Optionally, check Save VCA Picture checkbox to save the captured pictures of region entrance detection.
Configure detection rules
Follow the steps to set the detection rules and detection areas.
- Select an Arming Region to configure. Up to 4 regions are selectable.
- Drag the sliders to set Sensitivity. Sensitivity: The higher the value is, the more easily the detection alarm can be triggered. Its range is [0-100].
- Click Draw Region and draw a quadrilateral in the preview window by specifying four vertexes of the detection region.
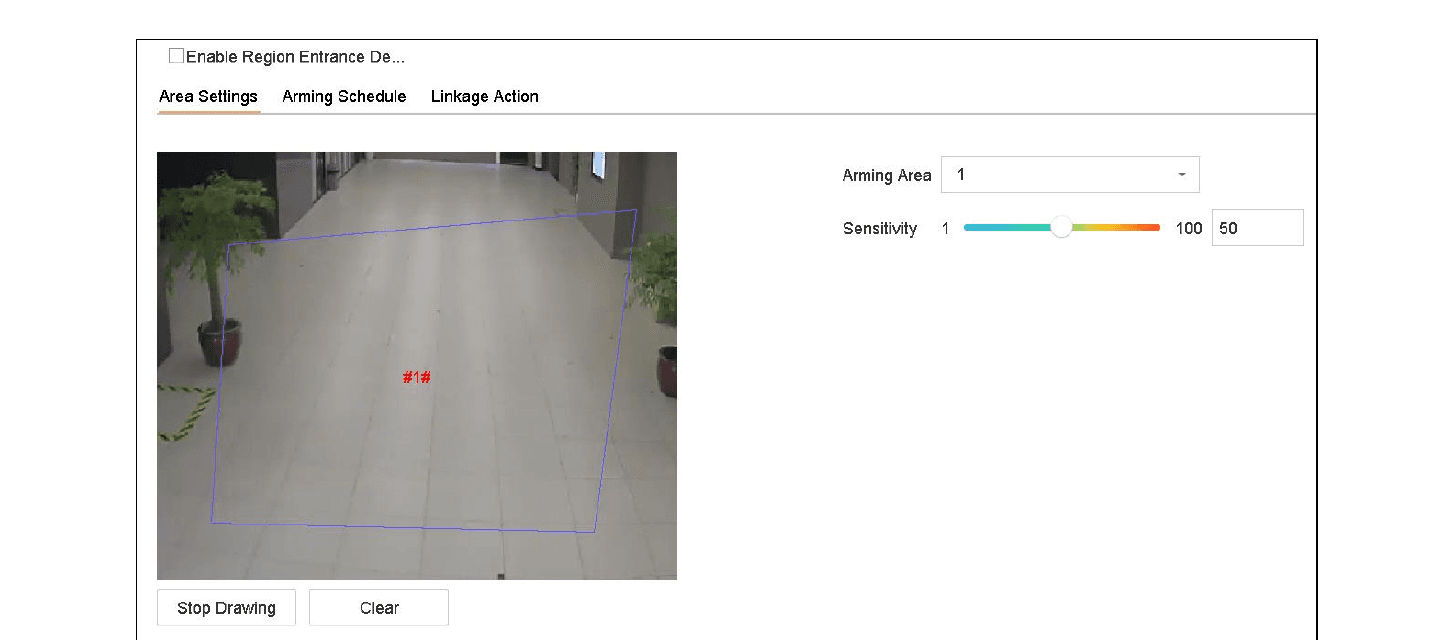
Figure 13-6 Region Entrance Detection
Set arming schedule
Set the arming schedule. Refer to Chapter 11.1 Configure Arming Schedule.
Set linkage actions
Set the linkage actions. Refer to Chapter 11.2 Configure Alarm Linkage Actions.
Apply
Click Apply.
Region Exiting Detection
Purpose:
Region exiting detection function detects objects that exit from a pre-defined virtual region.
Go to Smart Event
Go to System > Event > Smart Event.
Open Region Exiting
Click Region Exiting.
Select camera
Select a camera to configure.
Enable Region Exiting Detection
Check Enable Region Exiting Detection.
Enable picture saving
Optionally, check Save VCA Picture to save the captured pictures of region exiting detection.
Configure detection rules
Follow the steps to set the detection rules and detection areas.
- Select an Arming Region to configure. Up to 4 regions are selectable.
- Drag the sliders to set Sensitivity. Sensitivity: The higher the value is, the more easily the detection alarm can be triggered. Its range is [0-100].
- Click Draw Region and draw a quadrilateral in the preview window by specifying four vertexes of the detection region.
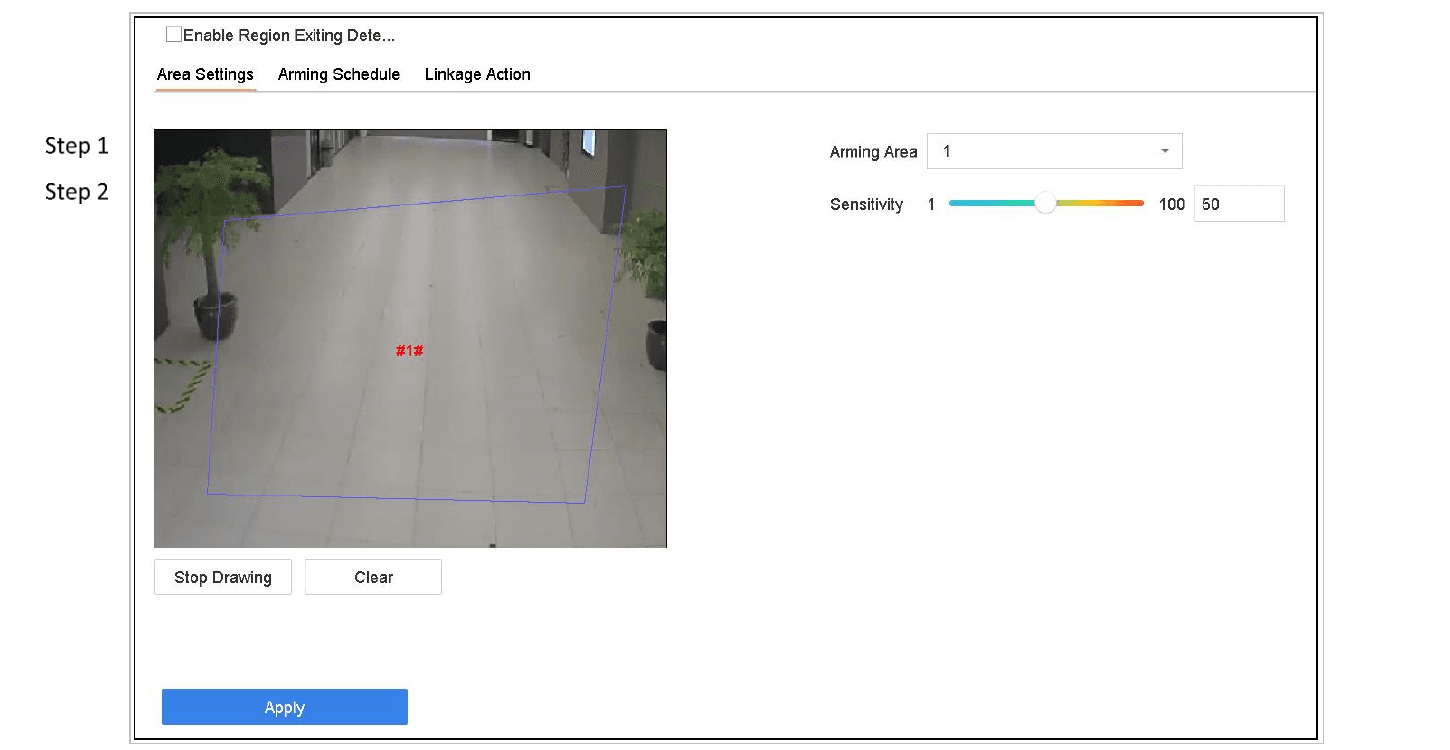
Figure 13-7 Region Exiting Detection
Set arming schedule
Set the arming schedule. Refer to Chapter 11.1 Configure Arming Schedule.
Set linkage actions
Set the linkage actions. Refer to Chapter 11.2 Configure Alarm Linkage Actions.
Apply
Click Apply.
Unattended Baggage Detection
Purpose:
Unattended baggage detection function detects the objects left over in the pre-defined region such as the baggage, purse, dangerous materials, etc., and a series of actions can be taken when the alarm is triggered.
Go to Smart Event
Go to System > Event > Smart Event.
Open Unattended Baggage
Click Unattended Baggage.
Select camera
Select a camera to configure.
Enable Unattended Baggage Detection
Check Enable Unattended Baggage Detection.
Enable picture saving
Optionally, check Save VCA Picture to save the captured pictures of unattended baggage detection.
Configure detection rules
Follow the steps to set the detection rules and detection areas.
- Select an Arming Region to configure. Up to 4 regions are selectable.
- Drag the sliders to set Time Threshold and Sensitivity.
- Time Threshold: The time of the objects left over in the region. If the value is 10, alarm is triggered after the object is left and stayed in the region for 10s. Its range is [5s-20s].
- Sensitivity: Similarity degree of the background image. The higher the value is, the more easily the detection alarm can be triggered.
- Click Draw Region and draw a quadrilateral in the preview window by specifying four vertexes of the detection region.
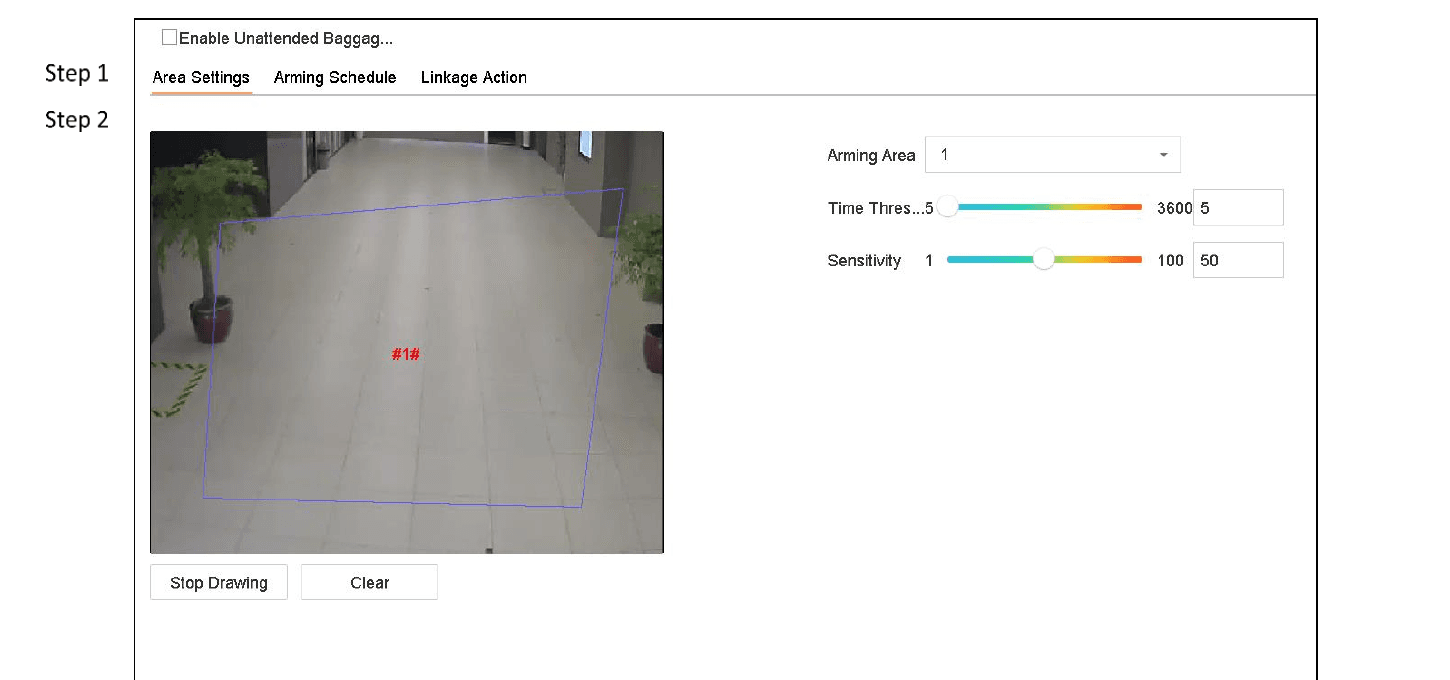
Figure 13-8 Unattended Baggage Detection
Set arming schedule
Set the arming schedule. Refer to Chapter 11.1 Configure Arming Schedule.
Set linkage actions
Set the linkage actions. Refer to Chapter 11.2 Configure Alarm Linkage Actions.
Apply
Click Apply.
Object Removal Detection
Purpose:
Object removal detection function detects the objects removed from the pre-defined region, such as the exhibits on display, and a series of actions can be taken when the alarm is triggered.
Go to Smart Event
Go to System > Event > Smart Event.
Open Object Removable
Click Object Removable.
Select camera
Select a camera to configure.
Enable Object Removable Detection
Check Enable Object Removable Detection.
Enable picture saving
Optionally, check Save VCA Picture to save the captured pictures of object removable detection.
Configure detection rules
Follow the steps to set the detection rules and detection areas.
- Select an Arming Region to configure. Up to 4 regions are selectable.
- Drag the sliders to set Time Threshold and Sensitivity.
- Time Threshold: The time of the objects removed from the region. If the value is 10, alarm is triggered after the object disappeared from the region for 10s. Its range is [5s-20s].
- Sensitivity: The similarity degree of the background image. Usually, when the sensitivity is high, a very small object taken from the region can trigger the alarm.
- Click Draw Region and draw a quadrilateral in the preview window by specifying four vertexes of the detection region.
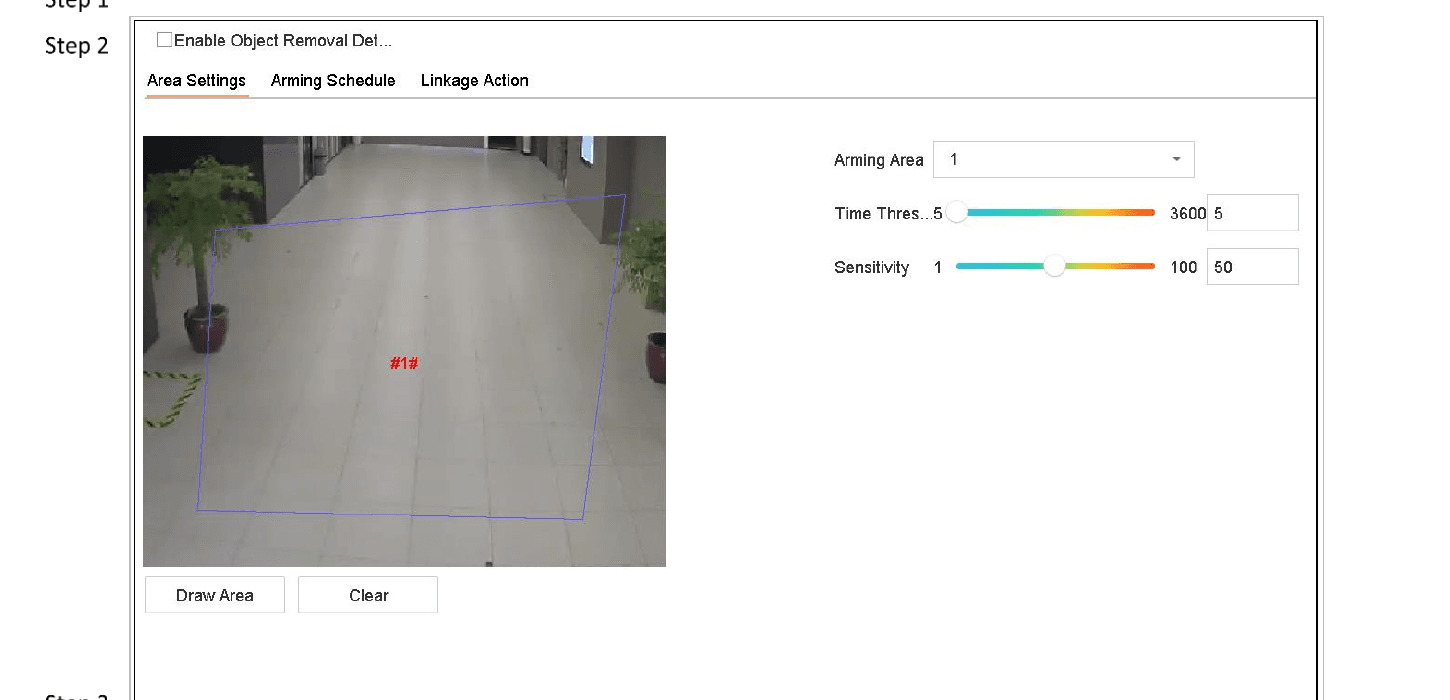
Figure 13-9 Object Removal Detection
Set arming schedule
Set the arming schedule. Refer to Chapter 11.1 Configure Arming Schedule.
Set linkage actions
Set the linkage actions. Refer to Chapter 11.2 Configure Alarm Linkage Actions.
Apply
Click Apply.
Audio Exception Detection
Purpose:
Audio exception detection detects the abnormal sounds in the surveillance scene, such as the sudden increase/decrease of the sound intensity.
Go to Smart Event
Go to System > Event > Smart Event.
Open Audio Exception
Click Audio Exception.
Select camera
Select a camera to configure.
Enable picture saving
Optionally, check Save VCA Picture to save the captured pictures of audio exception detection.
Configure detection rules
Follow the steps to set the detection rules.
- Select Exception Detection.
- Select Audio Loss Exception, Sudden Increase of Sound Intensity Detection, or Sudden Decrease of Sound Intensity Detection.
- Audio Loss Exception: Detects the sound steep rise in the surveillance scene. You can set the detection sensitivity and threshold for sound steep rise. You need to configure its Sensitivity and Sound Intensity Threshold.
- Sensitivity: The smaller the value is, the more severe the change should be to trigger the detection. Range [1-100].
- Sound Intensity Threshold: It can filter the sound in the environment. The louder the environment sound, the higher the value should be. Adjust it according to the environment. Range [1-100].
- Sudden Decrease of Sound Intensity Detection: Detects the sound steep drop in the surveillance scene. You need set the detection sensitivity [1-100].
- Audio Loss Exception: Detects the sound steep rise in the surveillance scene. You can set the detection sensitivity and threshold for sound steep rise. You need to configure its Sensitivity and Sound Intensity Threshold.
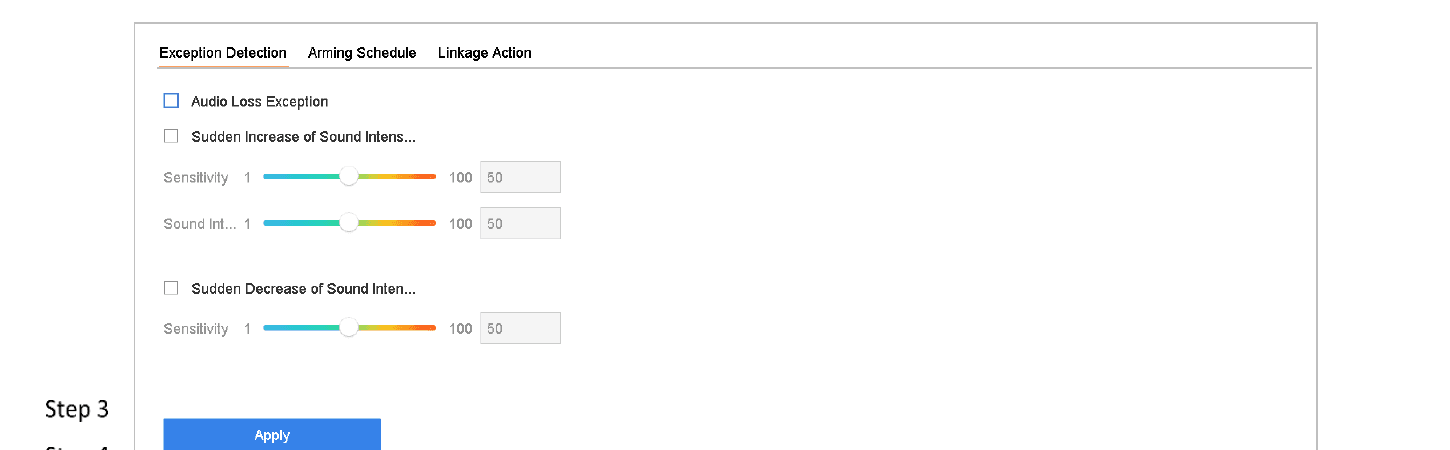
Figure 13-10 Audio Exception Detection
Set arming schedule
Set the arming schedule. Refer to Chapter 11.1 Configure Arming Schedule.
Set linkage actions
Set the linkage actions. Refer to Chapter 11.2 Configure Alarm Linkage Actions.
Apply
Click Apply.
Sudden Scene Change Detection
Purpose:
Scene change detection detects the change of surveillance environment affected by the external factors, such as the intentional rotation of the camera.
Go to Smart Event
Go to System > Event > Smart Event.
Open Sudden Scene Change
Click Sudden Scene Change.
Select camera
Select a camera to configure.
Enable Sudden Scene Change Detection
Check Enable Sudden Scene Change Detection.
Enable picture saving
Optionally, check Save VCA Picture to save the captured pictures of sudden scene change detection.
Set sensitivity
Drag the Sensitivity slider to set the detection sensitivity. Sensitivity range: [1-100]. The higher the value is, the more easily the change of scene can trigger the alarm.
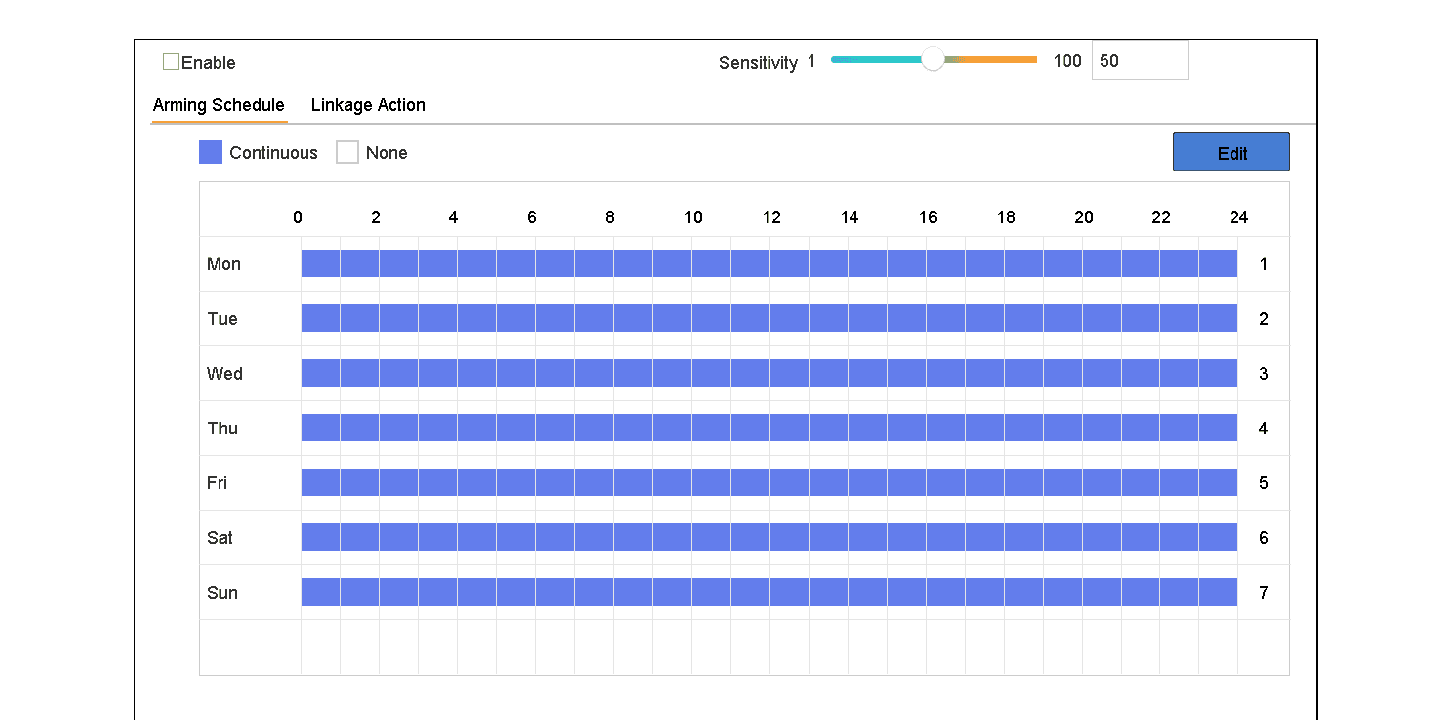
Figure 13-11 Sudden Scene Change
Set arming schedule
Set the arming schedule. Refer to Chapter 11.1 Configure Arming Schedule.
Set linkage actions
Set the linkage actions. Refer to Chapter 11.2 Configure Alarm Linkage Actions.
Apply
Click Apply.
Defocus Detection
Purpose:
The image blur caused by defocus of the lens can be detected.
Go to Smart Event
Go to System > Event > Smart Event.
Open Defocus
Click Defocus.
Select camera
Select a camera to configure.
Enable Defocus Detection
Check Enable Defocus Detection.
Enable picture saving
Optionally, check Save VCA Picture to save the captured pictures of defocus detection.
Set sensitivity
Drag the Sensitivity slider to set the detection sensitivity. Sensitivity range: [1-100]. The higher the value is, the more easily the defocus image can be detected.
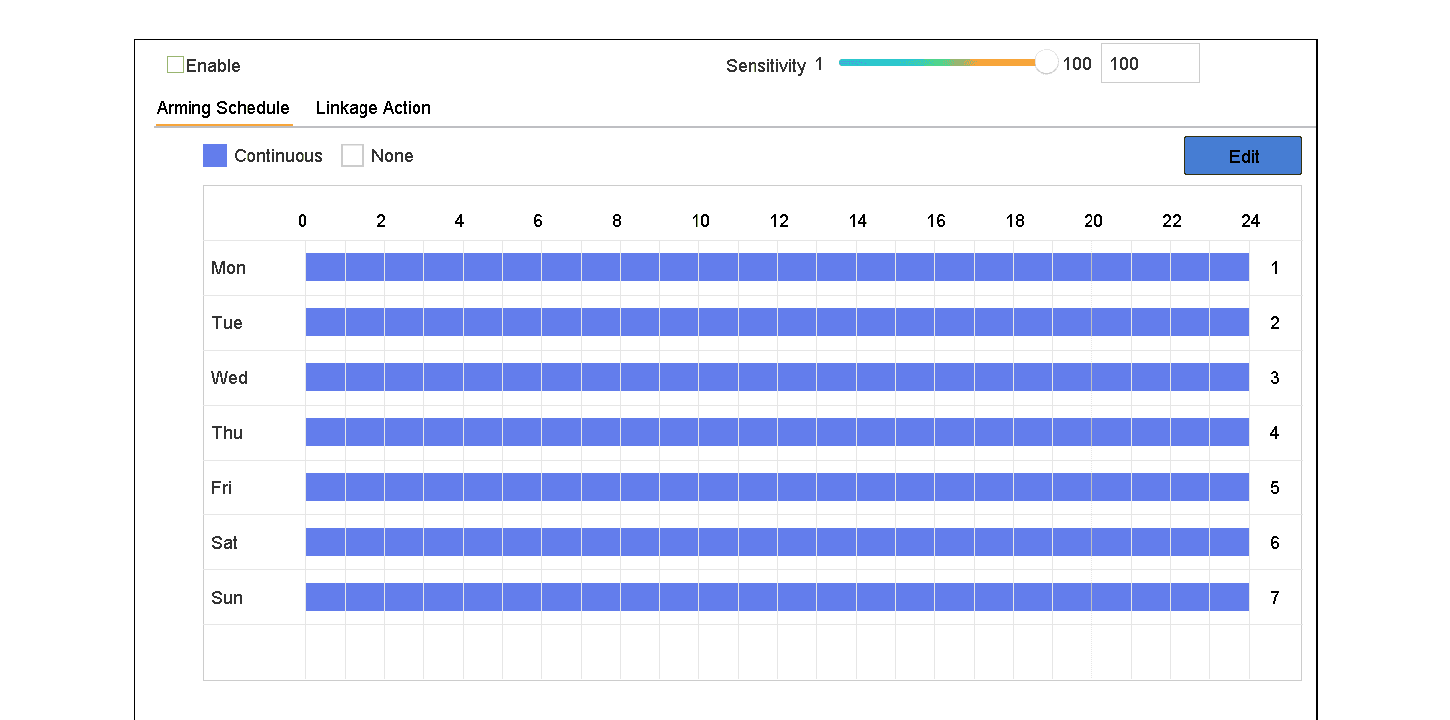
Figure 13-12 Defocus Detection
Set arming schedule
Set the arming schedule. Refer to Chapter 11.1 Configure Arming Schedule.
Set linkage actions
Set the linkage actions. Refer to Chapter 11.2 Configure Alarm Linkage Actions.
Apply
Click Apply.
PIR Alarm
Purpose:
A PIR (Passive Infrared) alarm is triggered when an intruder moves within the detector vision field. The heat energy dissipated by a person, or any other warm blooded creature such as dogs, cats, etc., can be detected.
Go to Smart Event
Go to System > Event > Smart Event.
Open PIR Alarm
Click PIR Alarm.
Select camera
Select a camera to configure.
Enable PIR Alarm
Check PIR Alarm.
Enable picture saving
Optionally, check Save VCA Picture to save the captured pictures of PIR alarm.
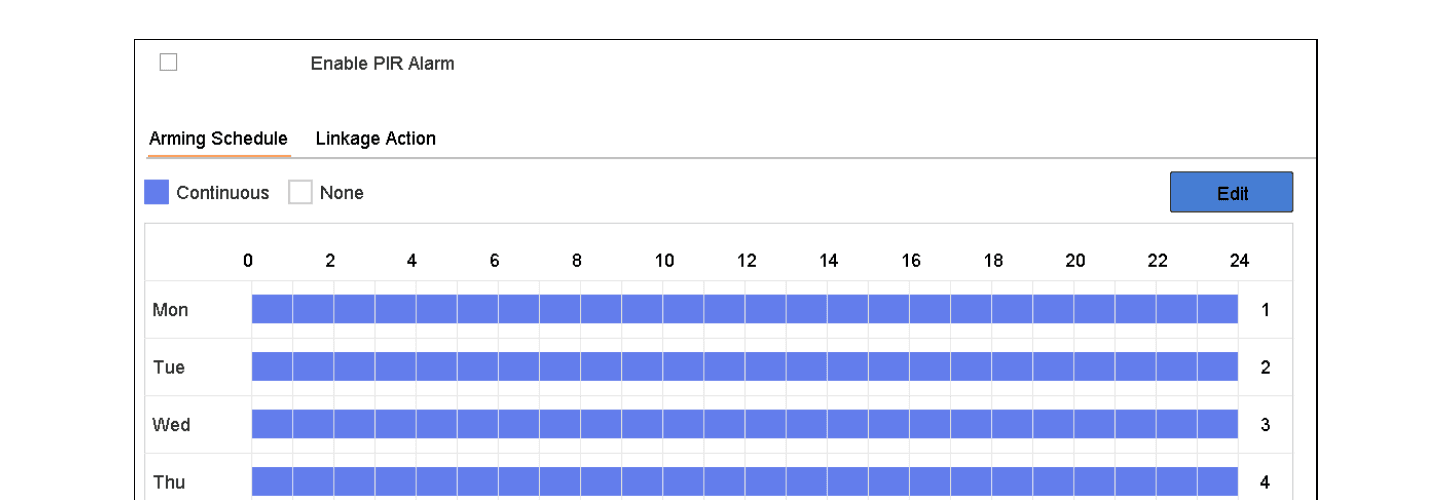
Figure 13-13 PIR Alarm
Set arming schedule
Set the arming schedule. Refer to Chapter 11.1 Configure Arming Schedule.
Set linkage actions
Set the linkage actions. Refer to Chapter 11.2 Configure Alarm Linkage Actions.
Apply
Click Apply.
POS Configuration
Connect the DVR to a POS machine or server to overlay transaction text on live view and playback, and configure POS event alarms.
Smart Analysis
Use VCA-based smart analysis features including face search, human body search, vehicle search, people counting, and heat map on the Turbo HD DVR GUI 4.0.