 LTS Connect -ohjekeskus
Camera Settings
Configure image, encode, snapshot, overlay, covered area, channel type, and coaxial camera upgrade settings for each connected camera on the Sapphire Series CVI DVR.
Configuring Camera Settings
Configuring Image Settings
You can configure the image settings such as saturation, contrast, brightness, sharpness for each connected camera.
Open the IMAGE interface
Select Main Menu > CAMERA > IMAGE.
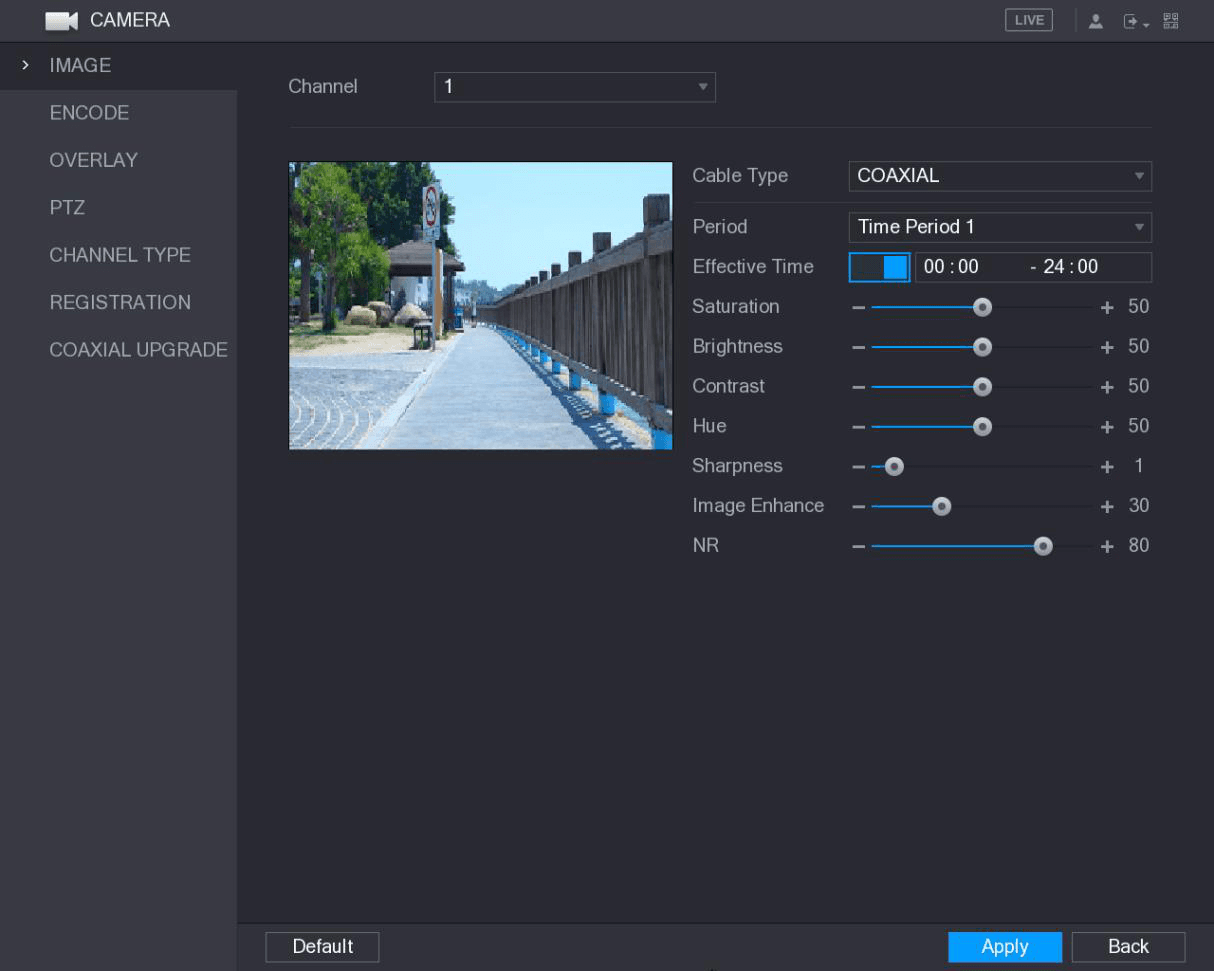
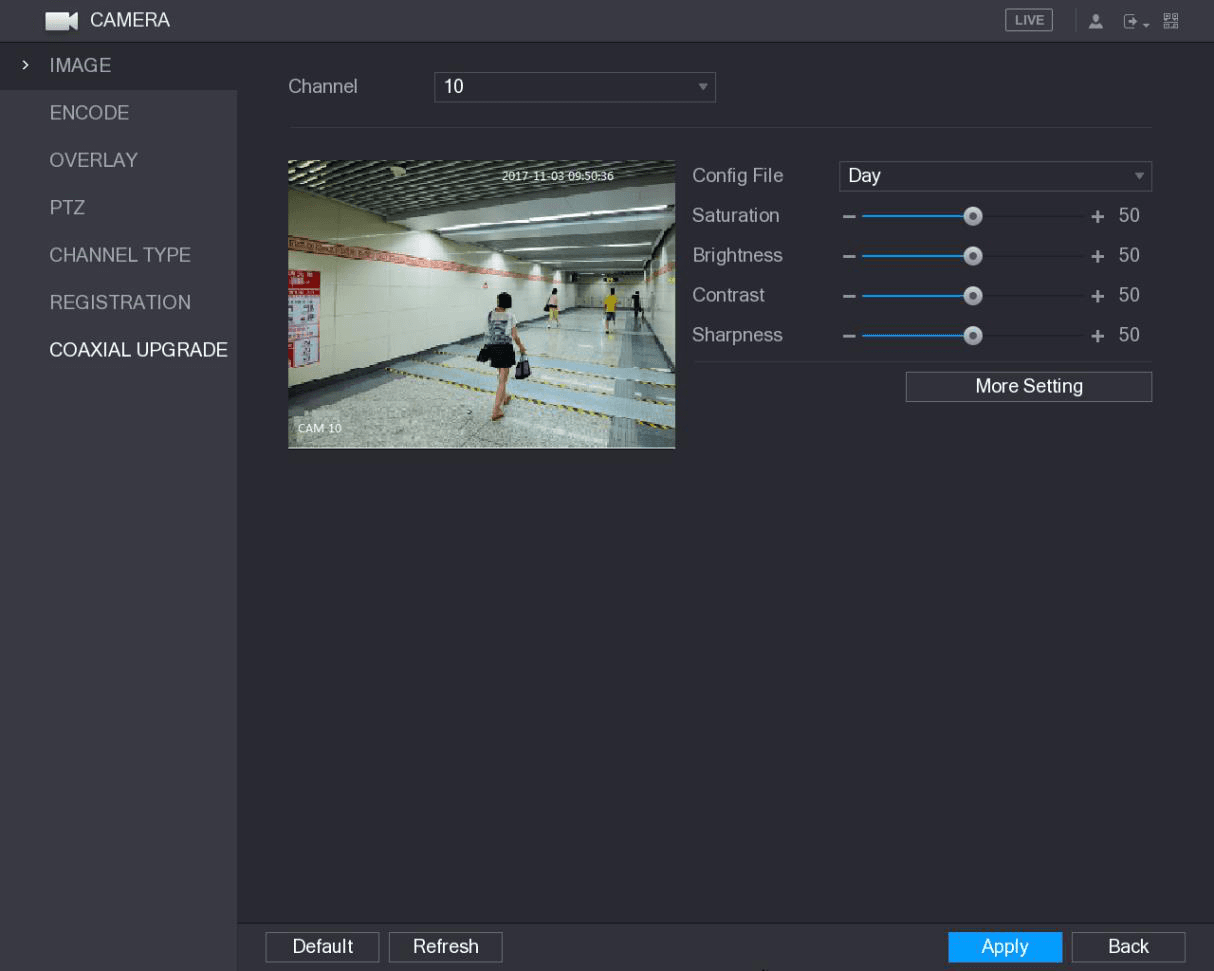
The IMAGE interface is displayed. See the following figures for the analog channel and the digital channel.
Configure the image parameters
Configure the settings for the image parameters. See the following table.
On the digital channel interface, click More Setting to display more parameters.
| Parameter | Description |
|---|---|
| Channel | In the Channel list, select the channel that you want to configure. |
| Cable Type | In the Cable Type list, select the cable type that the camera uses. Not all models support this function. |
| Period | In the Period list, select a time period for the image settings. The image settings will be only used during the selected period. |
| Effective Time | Enable the effective function. In the Effective Time box, enter the start time and end time for the period you selected. |
| Saturation | Adjusts the color shades. The bigger the value, the lighter the color will become. This value does not influence the general image lightness. The value ranges from 0 to 100. The default value is 50. The recommended range is between 40 and 60. |
| Contrast | Adjusts the image contrast. The bigger the value is, the more obvious the contrast between the light area and dark area will become. You can adjust this value when the contrast is not obvious. However, if the value is too big, the dark area is likely to become darker and the light area over exposed. If the value is too small, the image is likely to become dim. The value ranges from 0 to 100. The default value is 50. The recommended range is between 40 and 60. |
| Brightness | Adjusts the image brightness. The bigger the value is, the brighter the image will become. You can adjust this value when the image as a whole looks dark or bright. However, the image is likely to become dim if the value is too big. The value ranges from 0 to 100. The default value is 50. The recommended range is between 40 and 60. |
| Hue | Adjusts the hue of image. The value ranges from 0 to 100. The default value is 50. |
| Sharpness | Adjusts the sharpness of image edge. The bigger the value is, the more obvious the image edge, and the noise is also greater. The value ranges from 1 to 15. The default value is 1. |
| Image Enhance | Adjusts the image definition. The bigger the value is, the clearer the image will become, but there will be more noises. |
| NR | Reduces the noises from image. The bigger the value is, the better the image will become. |
| Config File | In the Config File list, select Day, Night, Normal, or Switch By Period. The system configures the parameters correspondingly.
|
| Mirror | Enable the function, the left and right side of the video image will be switched. It is disabled by default. |
| 3D Denoise | This function specially applies to the image which frame rate is configured as 2 at least. It reduces the noises by making use of the information between two frames. The bigger the value is, the better the effect. |
| Flip | In the Flip list, you can select 180° to change the video image display. By default, the setting is No Flip. |
| Light | In the Light list, select Close or Enable to use the backlight compensation or not. |
| Scene Mode | Configure the white balance to adjust the general hue of the image. The default setting is Auto.
|
| Day & Night | Configure the color and black&white mode of the image. This setting is not affected by the configuration files. The default setting is Auto.
|
Apply the settings
Click Apply to complete the settings.
Configuring Encode Settings
Encode
Open the Encode interface
Select Main Menu > CAMERA > ENCODE > Encode.
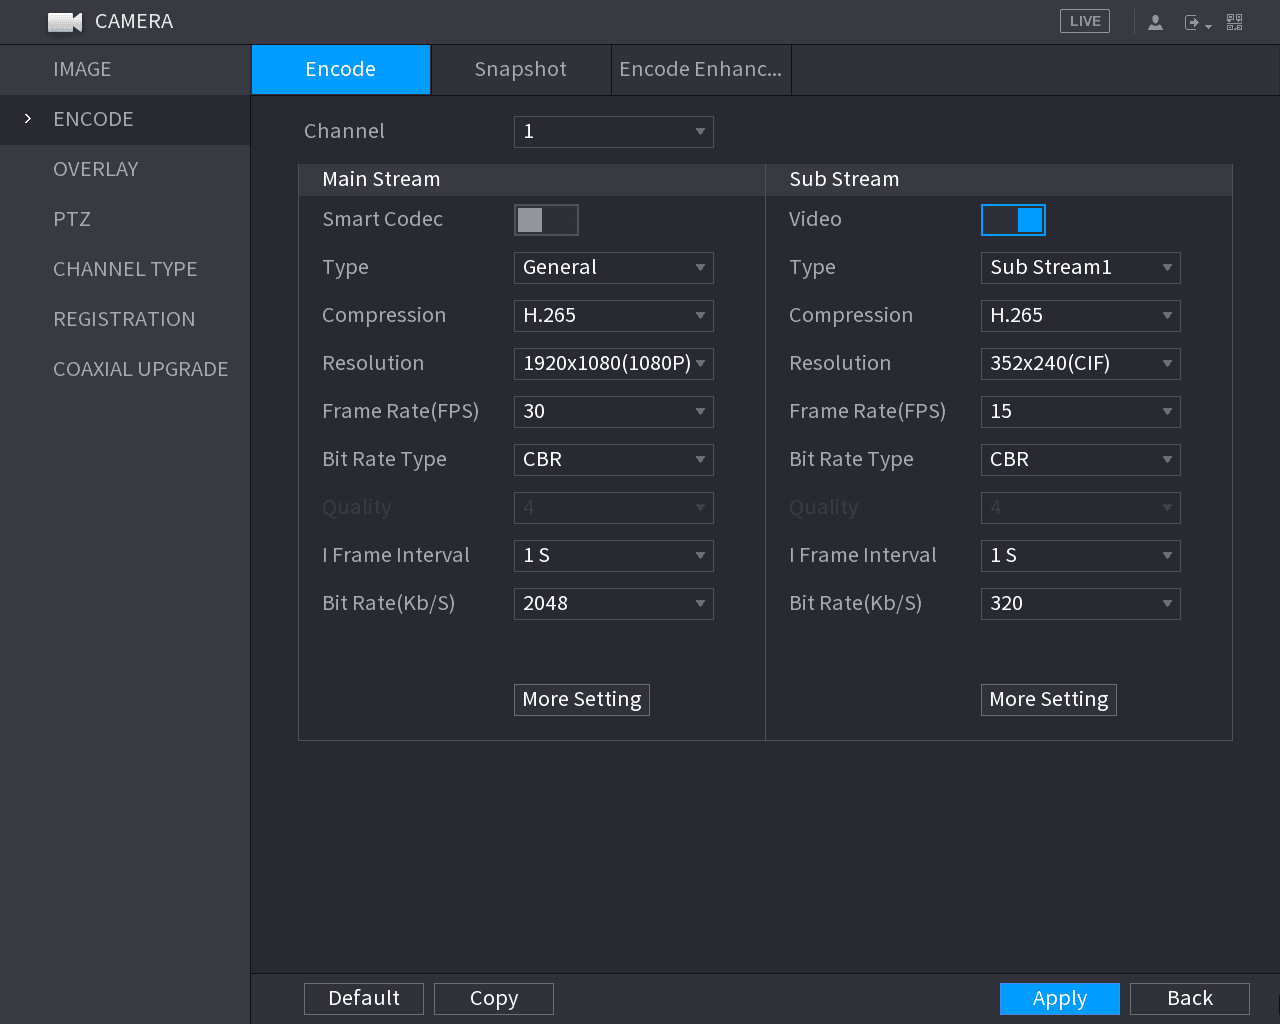
The Encode interface is displayed.
Configure the stream parameters
Configure the settings for the main/sub streams parameters. See the following table.
| Parameter | Description |
|---|---|
| Channel | In the Channel list, select the channel that you want to configure the settings for. |
| Smart Codec | Enable the smart codec function. This function can reduce the video bit stream for non-important recorded video to maximize the storage space. |
| Type |
|
| Compression | In the Compression list, select the encode mode.
|
| Resolution | In the Resolution list, select resolution for the video. The maximum video resolution might be different dependent on your device model. |
| Frame Rate (FPS) | Configure the frames per second for the video. The higher the value, the clearer and smoother the image will become. Frame rate changes along with the resolution. Generally, in PAL format, you can select the value from 1 through 25; in NTSC format, you can select the value from 1 through 30. However, the specific range of frame rate that you can select depends on the capability of the Device. |
| Quality | This function is available if you select VBR in the Bit Rate List. The higher the value, the better the image will become. |
| I Frame Interval | The interval between two reference frames. |
| Bit Rate (Kb/S) | In the Bit Rate list, select a value or enter a customized value to change the image quality. The bigger the value is, the better the image will become. |
| Video | Enable the function for sub stream. |
| Audio Encode | Click More Setting, the More Setting interface is displayed. Audio Encode: This function is enabled by default for main stream. You need to manually enable it for sub stream 1. Once this function is enabled, the recorded video file is composite audio and video stream. |
| Audio Source | Audio Source: In the Audio Source list, you can select LOCAL and HDCVI.
|
| Audio Format | Audio Format: In the Audio Format list, select a format that you need. |
Apply the settings
Click Apply to complete the settings.
Click Copy to copy the settings to other channels.
Snapshot
Open the Snapshot interface
Select Main Menu > CAMERA > ENCODE > Snapshot.
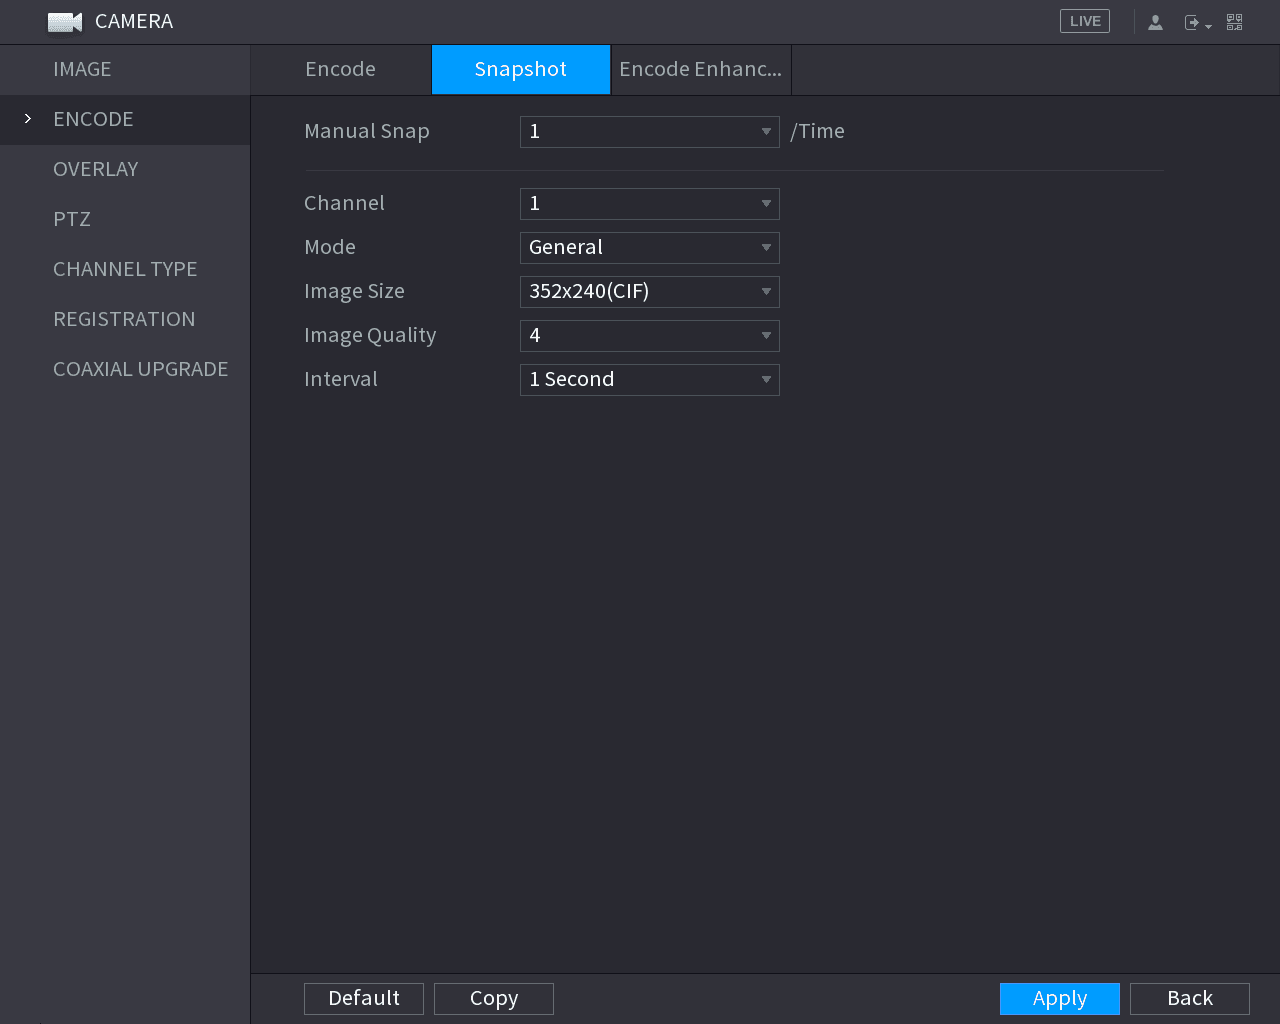
The Snapshot interface is displayed.
Configure the snapshot parameters
Configure the settings for the snapshot parameters. See the following table.
| Parameter | Description |
|---|---|
| Manual Snap | In the Manual Snap list, select how many snapshots you want to take each time. |
| Channel | In the Channel list, select the channel that you want to configure the settings for. |
| Mode | In the Mode list, you can select General, Event, or Human Face as the event type for which you want to take a snapshot.
|
| Image Size | In the Image Size list, select a value for the image. The bigger the value is, the better the image will become. |
| Image Quality | Configures the image quality by 6 levels. The higher the level, the better the image will become. |
| Interval | Configures or customizes the snapshot frequency. You can select 1 second per one snapshot to 7 seconds per one snapshot. The maximum is 3600 seconds per one snapshot. |
Apply the settings
Click Apply to complete the settings.
Click Copy to copy the settings to other channels.
Encode Enhancement
- Only some series products support encode enhancement.
- Enabling or disabling this function will take effect after the device is rebooted.
This function is disabled by default. After it is enabled, when main stream resolution is 4K, the frame rate can be 10 fps.
Open the Encode Enhancement interface
Select Main Menu > CAMERA > ENCODE > Encode Enhancement.
The Encode Enhancement interface is displayed.
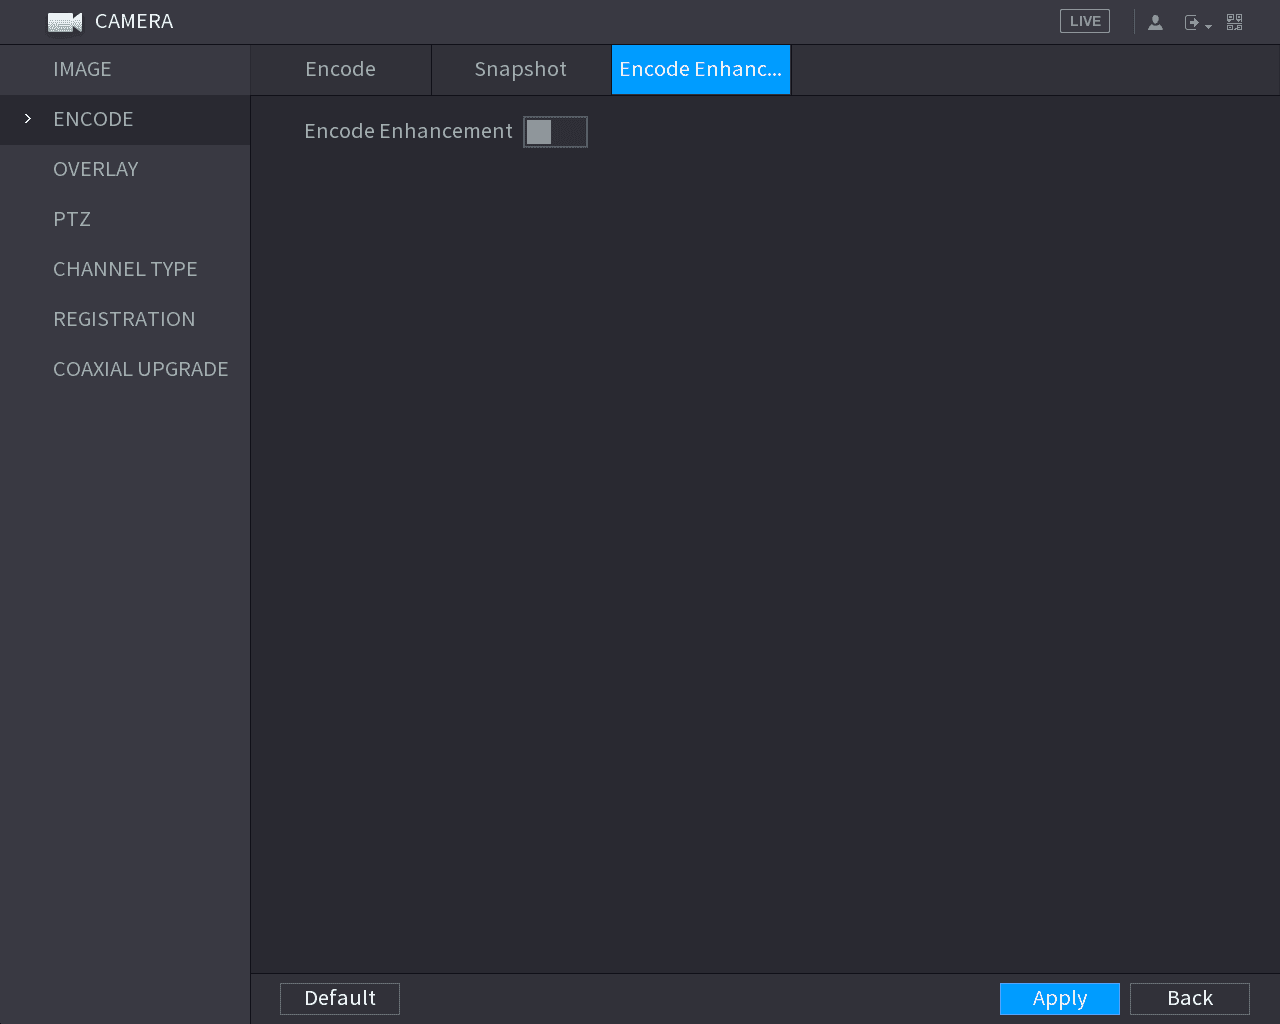
Enable the function
Click the toggle switch behind Encode Enhancement to enable this function.
Configuring Overlay Settings
You can configure to display system time and channel name on each channel window in the live view screen.
Open the Overlay interface
Select Main Menu > CAMERA > OVERLAY > Overlay.
The Overlay interface is displayed.
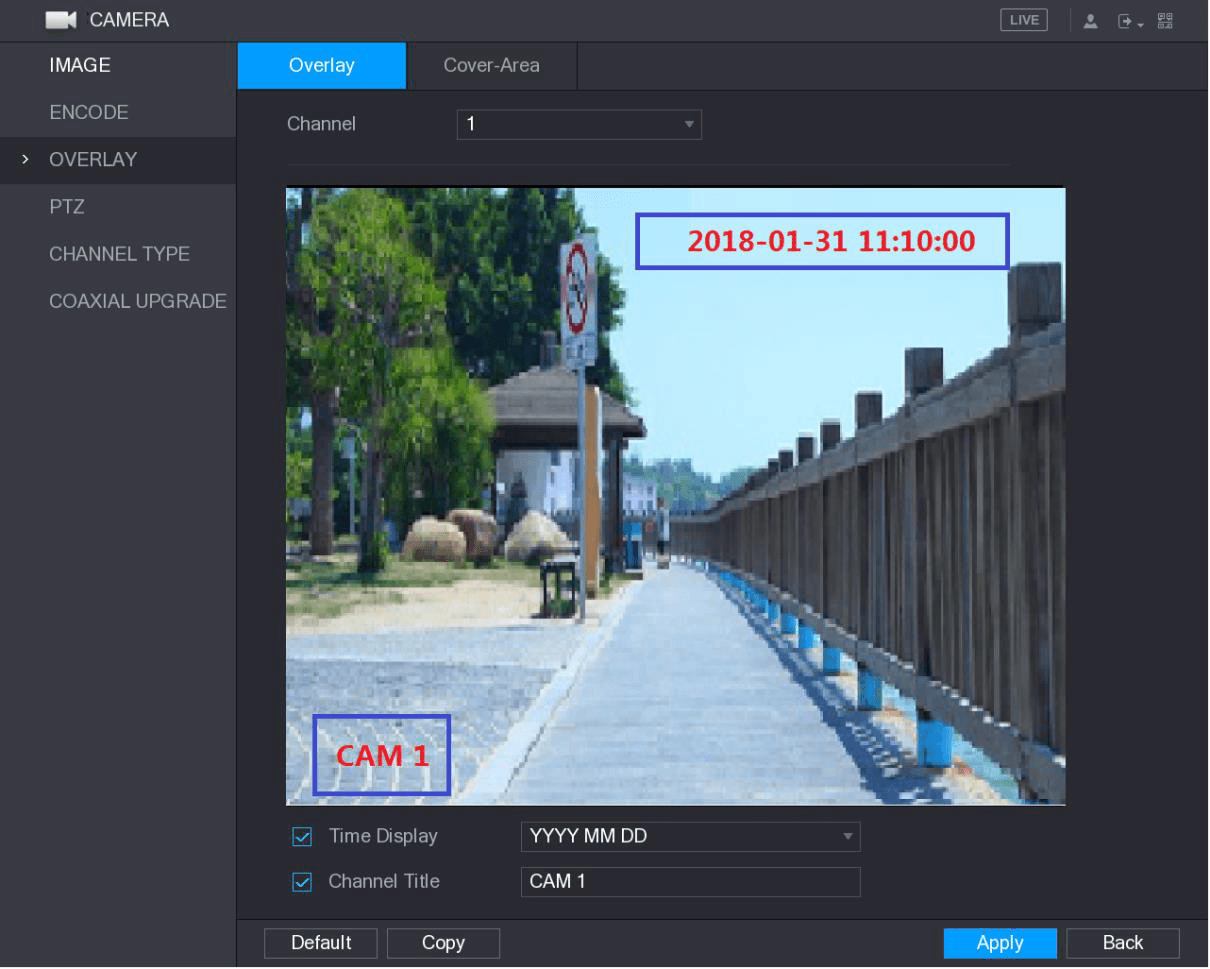
Configure the overlay parameters
Configure the settings for the text overlay parameters. See the following table.
| Parameter | Description |
|---|---|
| Channel | In the Channel list, select the channel that you want to configure the settings for. |
| Time Display | Select the Time Display check box to display the system time on each channel window in the live view screen. In the Time Display list, select time display style. |
| Channel Title | Select the Channel Title check box to display the channel name on each channel window in the live view screen. In the Channel Title box, enter the name for the selected channel. |
Apply the settings
Click Apply to complete the settings.
Click Copy to copy the settings to other channels.
Configuring Covered Area Settings
Open the Cover-Area interface
Select Main Menu > CAMERA > OVERLAY > Cover-Area.
The Cover-Area interface is displayed.
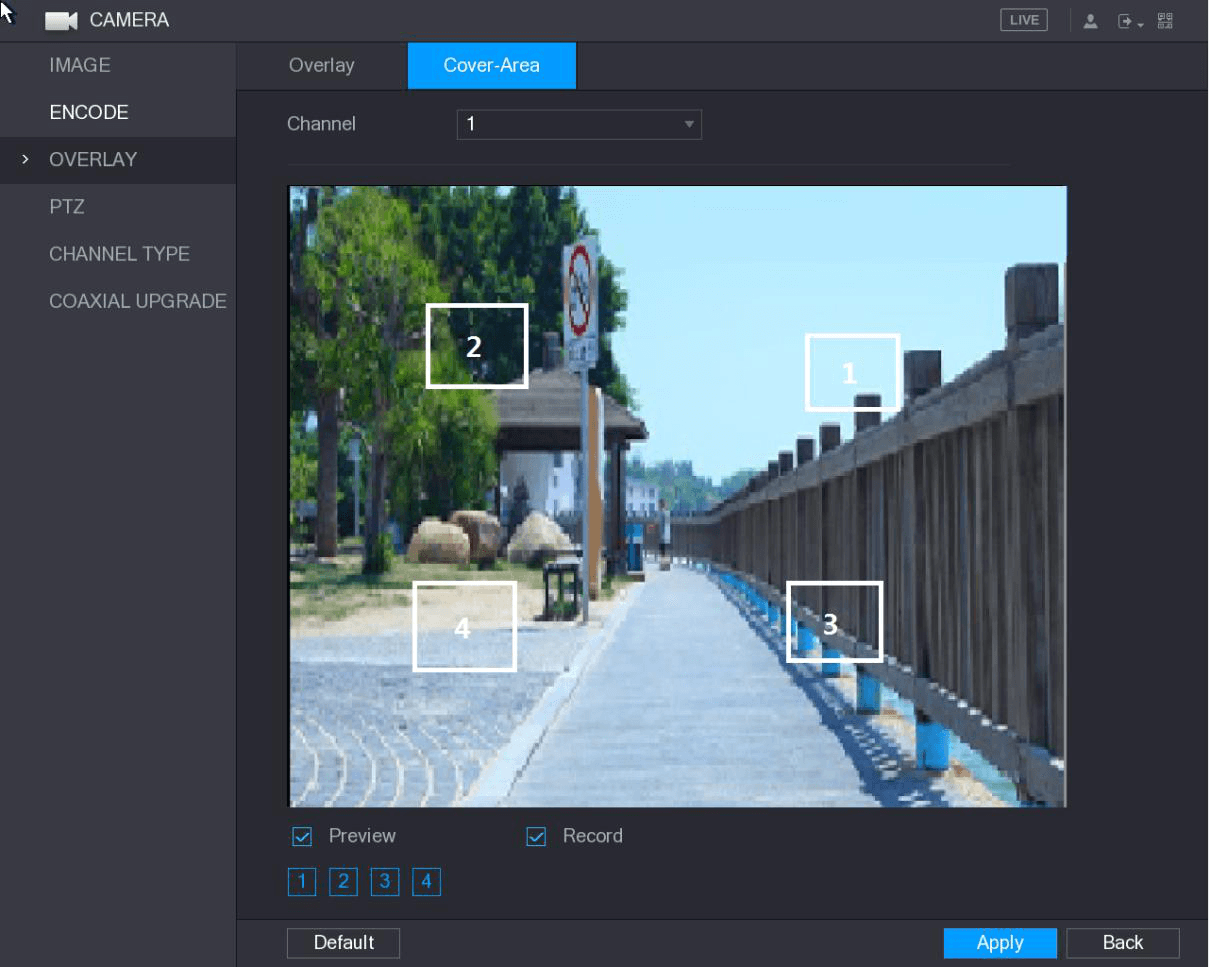
Configure the covered area parameters
Configure the settings for the covered area parameters. See the following table.
| Parameter | Description |
|---|---|
| Channel | In the Channel list, select the channel that you want to configure the settings for. |
| Preview |
|
| Record | To configure covering block, do the following:
|
Apply the settings
Click Apply to complete the settings.
Configuring Channel Type
You can configure the channel type as Analog or IP channel.
Open the CHANNEL TYPE interface
Select Main Menu > CAMERA > CHANNEL TYPE.
The CHANNEL TYPE interface is displayed.
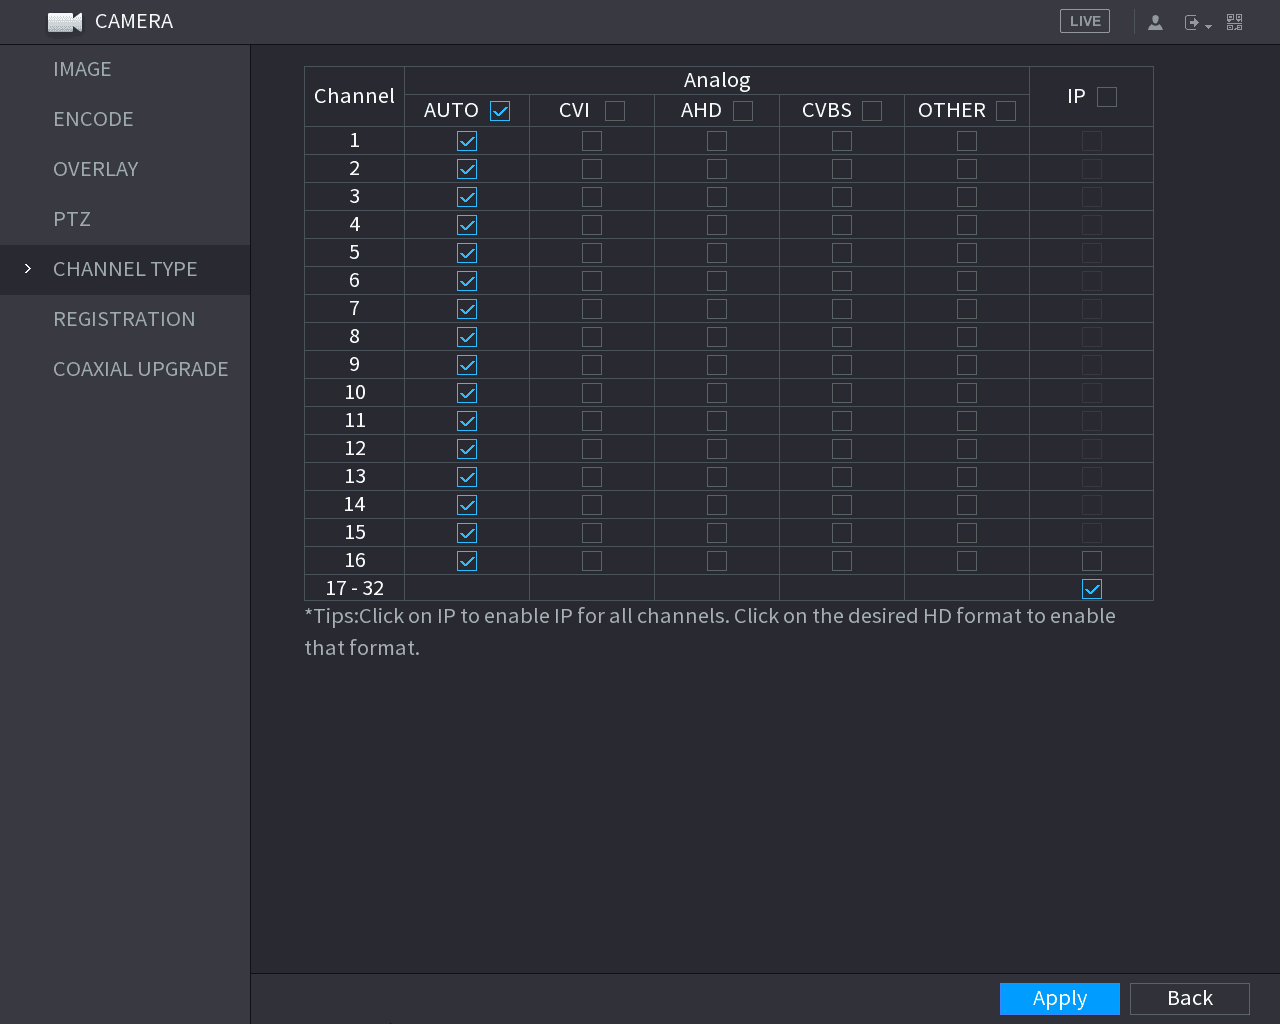
Configure the channels
Configure the channels.
- Analog Channel: Select the transmission medium such as CVI, CVBS, and then follow the onscreen instructions to complete the settings.
- IP Channel: You can enable the IP channels by disabling the corresponding analog channels. The Device also provides expanded IP channels for your use, such as the 17–32 channels in the figure above.
- The 17–32 channels are only for IP camera and the range changes dependent on the model you purchased.
- The channel selection for analog camera or IP camera are in sequence, for example, if you want to select channels for IP camera, you need to select from the last channel number Channel 16 first, which means, you cannot jump to select the channel 15 directly until you have selected the channel 16.
Apply the settings
Click Apply and follow the onscreen instructions to complete the settings.
Upgrading Coaxial Camera
Open the COAXIAL UPGRADE interface
Select Main Menu > CAMERA > COAXIAL UPGRADE.
The COAXIAL UPGRADE interface is displayed.
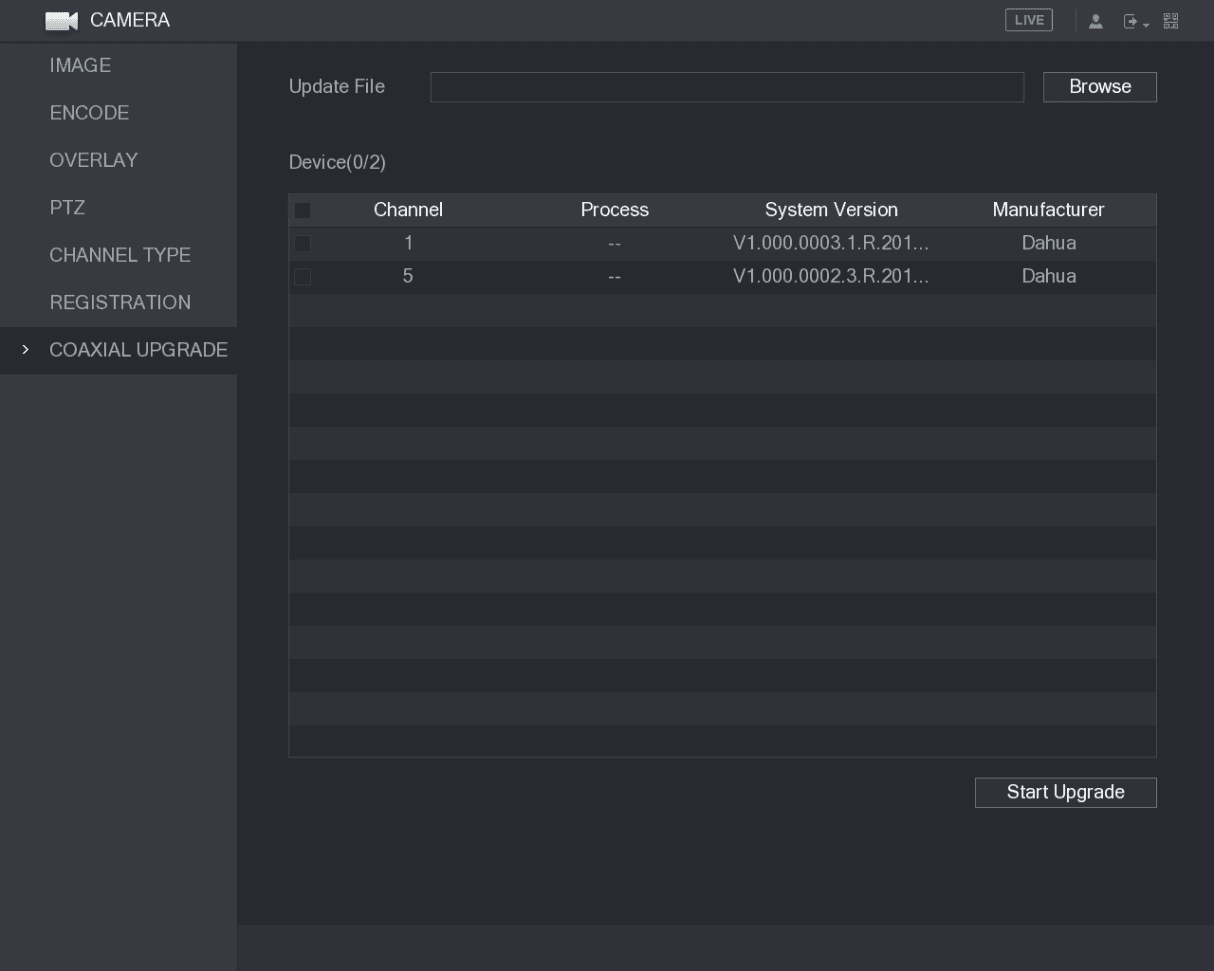
Confirm the upgrade file
Select the upgrade file and then click OK.
The COAXIAL UPGRADE interface is displayed.
You need to insert the USB storage device that contains the upgrading files.
Select the channel to upgrade
Select the check box of the channel that you want to upgrade.
Start the upgrade
Click Start Upgrade.
If the upgrading is successful, the system pops up a message indicating the upgrading is completed.
Controlling PTZ Cameras
Configure the PTZ connection, operate the basic and expanded PTZ control panels, set up and call presets, tours, patterns, AutoScan, AutoPan, and AUX functions, and call the OSD menu of a coaxial camera on the Sapphire Series CVI DVR.
Remote Devices
How to add, initialize, modify, import, export, and manage remote IP devices on the Sapphire Series CVI DVR through the Registration interface.