 Pusat Bantuan LTS Connect
Playing Back Video
Search for and play back recorded video and snapshots on the CVI DVR, including record control, instant playback, smart search, marking, splices, and the file list.
Enabling Record Control
- Manual recording operation requires the user have the permission to access STORAGE settings.
- Check to ensure the HDD installed in the Device has been formatted properly.
To enter the record control interface, do the following:
Open the record control interface
Right-click on the live view screen, the shortcut menu is displayed. On the shortcut menu, select Manual > Record Control. The RECORD interface is displayed, see Figure 5-101.
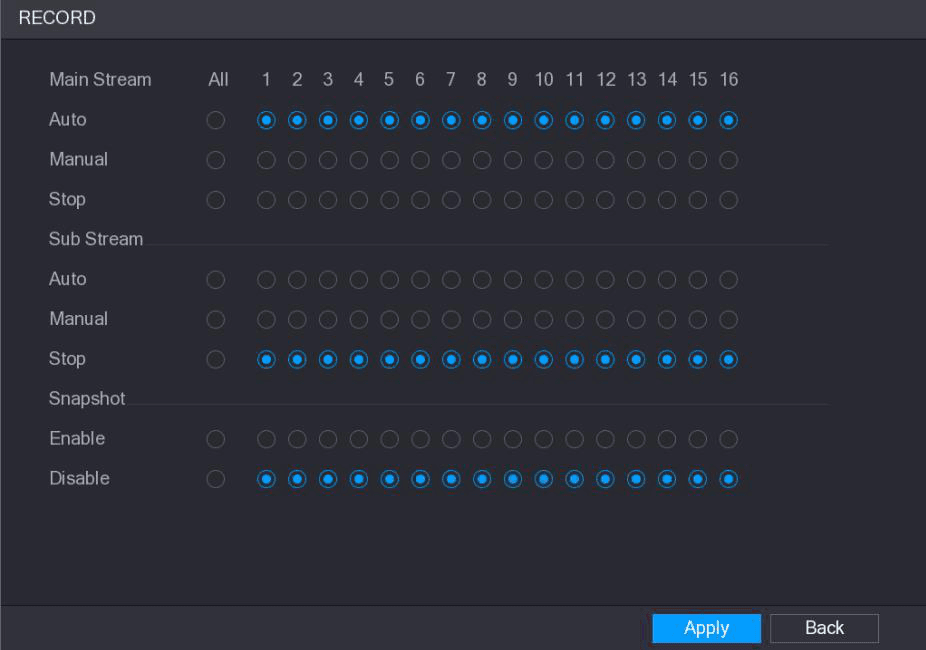
Configure the parameters
Configure the settings for the record control parameters. See Table 5-32.
| Parameter | Description |
|---|---|
| Channel | Displays all the analog channels and the connected digital channels. You can select a single channel or select All. |
| Record status | Auto: Automatically record according to the record type and recording time as configured in the recording schedule. Manual: Keep general recording for 24 hours for the selected channel. Stop: Do not record. |
| Snapshot status | Enable or disable the scheduled snapshot for the corresponding channels. |
Instant Playback
You can use the instant playback function to play back the previous five minutes to sixty minutes of the recorded video in any channel. For details about instant playback function, see 5.2.2.1 Instant Playback.
Main Interface of Video Playback
You can search for and play back the recorded video saved on the Device.
Select Main Menu > VIDEO, the video search interface is displayed. See Figure 5-102.
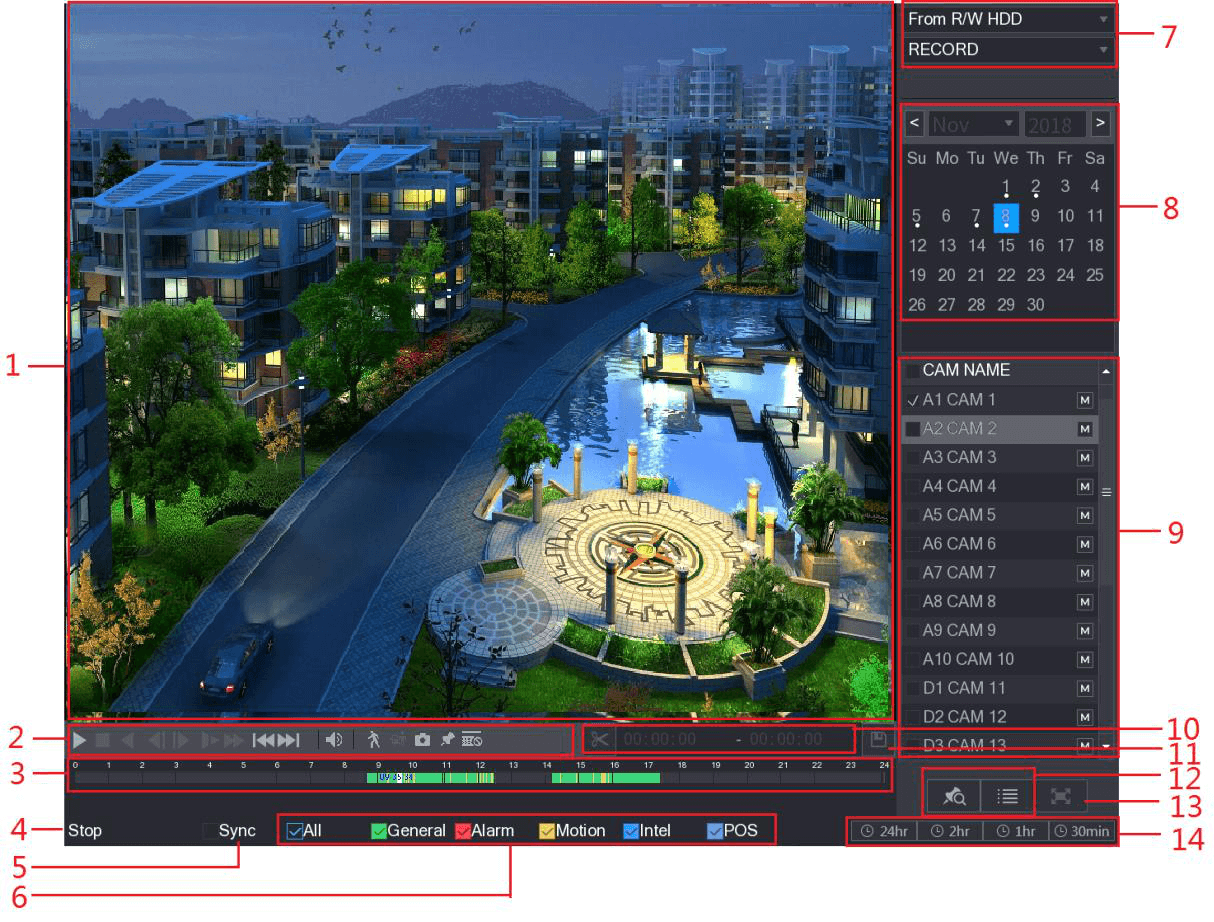
The following table describes the elements of the video playback interface. See Table 5-33.
| No. | Function | Description |
|---|---|---|
| 1 | Display Window | Display the searched recorded video or picture. It supports playing in single-channel, 4-channel, 9-channel, and 16-channel simultaneously. When playing back in a single channel mode, hold down the left mouse button to select the area that you want to enlarge. The area is enlarged after the left mouse button is released. To exit the enlarged status, right-click on the image. |
| 2 | Playback Controls Bar | Playback control buttons. For details about the control buttons, see 5.9.3.1 Introducing Playback Controls. |
| 3 | Time Bar | Display the type and time period of the current recorded video. In the 4-channel layout, there are four time bars are displayed; in the other view layouts, only one time bar is displayed. Click on the colored area to start playback from a certain time. In the situation when you are configuring the settings, rotate the wheel button on the time bar, the time bar is zooming in from 0. In the situation when playback is ongoing, rotate the wheel button on the time bar, the time bar is zooming from the time point where the playback is located. Time bar colors: Green indicates general type; Red indicates external alarm; Yellow indicates motion detection; Blue indicates intelligent events; Purple indicates POS events. For some models, when you are clicking on the blank area in the time bar, the system automatically jumps to the next time point where there is a recorded video located. |
| 4 | Play Status | Includes two playback status: Play and Stop. |
| 5 | Sync | Select the Sync check box to simultaneously play recorded videos of different channels in the same period in multi-channel view. |
| 6 | Record type | Select the check box to define the recording type to search for. |
| 7 | Search type | Select the content to play back: Record, PIC, Splice Playback. For details about the selecting search type, see 5.9.3.2 Selecting Search Type. |
| 8 | Calendar | Click the date that you want to search, the time bar displays the corresponding record. The dates with record or snapshot have a small solid circle under the date. |
| 9 | View Layout and Channel Selection | In the CAM NAME list, select the channel(s) that you want to play back. The window split is decided by how you select the channel(s). For example, if you select one channel, the playback is displayed in the single-channel view; if you select two to four channels, the playback is displayed in the four-channel view. The maximum is eight channels. Click the stream button to switch the streams; one icon indicates main stream, and the other indicates sub stream. |
| 10 | Video Splice | Splice a section of recorded video and save it. For details about splicing a recorded video, see 5.9.3.3 Clipping Recorded Video. |
| 11 | Backup | Back up the recorded video files. For details, see 5.9.3.4 Backing up Recorded Video. |
| 12 | List Display | This area includes Mark List and File List. Click the Mark List button, the marked recorded video list is displayed. Double-click the file to start playing. Click the File List button, the searched recorded video list is displayed. You can lock the files. For details, see 5.9.8 Using the File List. |
| 13 | Full Screen | Click to display in full screen. In the full screen mode, point to the bottom of the screen, the time bar is displayed. Right-click on the screen to exit full screen mode. |
| 14 | Time Bar Unit | You can select 24hr, 2hr, 1hr, or 30min as the unit of time bar. The time bar display changes with the setting. |
Introducing Playback Controls Bar
You can perform the operations such as control the speed of playback, add mark, and take snapshots through the playback controls bar. See Figure 5-103 and Table 5-34.
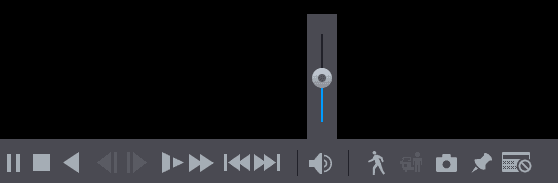
The play backward function and playback speed are dependent on the product version. The actual product shall govern. You can also contact the technical support to consult the hardware version information.
| Function | Description |
|---|---|
| Play/Pause | During playing back, you can switch between play and pause. |
| Stop | During playing back, you can click the Stop button to stop playback. |
| Play Backward | During playing back, click the Play Backward button to backward play the recorded video, the button switches to the stop-backward button; click it to stop playing backward. During playing back, click to start playing forward. |
| Previous Frame/Next Frame | When the playback is paused, click the previous-frame or next-frame button to play single-frame recorded video. When playing back single-frame recorded video, click to start playing forward. |
| Slow Playback | During playing back, click to set the speed of slow playback as SlowX1/2, SlowX1/4, SlowX1/8, or SlowX1/16. During fast playback, click to slow down the speed of fast playback. |
| Fast Playback | During playing back, click to set the speed of fast playback as FastX2, FastX4, FastX8, or FastX16. During slow playback, click to speed up slow playback. |
| Previous Day/Next Day | Click the previous-day or next-day button to play the previous day or next day of the current recorded video. |
| Volume | Adjust volume of playback. |
| Smart Search | For details about using the smart search, see 5.9.4 Smart Search. |
| Smart detection | Click to select person or vehicle. The system plays the detected person or vehicle videos. Person and vehicle can be selected simultaneously. |
| Snapshot | In the full screen mode, click to take a snapshot and save into the USB storage device or mobile HDD. |
| Add Mark | Add Mark for the recorded view. For details about adding mark, see 5.9.5 Marking and Playing Back Video. |
| POS Hide | During single-channel playback, click to display or hide POS information on the screen. |
Selecting Search Type
You can search the recorded videos, splice, or snapshots from HDD or external storage device.
- From R/W HDD: Recorded videos or snapshots playback from HDD of the Device. See Figure 5-104.
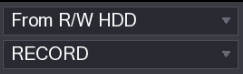
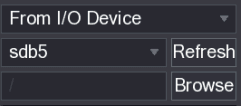
- From I/O Device: Recorded videos playback from external storage device. See Figure 5-105. Click Browse, select the save path of recorded video file that you want to play. Double-click the video file or click the play button to start playing.
Clipping Recorded Video
During playback, clip sections of recorded video and save to the USB storage device. For the video clip interface, see Figure 5-106.

Select and start a recorded video
Select a recorded video that you want to play.
- Click the play button to start playing from the beginning.
- Double-click anywhere in the time bar colored area to start playback.
Mark the start time
Click on the time bar to select the start time, and then click the clip button to start clipping.
Mark the end time
Click on the time bar to select the end time, and then click the clip button to stop clipping.
Save the clip
Click the save button. The BACKUP dialog box is displayed. You can back up the files.
- You can clip the video of a single-channel or multiple channels.
- Maximum 1024 files can be backed up at one time.
- The files that are selected in the File List cannot be clipped.
Backing up Recorded Video
You can back up the recorded video file or splice video file into the USB storage device.
Select the file to back up
Select the recorded video file that you want to back up. You can select the following two types of files:
- Recorded video file: Click the File List button, the File List area is displayed. Select the file(s) that you want to back up.
- Splice video file. For details about splicing video file, see 5.9.3.3 Clipping Recorded Video.
Open the BACKUP dialog box
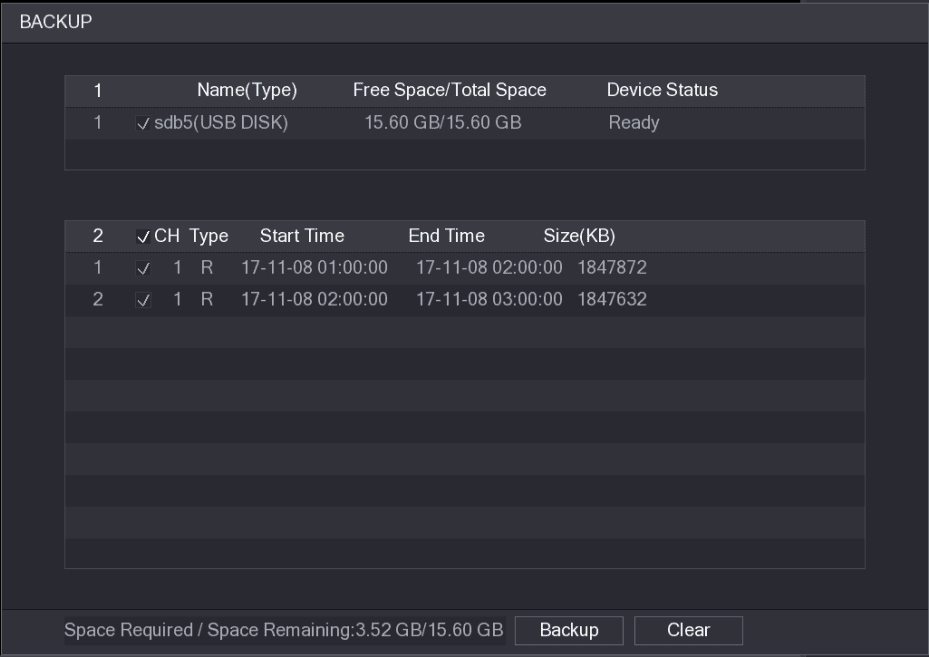
Click the save button. The BACKUP dialog box is displayed. See Figure 5-107.
Back up the file
Click Backup.
If you do not want to back the file, clear the check box.
Smart Search
During playback, you can analyze a certain area to find if there was any motion detection event occurred. The system will display the images with motion events of the recorded video.
Not all models support this function.
To use the Smart Search function, you need to enable the motion detection for the channel by selecting Main Menu > ALARM > VIDEO DETECT > Motion Detect.
To use the Smart Search function, do the following:
Open the video search interface
Select Main Menu > VIDEO, the video search interface is displayed.
Select the channel
In the CAM NAME list, select the channel(s) that you want to play.
Start playback
Click the play button or double-click anywhere in the time bar colored area to start playback.
Display the grid
Click the Smart Search button. The grid is displayed on the screen.
- Only single-channel supports smart search.
- If multi-channels are selected, double-click on the channel window to display this channel only on the screen, and then you can start using smart search function.
Select the searching area
Drag the pointer to select the searching area.
The grid area supports 22×18 (PAL) and 22×15 (NTSC).
Play back the motional splices
Click the Smart Search button. The screen starts playing back the motional splices of recorded video for the selected searching area.
Exit playback
Click the Smart Search button to exit the playback.
Marking and Playing Back Video
You can mark the recording for somewhere important. Then you can easily find the marked recording by searching time and mark name.
Marking a Video
Open the video search interface
Select Main Menu > VIDEO, the video search interface is displayed.
Open the Add Mark dialog box
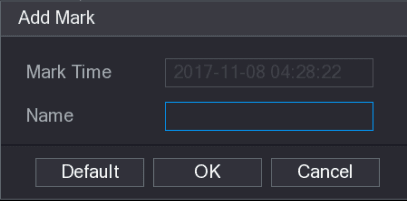
In the playback mode, click the Add Mark button. The Add Mark dialog box is displayed. See Figure 5-108.
Enter a name
In the Name box, enter a name.
Save the mark
Click OK. This marked video file displays in the Mark List.
Playing Back Marked Video
This function is supported on single-channel playback.
Select one channel
In the CAM NAME list, select one channel.
Open the Mark List
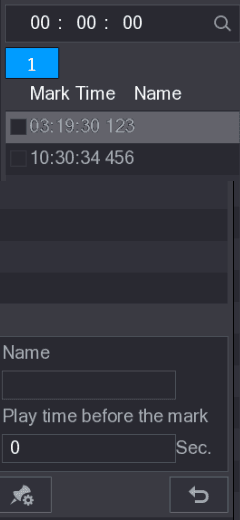
Click the Mark List button. The Mark List interface is displayed. See Figure 5-109.
Play back the marked video
Double-click the file that you want to play back. To search the marked video by time, in the SEARCH box on the top of the interface, enter the time, and then click the search button.
Playing Back Time before the Mark
You can configure to play N seconds of the marked video before the marked time.
Enter the mark name
In the Name box, enter the name of a marked video.
Set the time before the mark
In the Playback time before the mark box, enter N seconds.
Start playback
Click the search button. The playback starts from N seconds before the marked time.
If there is N seconds exist before the marked time, the playback starts from N seconds before the marked time. If there is not, it plays back as much as there is.
Managing Marked Video
In the Mark List interface, click the manager button, the Manager interface is displayed. See Figure 5-110.
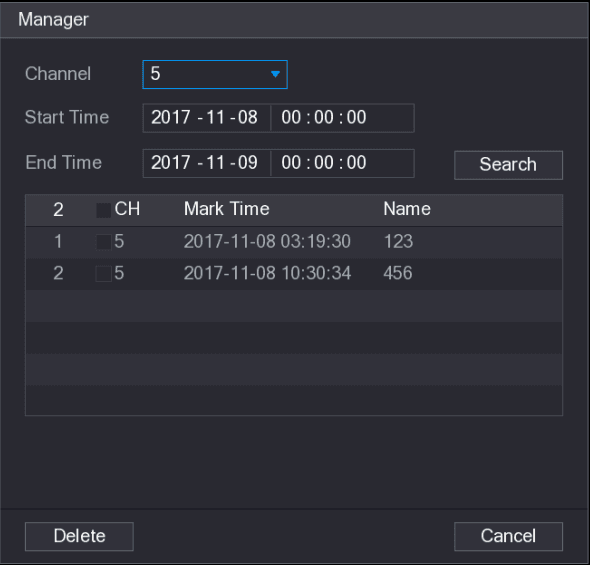
- By default, it manages all the marked videos of the selected channel.
- To search the marked video, select channel number from the Channel list, enter time in Start Time box and End Time box, and then click Search.
- All the marked videos display in time order.
- To modify the name of marked video, double-click a marked video, the Edit Mark dialog box is displayed.
- To delete the marked video, select the marked video, and then click Delete.
After opening the Manager interface, the playback will pause until exiting this interface. If the marked video that was in playing back is deleted, the playback will start from the first marked video in the Mark List.
Playing Back Snapshots
You can search and play back the snapshots.
Open the video search interface
Select Main Menu > VIDEO, the video search interface is displayed.
Select PIC
In the Search Type list, select PIC.
Select a channel
In the Channel list, select a channel number.
Select a date
In the Calendar area, select a date.
Start playing snapshots
Click the play button. The system starts playing snapshots according to the configured intervals.
Playing Back Splices
You can clip the recorded video files into splices and then play back at the same time to save your time.
Not all models support this function.
Select the search type and split mode
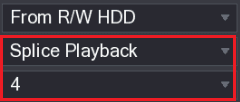
Select Main Menu > VIDEO, the video search interface is displayed. In the Search Type list, select Splice Playback; in the Split Mode list, select 4, 9, or 16. See Figure 5-111.
Select a date
In the Calendar area, select a date.
Start playing back splices
Start playing back splices. See Figure 5-112.
- Click the play button, the playback starts from the beginning.
- Double-click anywhere on the time bar, the playback starts from where you click.

Every recorded video file must be at least five minutes. If a recorded video file is less than 20 minutes but still choose to split into four windows, the system will automatically adjust the windows quantity to ensure every splice is more than five minutes, and in this case it is possible that there are no images are displaying in some windows.
Using the File List
You can view all the recorded videos within a certain period from any channel in the File List.
Open the video search interface
Select Main Menu > VIDEO, the video search interface is displayed.
Select a channel
Select a channel(s).
Open the File List
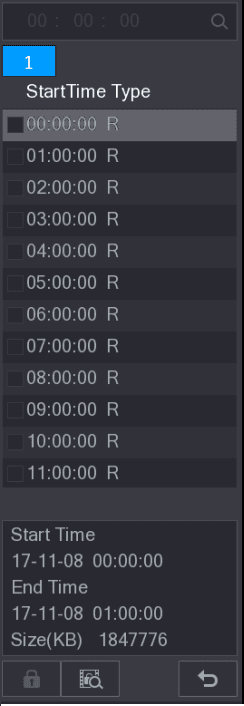
Click the File List button. The File List interface is displayed. See Figure 5-113.
Start playback
Start playback.
- Click the play button, the playback starts from the first file by default.
- Click any file, the system plays back this file.
- In the time box on the top of the file list interface, you can enter the specific time to search the file that you want to view.
- In the File List area, there are 128 files can be displayed.
- File type: R indicates general recorded video; A indicates recorded video with external alarms; M indicates recorded video with motion detection events; I indicates recorded video with intelligent events.
- Click the return button to return to the interface with calendar and CAM NAME list.
Locking and Unlocking the Recorded Video
- To lock the recorded video, on the File List interface, select the check box of the recorded video, and then click the lock button. The locked video will not be covered.
- To view the locked information, click the lock button, the FILE LOCKED interface is displayed.
The recorded video that is under writing or overwriting cannot be locked.
- To unlock the recorded video, in the FILE LOCKED interface, select the video, and then click Unlock.
Record and Snapshot Settings
Configure manual and automatic recording, record control parameters, and scheduled, event triggered, and face detection triggered snapshots, including backing up snapshots to FTP.
Alarm Events Settings
Configure alarm information, alarm input and output, video detection, and system event alarms on the Sapphire Series CVI DVR.