 LTS Connect pagalbos centras
Account Settings
Add, modify, and delete user accounts, group accounts, and ONVIF users, and set security questions for the admin account on the Sapphire Series CVI DVR.
You can add, modify and delete user accounts, groups, and ONVIF users, and set security questions for admin account.
- The user name supports 31 characters and group name supports 15 characters. The user name can be consisted of letter, number, "_", "@", ".".
- You can set maximum 64 users and 20 groups. The group name by "User" and "Admin" cannot be deleted. You can set other groups and define the relevant permissions. However, the admin account cannot be set randomly.
- You can manage the account by user and group and the name cannot be repeated. Every user must belong to a group, and one user only belongs to one group.
Configuring User Account
Adding a User Account
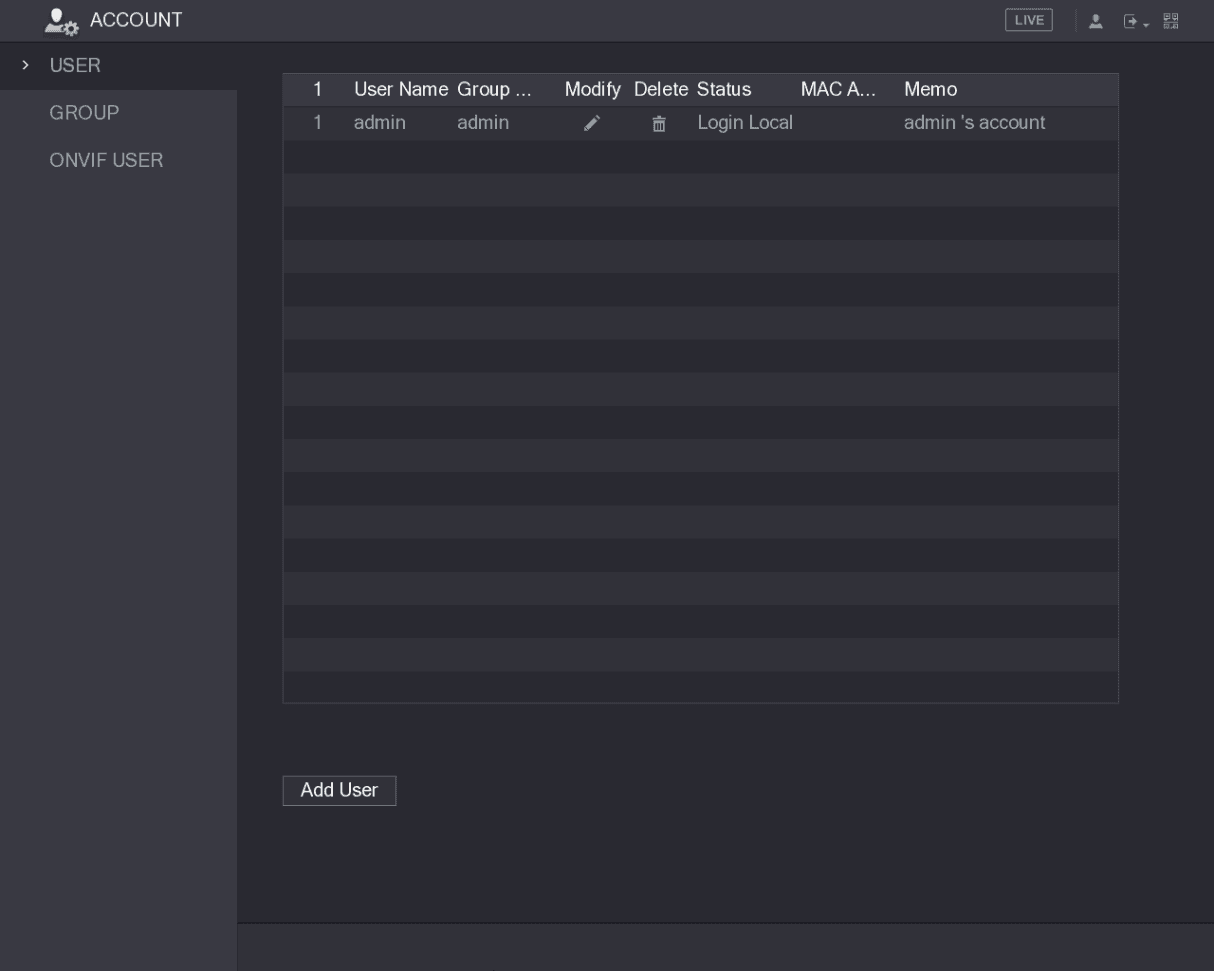
Open the USER interface
Select Main Menu > ACCOUNT > USER.
The USER interface is displayed. See Figure 5-217.
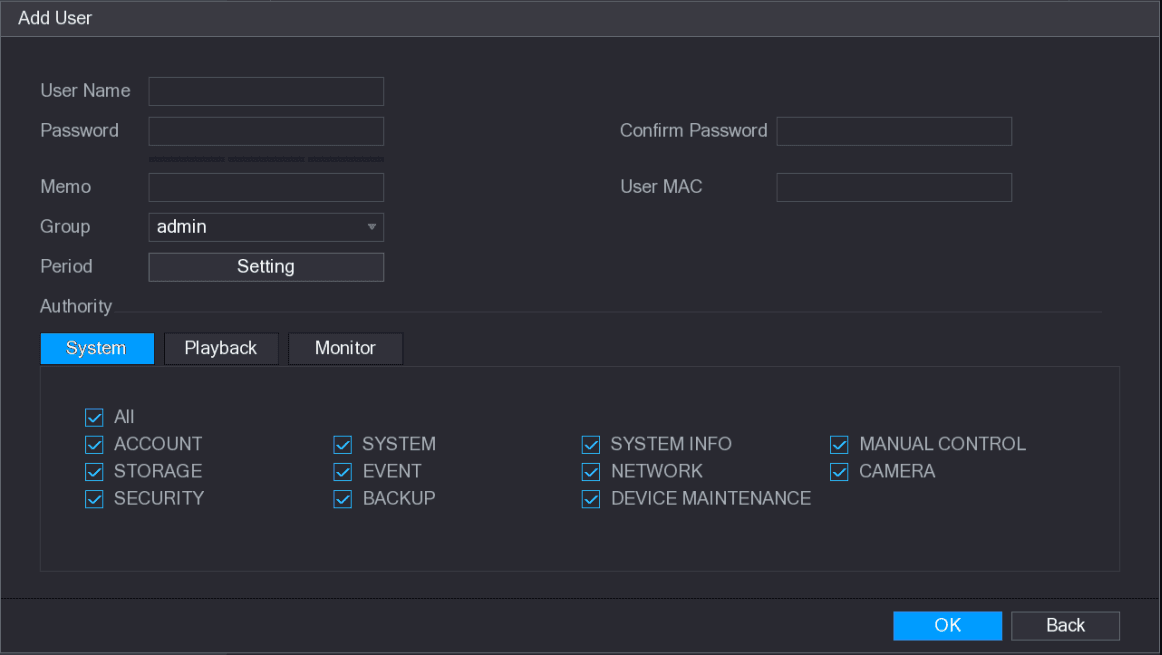
Configure the parameters
Configure the settings for the parameters of adding a user account. See Table 5-70.
| Parameter | Description |
|---|---|
| User Name | Enter a user name and password for the account. |
| Password | Enter a user name and password for the account. |
| Confirm Password | Re-enter the password. |
| Memo | Optional. Enter a description of the account. |
| User MAC | Enter user MAC address. |
| Group | Select a group for the account. The user rights must be within the group permission. |
| Period | Click Set to display Set interface. Define a period during which the new account can login the device. The new account cannot login the device during the time beyond the set period. |
| Authority | In the Authority area, select the check boxes in the System tab, Playback tab, and Monitor tab. To manage the user account easily, when defining the user account authority, it is recommended not to give the authority to the common user account higher that the advanced user account. |
Complete the settings
Click OK to complete the settings.
Setting Permitted Period
Open the Set interface
Next to Period, click Setting.
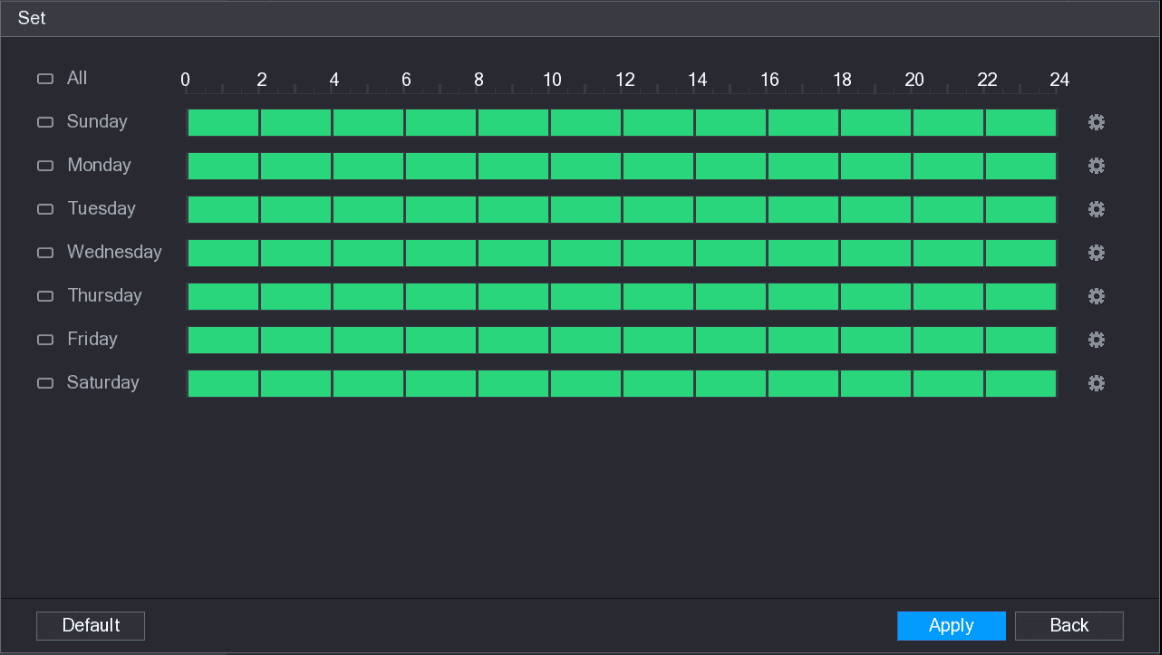
The Set interface is displayed. See Figure 5-219.
Define the permitted period
Define the permitted period. By default, it is active all the time.
- Define the period by drawing.
- Define for a specified day of a week: On the timeline, click the half-hour blocks to select the active period.
- Define for several days of a week: Click the check box icon before each day, the icon switches to the linked icon. On the timeline of any selected day, click the half-hour blocks to select the active periods, all the days with the linked icon will take the same settings.
- Define for all days of a week: Click All, all the icons switch to the linked icon. On the timeline of any day, click the half-hour blocks to select the active periods, all the days will take the same settings.
- Define the period by editing. Take Sunday as an example.
-
Click the gear icon.
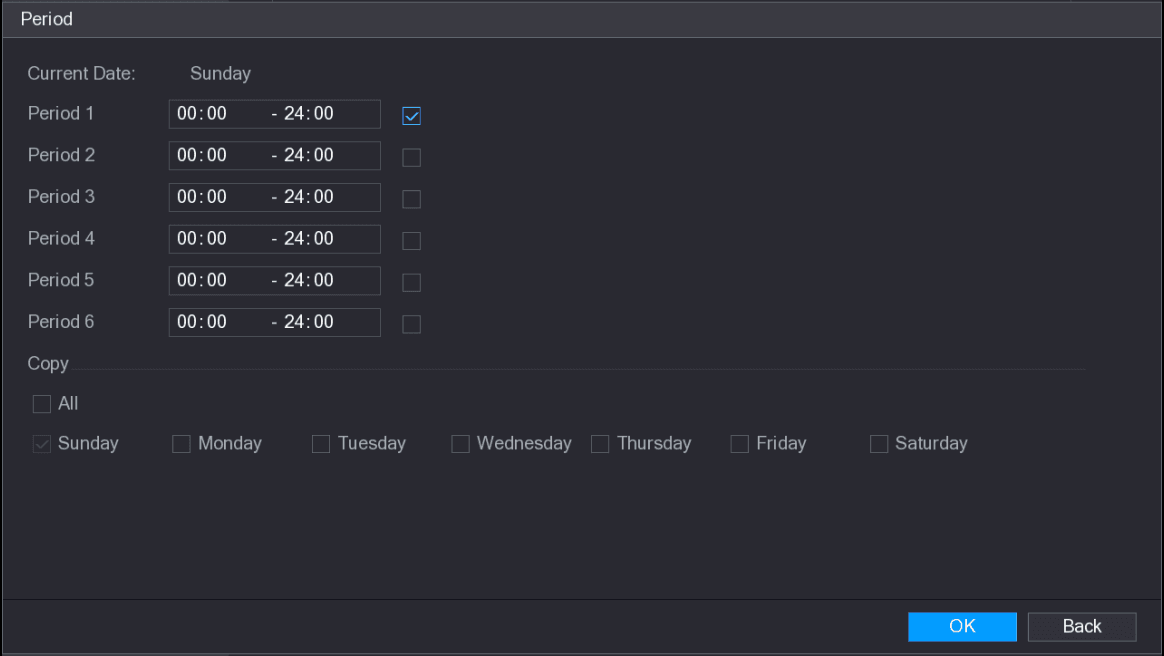
The Period interface is displayed. See Figure 5-220.
-
Enter the time frame for the period and select the check box to enable the settings.
There are six periods for you to set for each day.
Under Copy, select All to apply the settings to all the days of a week, or select specific day(s) that you want to apply the settings to.
-
Click OK to save the settings.
-
Save the period
Click OK.
Modify a User Account
Open the USER interface
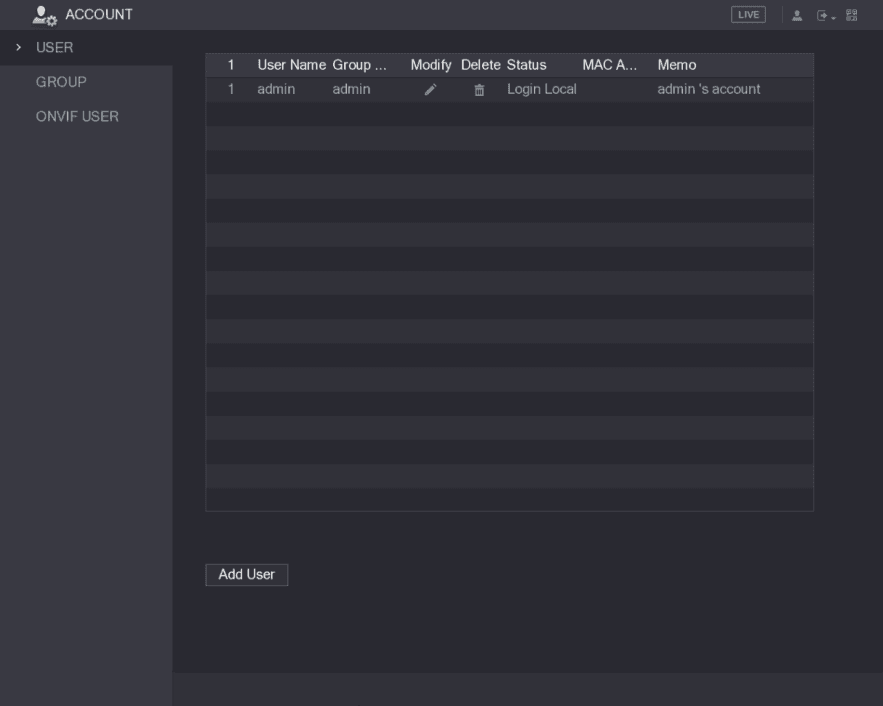
Select Main Menu > ACCOUNT > USER.
The USER interface is displayed. See Figure 5-221.
Open the Modify User interface
Click the modify icon for the user account that you want to modify.
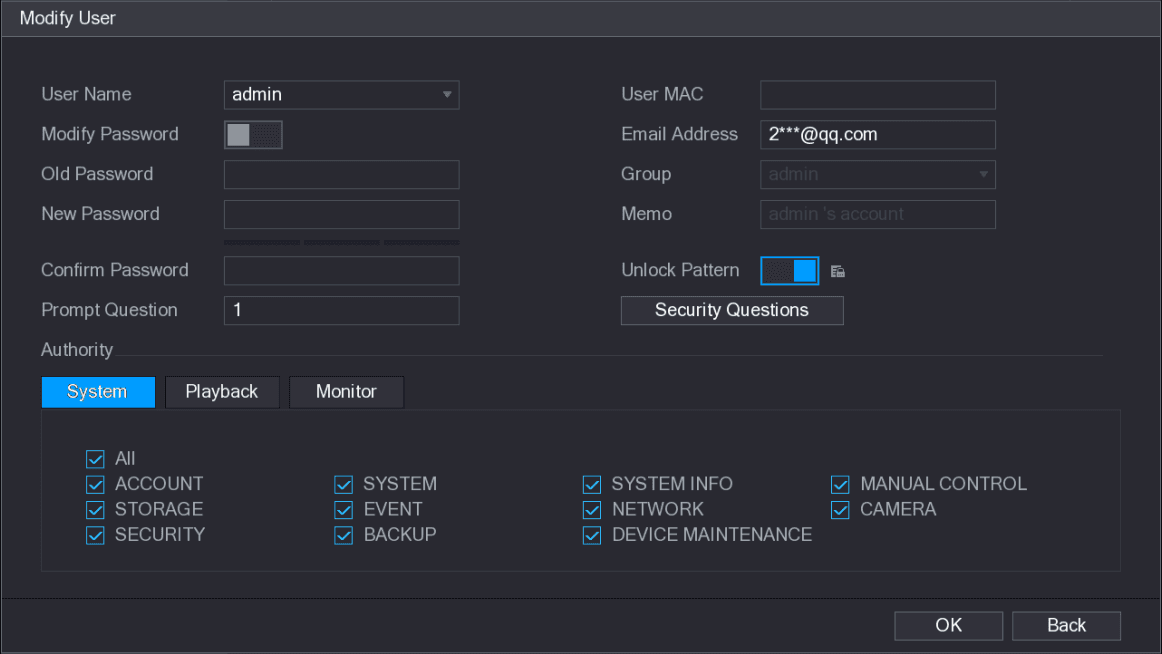
The Modify User interface is displayed. See Figure 5-222.
Change the settings
Change the settings for password, user name, user group, user MAC, memo, period, and authority.
The new password can be set from 8 digits through 32 digits and contains at least two types from number, letter and special characters (excluding "'", """, ";", ":" and "&").
For the admin account, you can enter or modify email address, enable/disable the unlock pattern, modify the security questions.
- In the Email Address box, enter the email address, and the click Save to save the setting.
- To use the unlock pattern, enable Unlock Pattern, click the unlock pattern icon, draw a pattern in the Unlock Pattern interface, and then click Save to save the setting.
- Configuring security questions.
-
Click Security Questions.
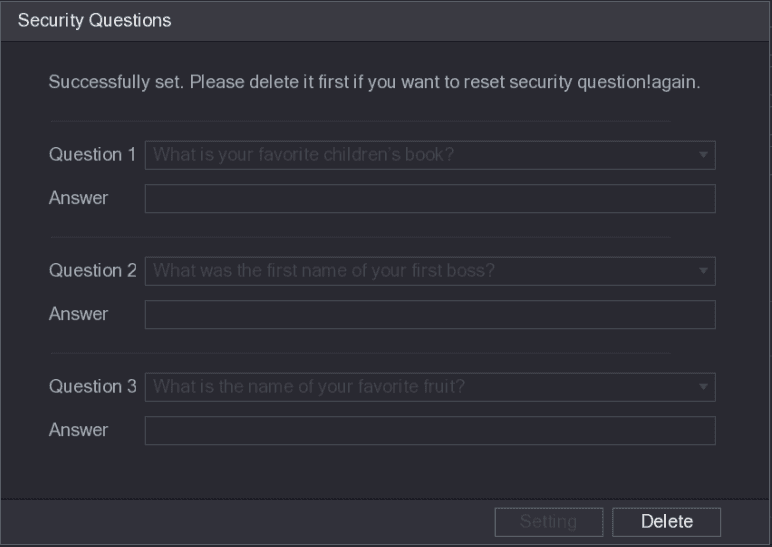
The Security Questions interface is displayed. See Figure 5-223.
-
In the Question list, select questions and enter the answers in the Answer box.
-
Click Setting to save the settings.
You can use the security questions and answers to reset the password for admin account.
-
To reset the security questions, on the Security Questions, enter the correct answers for each question, and then click Delete.
Complete the settings
Click OK to complete the settings.
Deleting a User Account
Open the USER interface
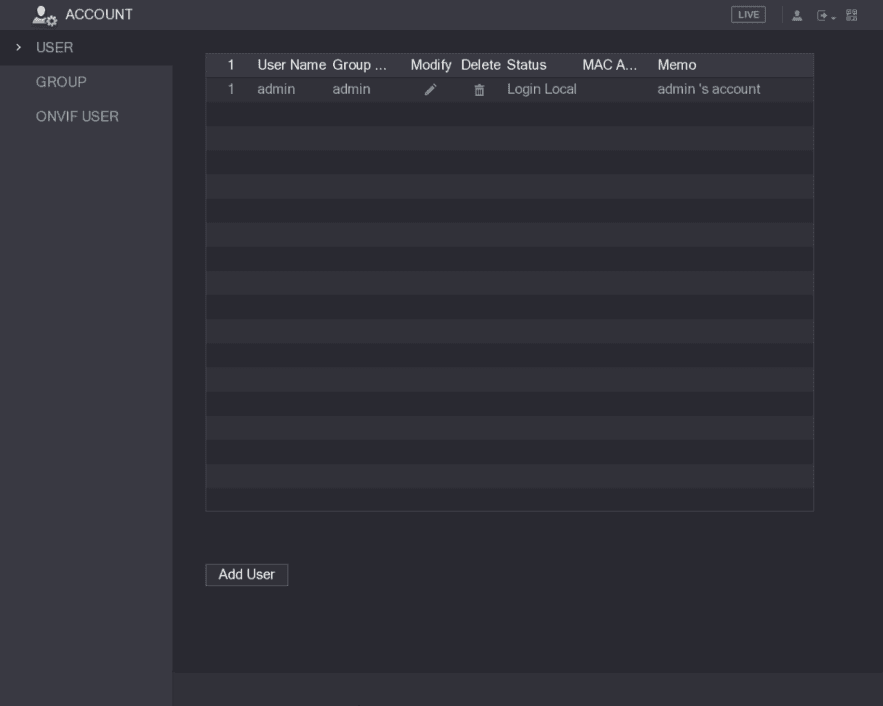
Select Main Menu > ACCOUNT > USER.
The USER interface is displayed. See Figure 5-224.
Delete the user account
Click the delete icon for the user account that you want to delete.
A Message is displayed.
Click OK to delete a user account.
Configuring Group Account
Adding a Group
Open the GROUP interface
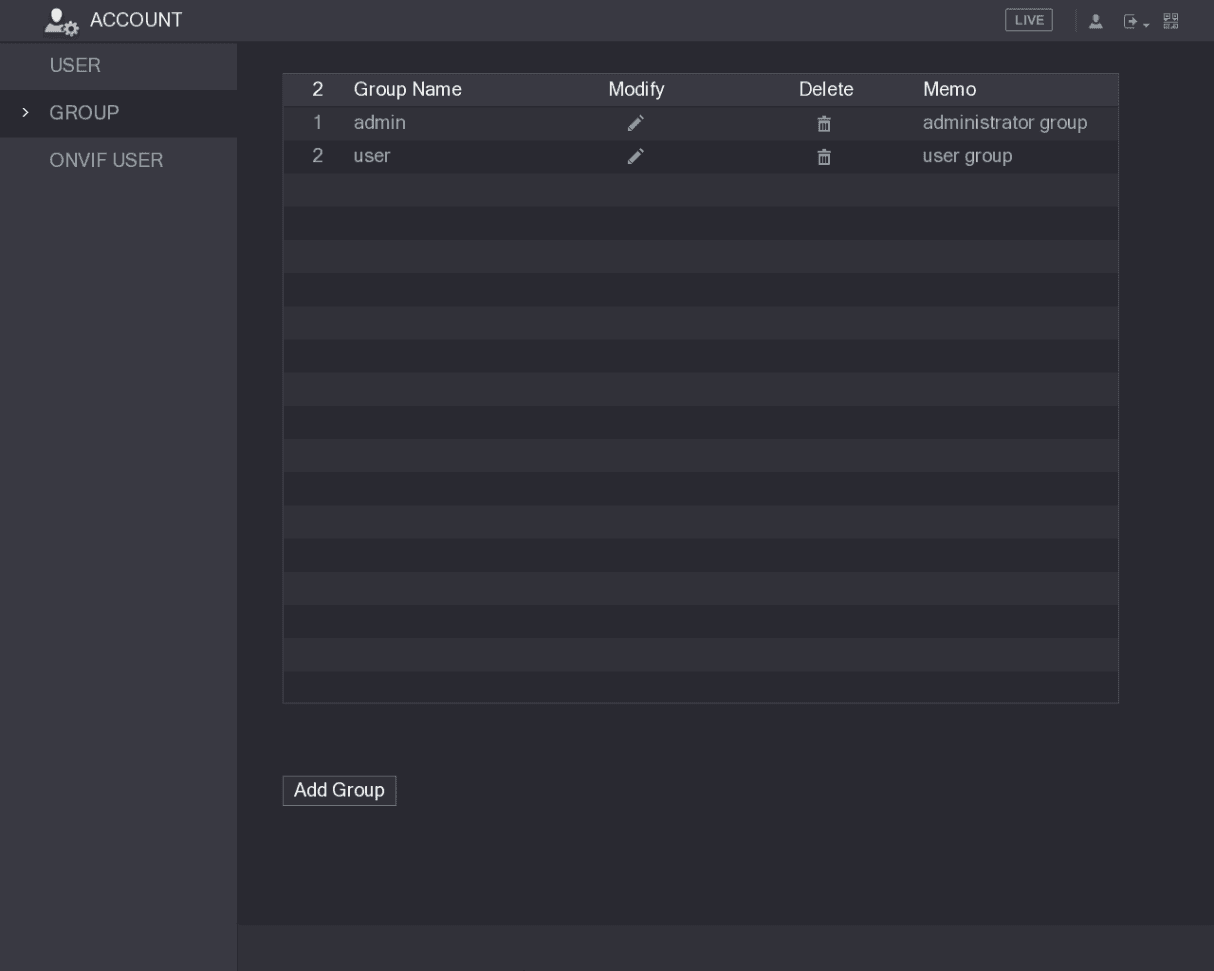
Select Main Menu > ACCOUNT > GROUP.
The GROUP interface is displayed. See Figure 5-225.
Configure the parameters
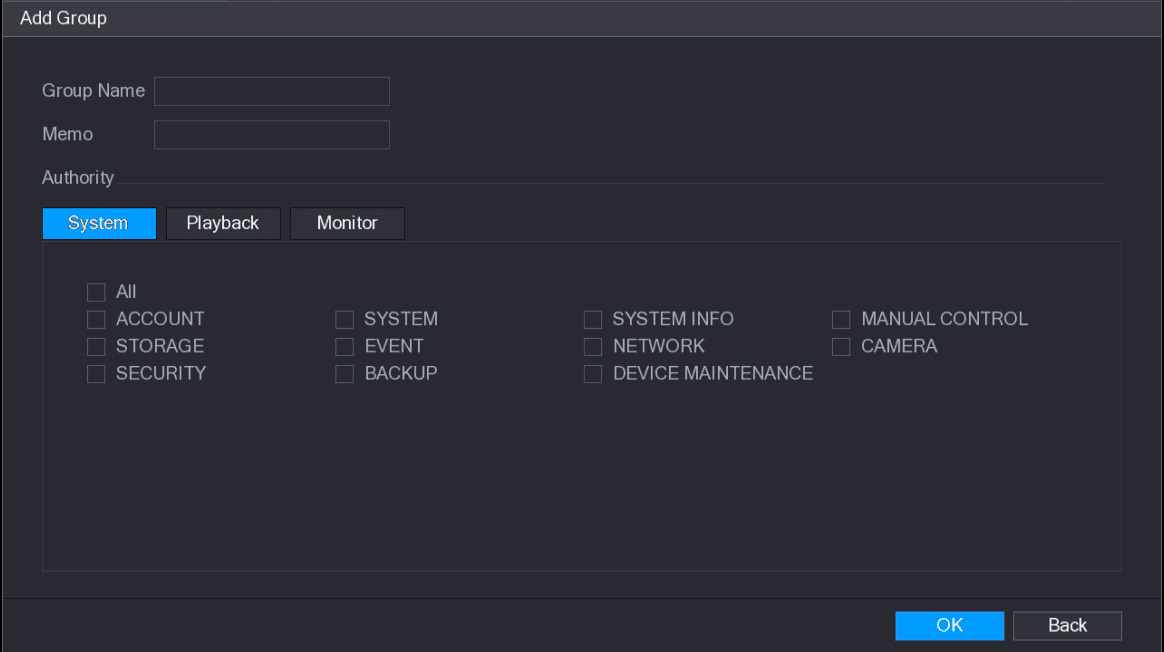
Configure the settings for the parameters of adding a group. See Table 5-71.
| Parameter | Description |
|---|---|
| Group Name | Enter a name for the group. |
| Memo | Optional. Enter a description of the account. |
| Authority | In the Authority area, select the check boxes in the System tab, Playback tab, and Monitor tab. |
Complete the settings
Click OK to complete the settings.
Modifying a Group
Open the GROUP interface
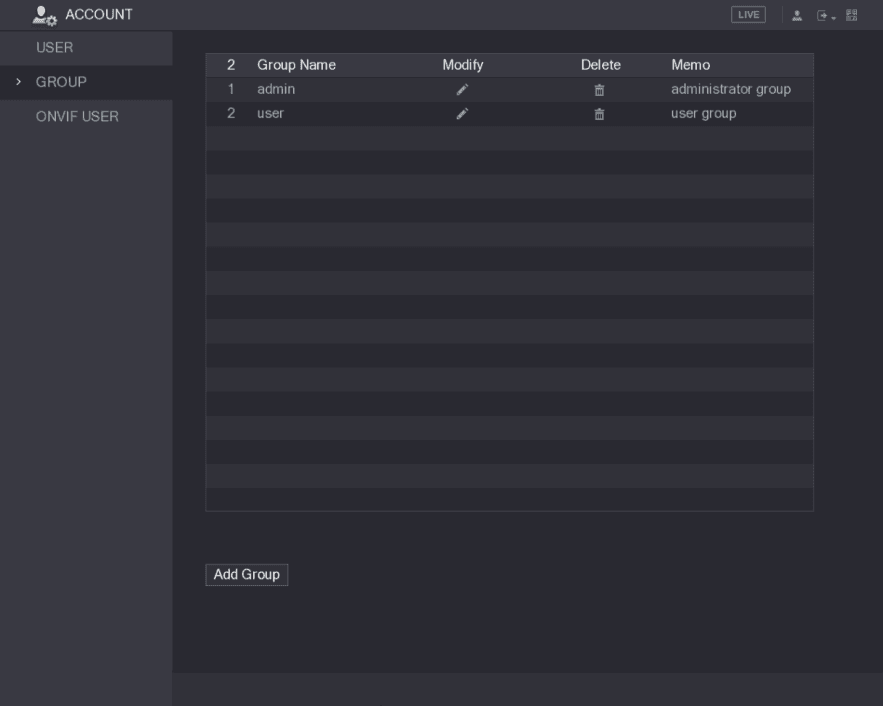
Select Main Menu > ACCOUNT > GROUP.
The GROUP interface is displayed. See Figure 5-227.
Open the Modify Group interface
Click the modify icon for the group account that you want to modify.
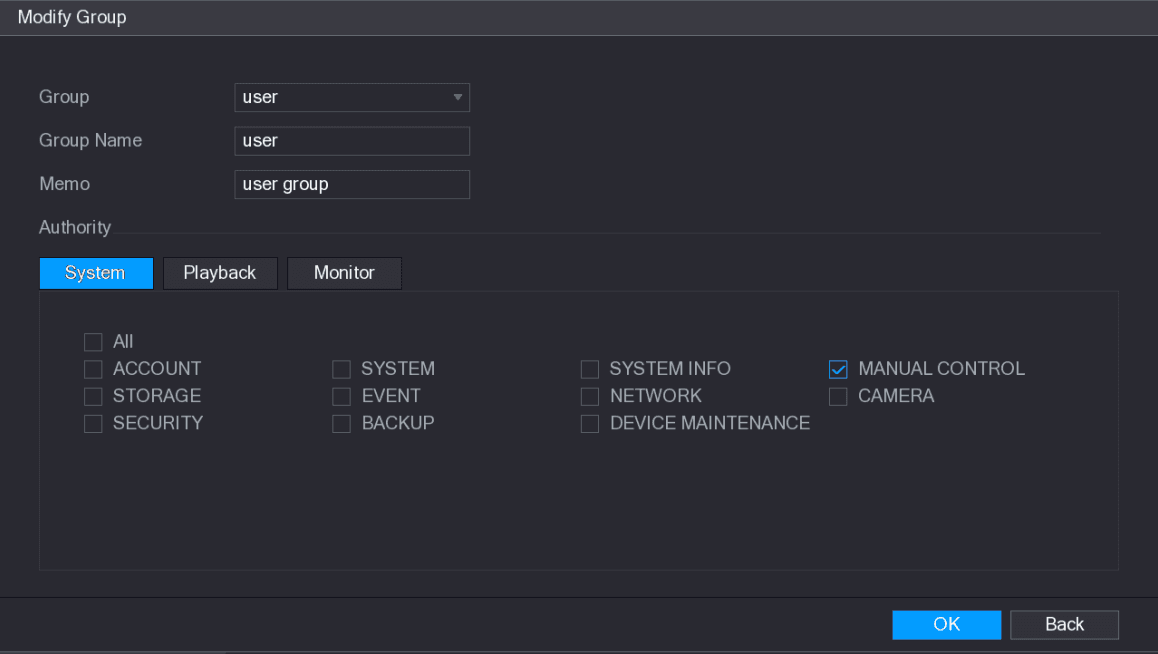
The Modify Group interface is displayed. See Figure 5-228.
Change the settings
Change the settings for group name, memo, and authority.
Complete the settings
Click OK to complete the settings.
Deleting a Group
Open the GROUP interface
Select Main Menu > ACCOUNT > GROUP.
The GROUP interface is displayed. See Figure 5-229.
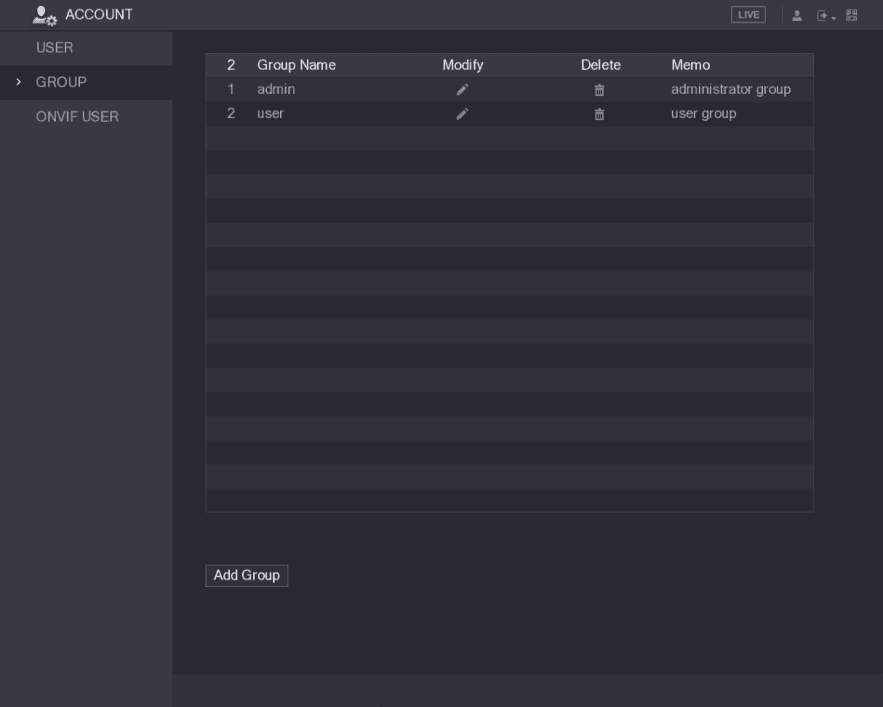
Delete the group
Click the delete icon for the user account that you want to delete.
A Message is displayed.
Click OK to delete a group.
Configuring ONVIF Users
The device manufactured by other company can connect to the Device through ONVIF protocol by an authorized ONVIF account.
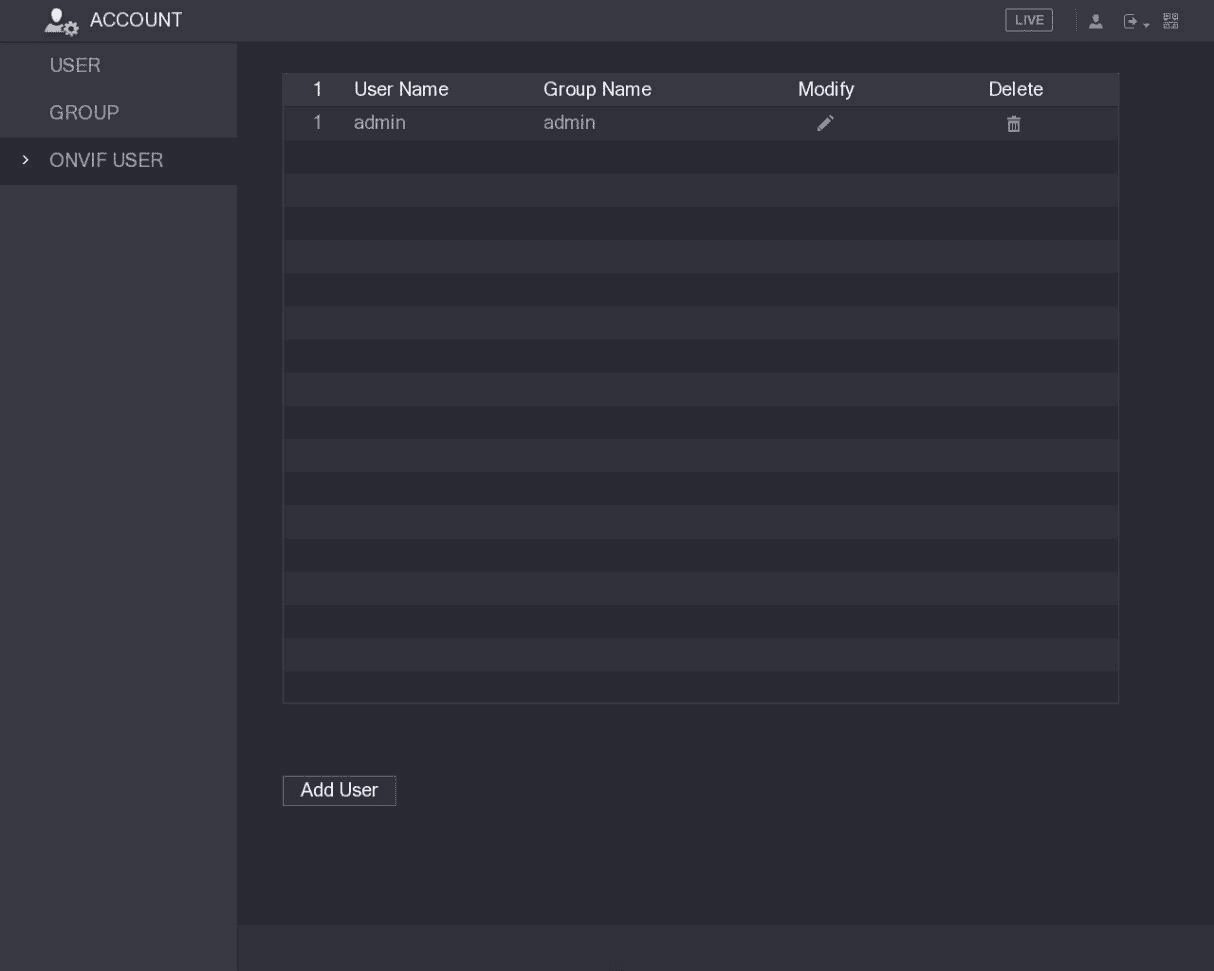
The admin account is created for ONVIF users right after the Device has been initialized.
Open the ONVIF USER interface
Select Main Menu > ACCOUNT > ONVIF USER.
The ONVIF USER interface is displayed. See Figure 5-230.
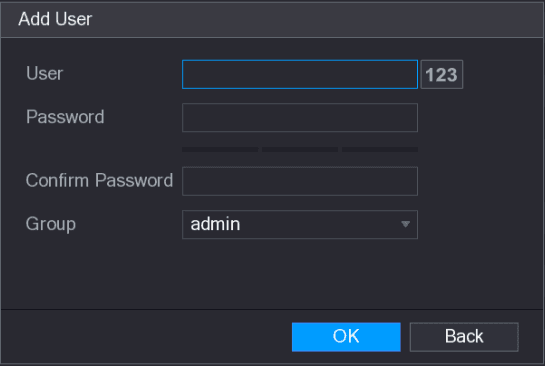
Enter the account details
Enter user name, password, and select the group that you want this account to belong to.
Save the settings
Click OK to save the settings.
Click the modify icon to modify the account; click the delete icon to delete the account.
Network Management
Configure the Sapphire Series CVI DVR network settings including TCP/IP, ports, Wi-Fi, 3G/4G, PPPoE, DDNS, UPnP, email, SNMP, multicast, alarm center, register, P2P, 802.1x, and run network connection tests and packet capture.
Audio Management
Manage audio files and configure the playing schedule on the Sapphire Series CVI DVR so audio is activated when an alarm event occurs.