 Trung tâm trợ giúp LTS Connect
Remote Devices
How to add, initialize, modify, import, export, and manage remote IP devices on the Sapphire Series CVI DVR through the Registration interface.
Configuring Remote Devices
Adding Remote Devices
This function is available after you have configured the channel type as IP channel as described in previous section, see 5.5.5 Configuring Channel Type.
You can add remote devices by adding the IP address.
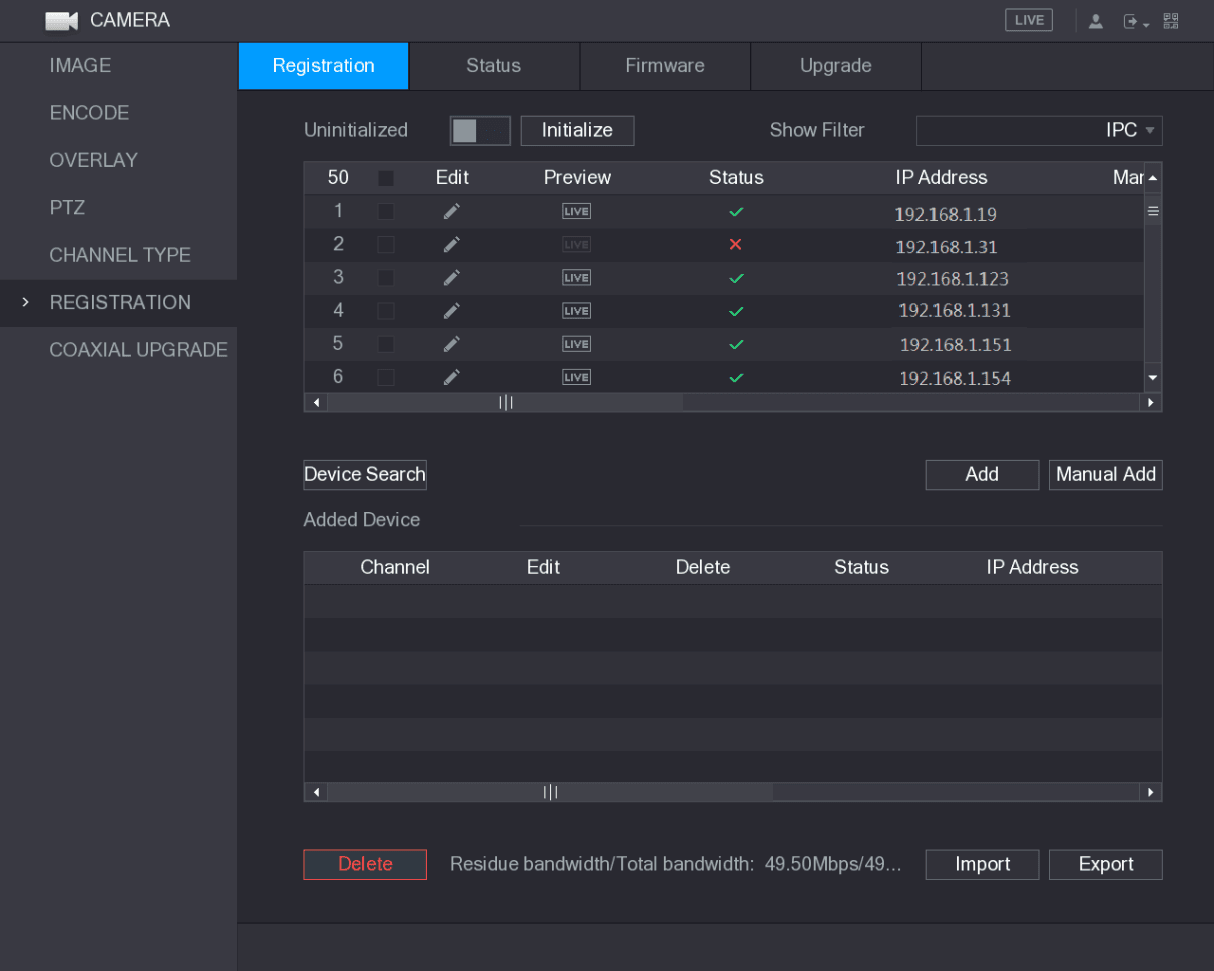
Select Main Menu > CAMERA > REGISTRATION > Registration, the Registration interface is displayed. See Figure 5-75.
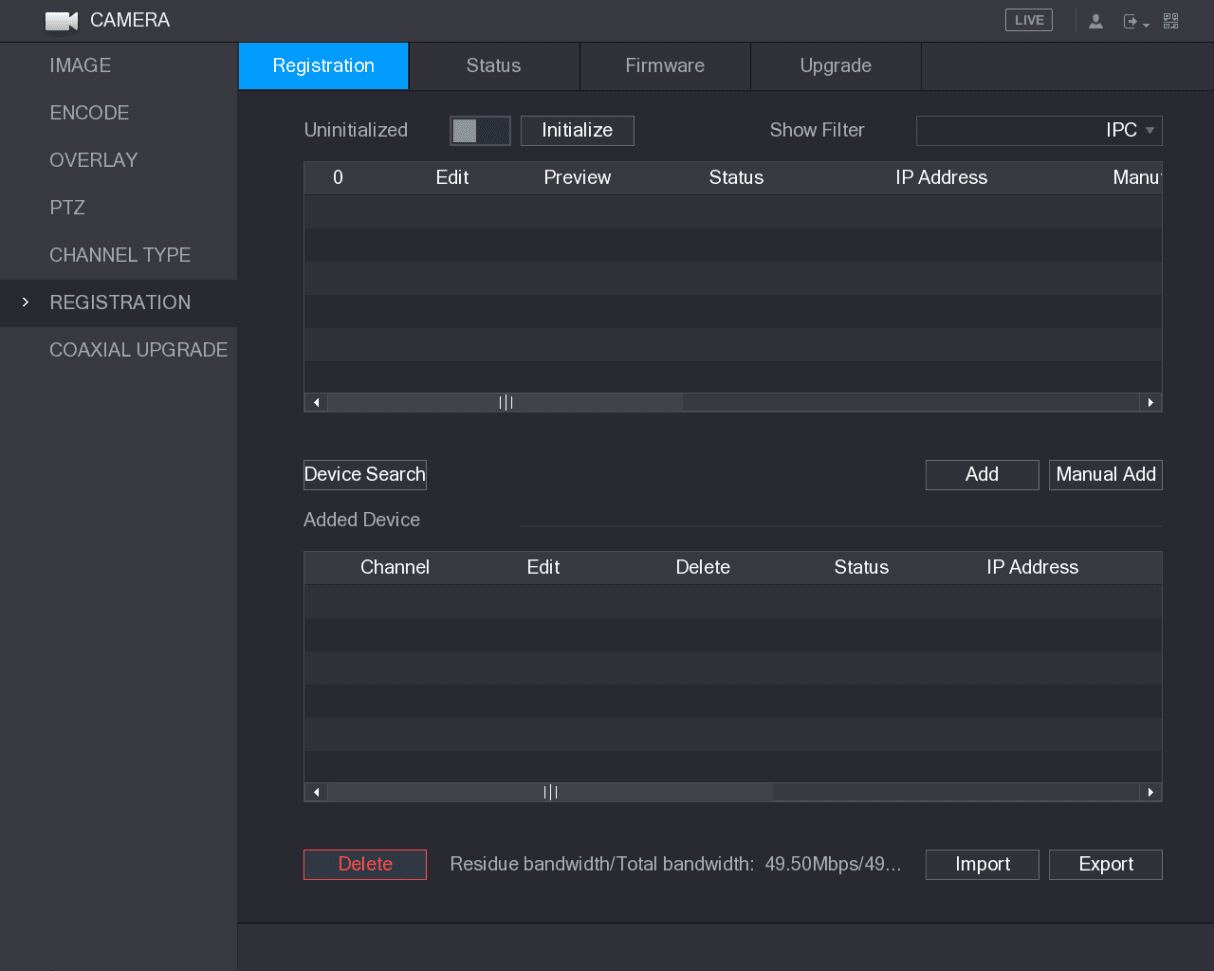
Table 5-28
| Parameter | Description |
|---|---|
| Uninitialized | Enable the Uninitialized function, the uninitialized devices out of the searched devices are displayed in the searched device list. |
| Initialize | Select the uninitialized device from the uninitialized device list, and the click Initialize to start initializing device. |
| Show Filter | In the Show Filter list, select the remote device type that you want to display in the searched device list. None: Display all types of devices. IPC: Display the front-end devices. DVR: Display all storage devices such as NVR, DVR and HCVR. OTHER: Display the devices that do not belong to IPC or DVR type. |
| Searched Device List | Displays the searched devices. You can view the device information such as status, IP address. |
| Device Search | Click Device Search, the searched devices display in the searched device list. To adjust the display sequence, in the title line, you can click the IP address, Manufacturer, Type, MAC Address, Port, or Device Name text. For example, click the IP address text, the sequence icon is displayed. "*" is displayed next to the added device. |
| Add | In the Searched Device List area, select the device that you want to add. |
| Manual Add | Add the device by manually configuring settings such as IP address, channel selection. For details, see 5.6.1.3 Adding Remote Devices Manually. |
| Added Device List | Displays the added devices. You can edit and delete the device, and view the device information. |
| Delete | Select the check box of the added device, and then click Delete to delete the added device. |
| Import | Select the searched devices and then click Import to import the devices in batches. |
| Export | Select the added devices and then click Export. The exported devices information is saved into the USB storage device. |
Initializing Remote Devices
You can reset the password and IP address of the remote devices through initializing.
Search for devices
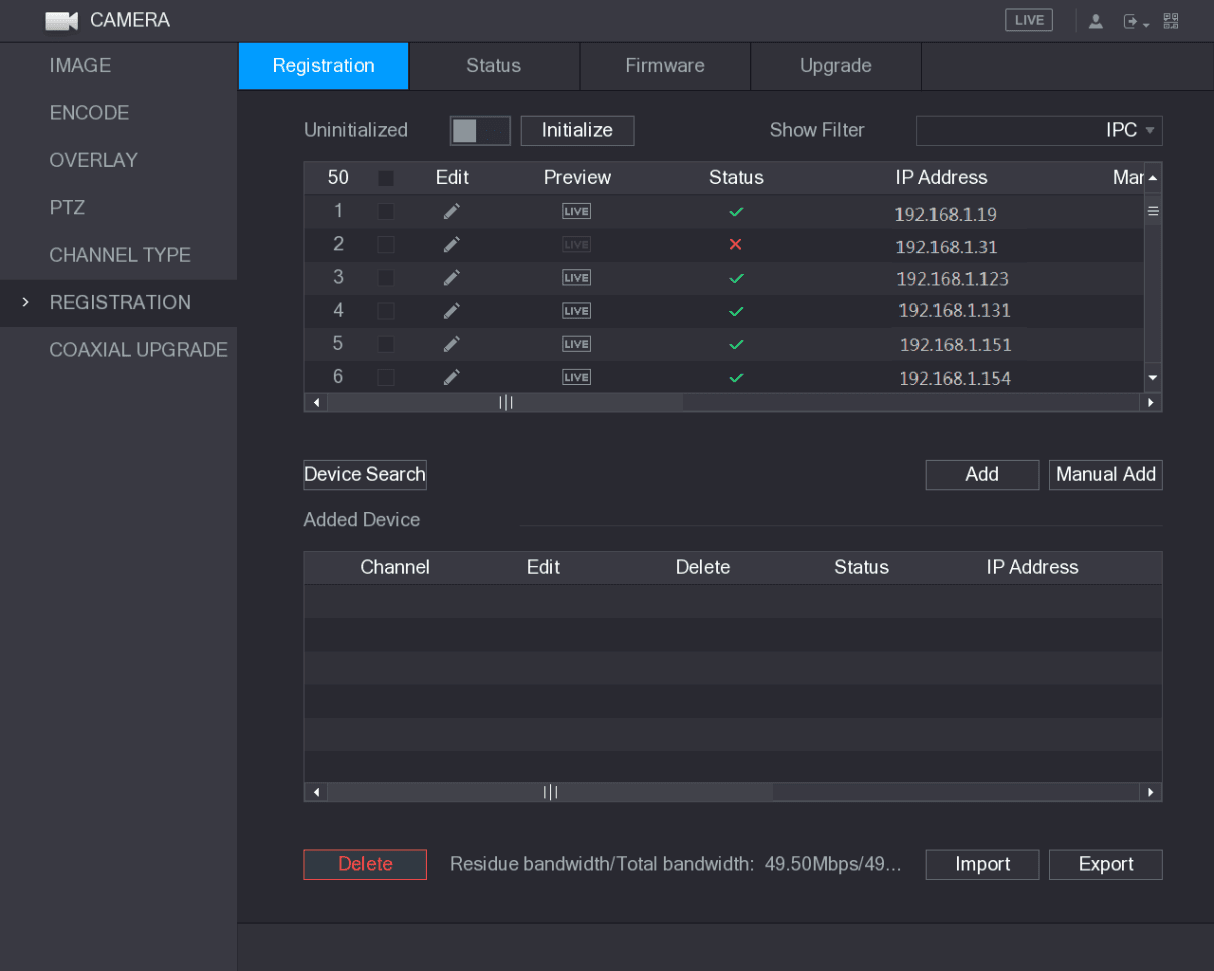
Click Device Search.
The searched devices are displayed in the table. See Figure 5-76.
Enable the Uninitialized function
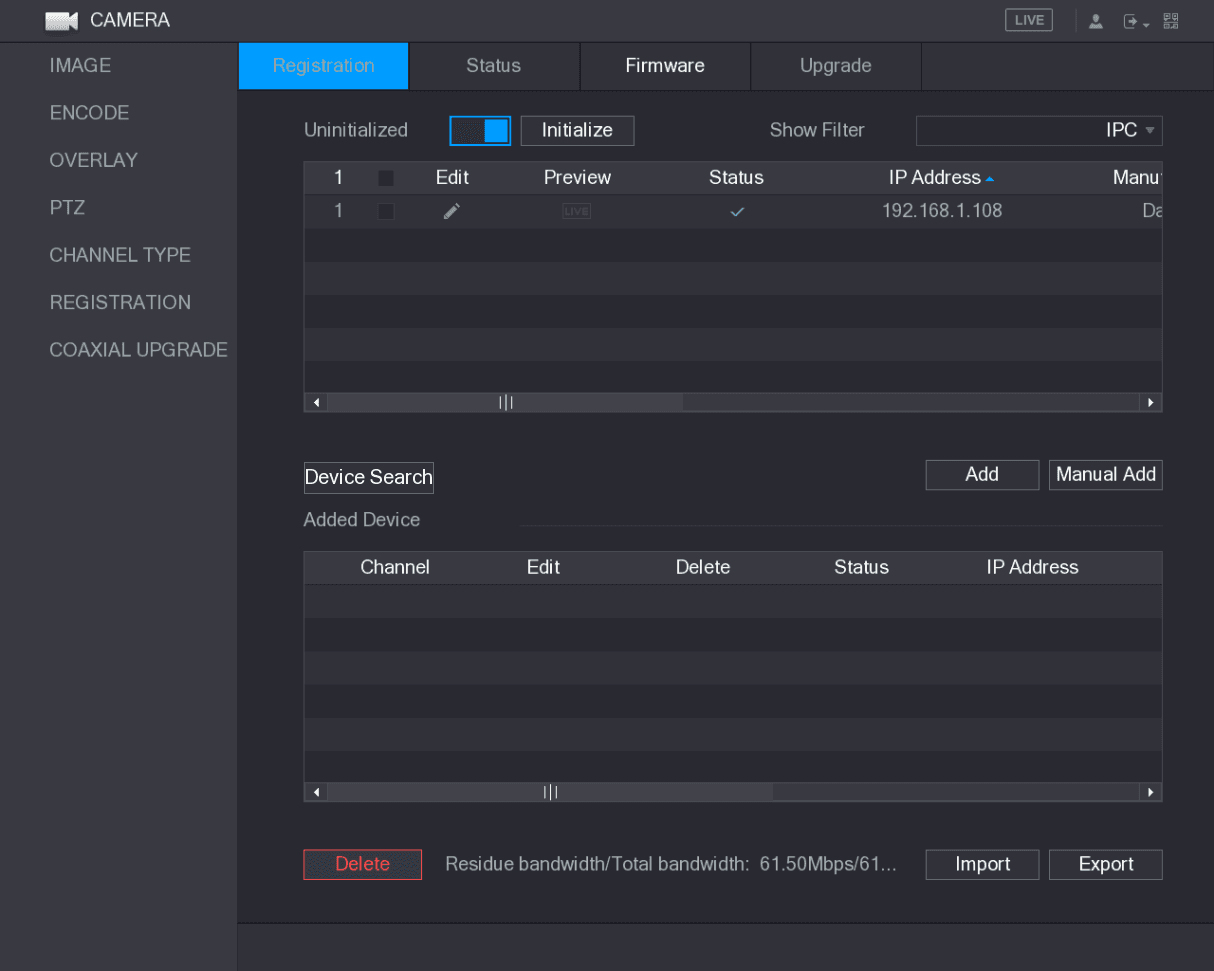
Enable the Initialized function.
The uninitialized devices are displayed. See Figure 5-77.
Select the device to initialize
Select the uninitialized device that you want to initialize.
Open the initialization wizard
Click Initialize.
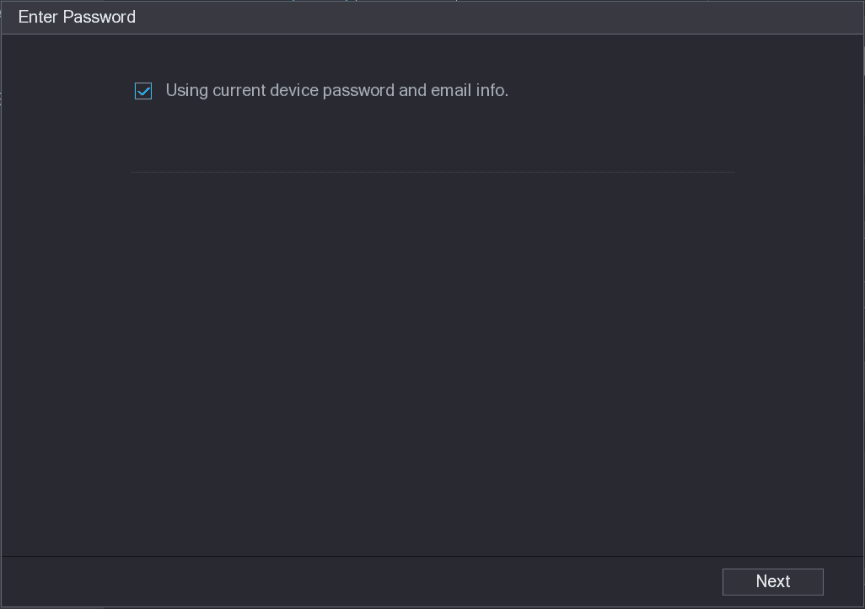
The Enter Password interface is displayed. See Figure 5-78.
Configure the password and email information
Configure the password and email information.
If you select the Using current device password and email info check box, the remote device automatically uses the current password and email information, so you do not need to set the password and email address again and can go to Step 6.
Clear the Using current device password and email info check box.
The password setting interface is displayed. See Figure 5-79.
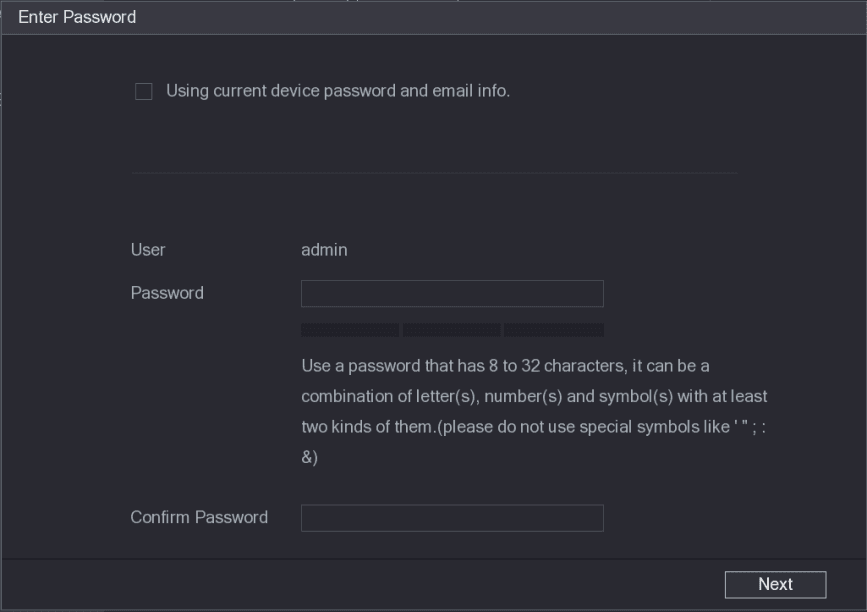
Configure the settings for the password setting parameters. See Table 5-29.
Table 5-29
| Parameter | Description |
|---|---|
| User | The default is admin. |
| Password | The password must consist of 8 to 32 non-blank characters and contain at least two types of characters among upper case, lower case, number, and special character (excluding "'", """, ";", ":" and "&"). |
| Confirm Password | Please enter a strong password according to the password strength bar indication. |
Set the reserved email address
Click Next.
The Password Protection interface is displayed. See Figure 5-80.
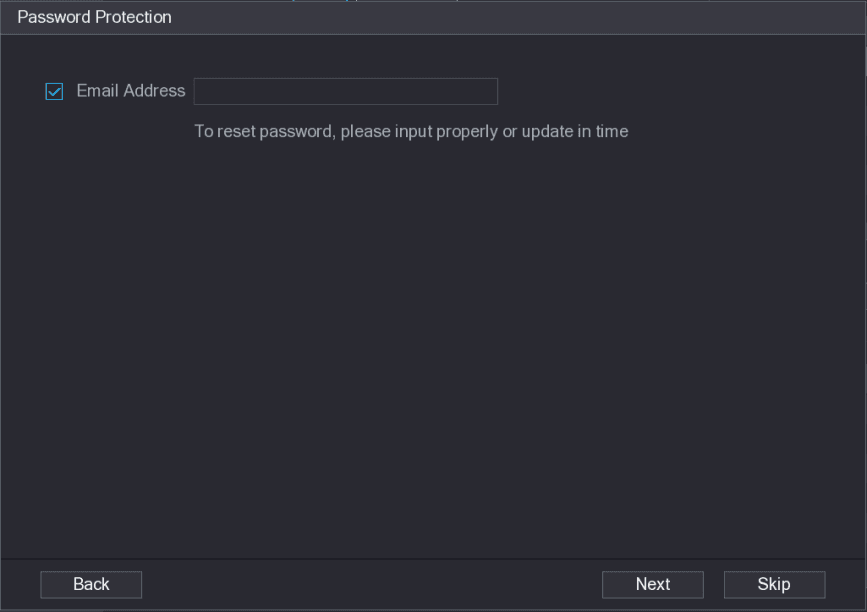
Select the Email Address box and enter the email address that you want to reserve for password reset in the future.
If you do not want to set the reserved email address, click Skip.
Configure the IP address
Click Next.
The NETWORK interface is displayed. See Figure 5-81.
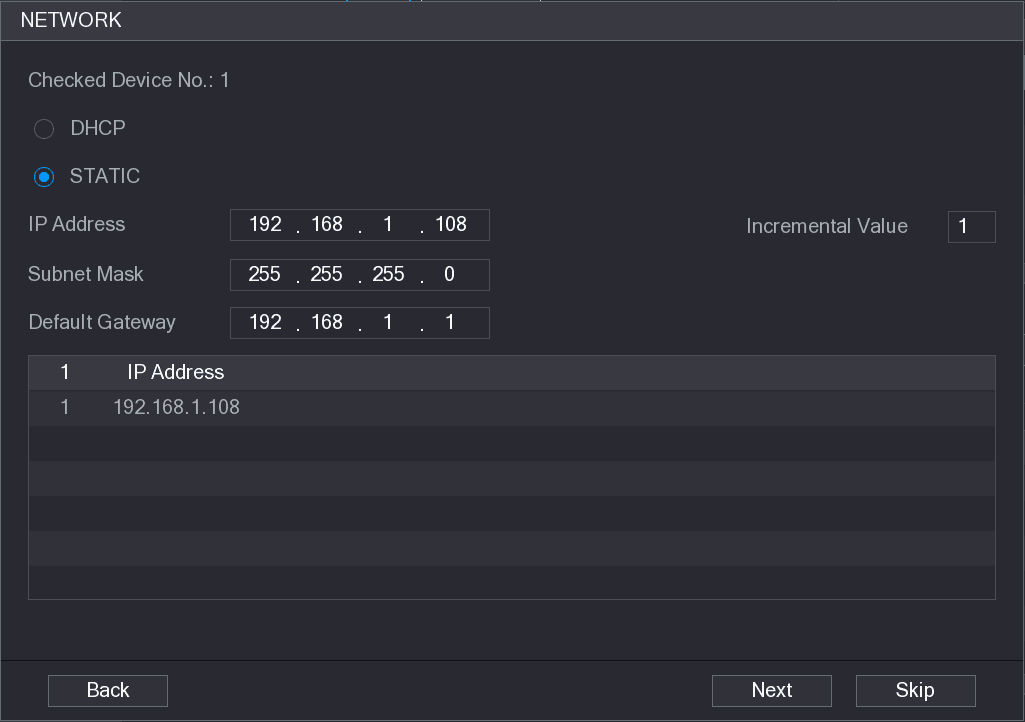
Configure the IP address.
- Select the DHCP check box, you do not need to enter the IP address information, because the system will allocate one IP address to the remote device.
- Select the STATIC check box, you need to enter the IP address, subnet mast, default gateway, and incremental value. The system will allocate the IP address to the remote devices by progressively increasing the last part of the IP address when initializing devices in batches.
When configuring IP address for multiple remote devices which were not in the same network segment, these remote devices will belong to the same network segment after configuration.
Start initializing
Click Next.
The initializing is started. After the process is completed, see Figure 5-82.
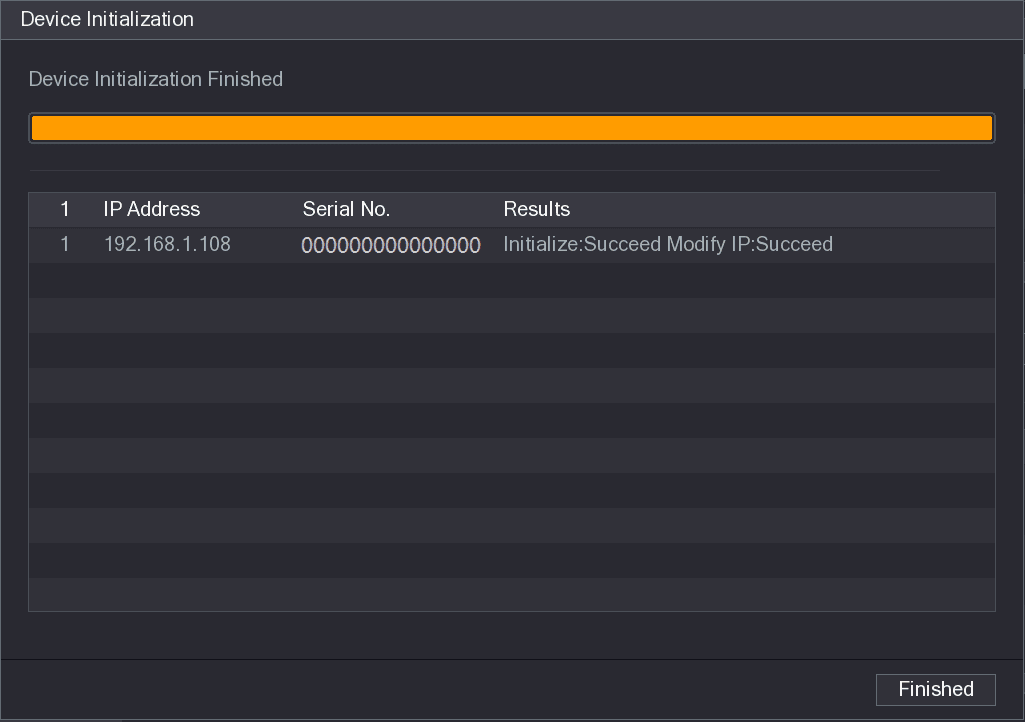
Complete the settings
Click Finished to complete the settings.
Adding Remote Devices Automatically
Search for devices
On the Registration interface, click Device Search.
The searched devices are displayed. See Figure 5-83.
Select the device
Select the check box of the device.
Add the device
Click Add.
The device is added into the Added Device area.
- You can also double-click the device to add it into the Added Device area.
- You can add devices in batches.
Adding Remote Devices Manually
Open the Manual Add interface
On the Registration interface, click Manual Add.
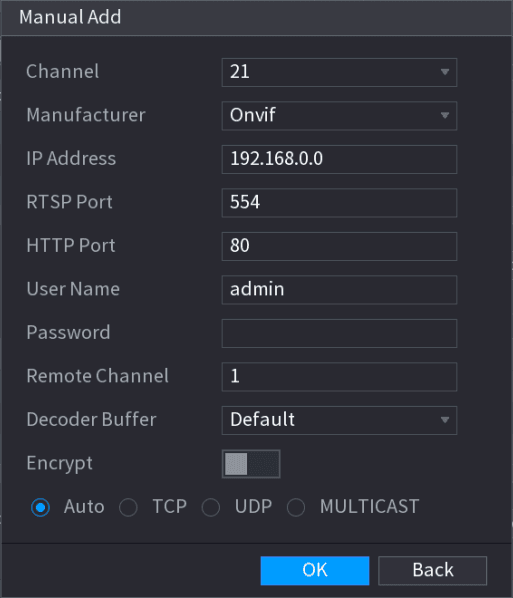
The Manual Add interface is displayed. See Figure 5-84.
Configure the device parameters
Configure the settings for the manual adding device parameters. See Table 5-30.
Table 5-30
| Parameter | Description |
|---|---|
| Channel | In the Channel list, select the channel that you want use on the Device to connect the remote device. |
| Manufacturer | In the Manufacturer list, select the manufacturer of the remote device. |
| IP Address | In the IP Address box, enter the IP address of remote device. The default is 192.168.0.0 which the system cannot connect to. |
| RTSP Port | The default value setting is 554. You can enter the value according to your actual situation. |
| HTTP Port | The default value setting is 80. You can enter the value according to your actual situation. If you enter other value, for example, 70, and then you should enter 70 after the IP address when logging in the Device by browser. |
| User Name | Enter the user name of the remote device. |
| Password | Enter the password of the user for the remote device. |
| Remote Channel | Enter the remote channel number of the remote device that you want to add. |
| Decoder Buffer | In the Decoder Buffer list, select Default, Realtime, or Fluent. |
| Protocol Type | If the remote device is added through private protocol, the default type is TCP. If the remote device is added through ONVIF protocol, the system supports Auto, TCP, UDP, or MULTICAST. If the remote device is added through other manufacturers, the system supports TCP and UDP. |
| Encrypt | If the remote device is added through ONVIF protocol, selecting the Encrypt check box will provide encryption protection to the data being transmitted. To use this function, the HTTPS function should be enabled for the remote IP camera. |
Save the settings
Click Apply to save the settings.
- Only one device can be added manually at one time.
- The success icon indicates successful connection and the failure icon indicates connection failed.
Modifying or Deleting Remote Devices
You can modify and delete the added devices.
- To modify the remote devices, do the following:
Open the Edit interface
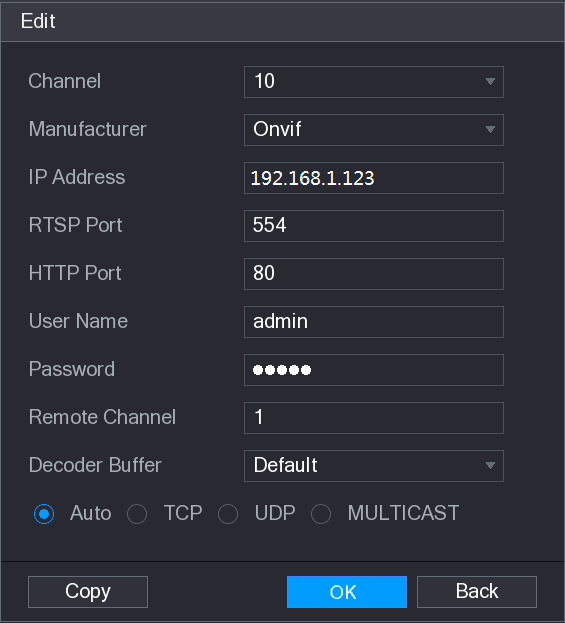
Click the edit icon or double-click a device.
The Edit interface is displayed. See Figure 5-85.
Select the channel
In the Channel list, select the channel that you want to modify settings for.
Save the settings
Click OK to save the settings.
Click Copy to copy the user name and password to other channels.
- To delete one or more added devices, do the following:
- Click the delete icon to delete one device.
- Select the check box of the devices that you want to delete, and then click Delete.
Modifying IP Address
You can modify a single IP address or multiple IP addresses of remote devices at one time.
- To modify a single IP address, do the following:
Open the Modify IP interface
In the Searched Device list area, click the modify IP icon for the device that you want to modify IP.
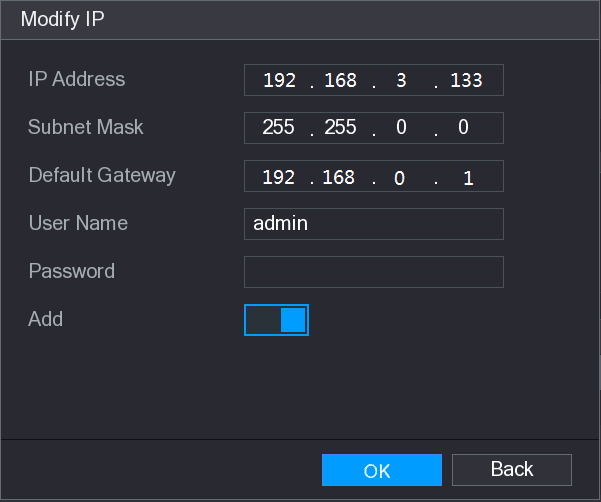
The Modify IP interface is displayed. See Figure 5-86.
Configure the settings
Configure the settings for IP address, subnet mask, default gateway, user name, and password.
Enable the Add function
Enable the Add function to add the device into the Added Device area.
Save the settings
Click OK to save the settings.
- To modify IP address in batches, do the following:
Select the devices
In the Searched Device list area, select the devices that you want to modify IP address in batches.
Open the Modify IP interface
Click the modify IP icon.
The Modify IP interface is displayed. See Figure 5-87.
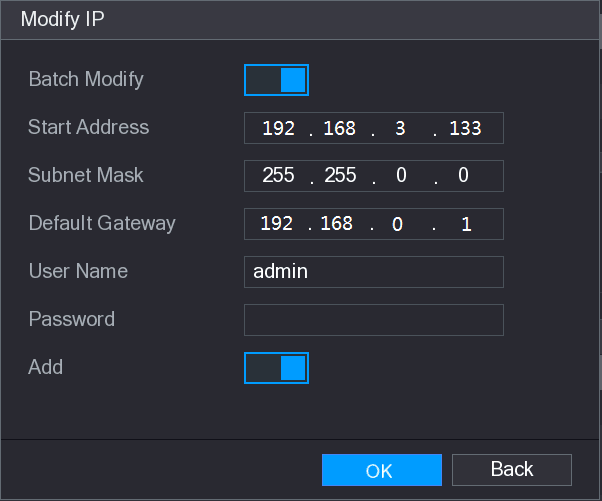
Enable Batch Modify
Enable the Batch Modify function.
Configure the settings
Configure the settings for start IP address (the IP address is allocated in sequence), subnet mask, default gateway, user name, and password.
Enable the Add function
Enable the Add function to add the devices into the Added Device area.
Save the settings
Click Apply to save the settings.
Exporting IP Address
You can export the added IP address to the USB storage device.
The exported information is saved in .csv file, which includes IP address, port number, channel number, manufacturer, user name, and password.
Insert the USB storage device
Insert the USB storage device to the USB port of the Device.
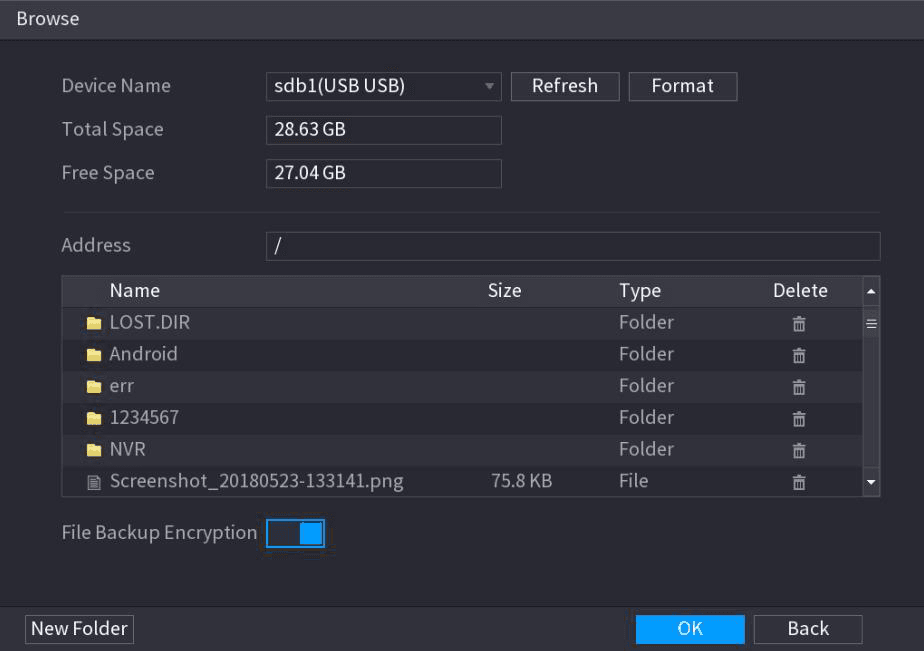
Configure the save path
Configure the save path.
Save the settings
Click OK to save the settings.
A pop-up message indicating "Successfully exported" is displayed.
Confirm
Click OK.
When exporting IP address, the File Backup Encryption check box is selected by default. The file information includes IP address, port, channel number, manufacturer, user name, and password.
- If you select the File Backup Encryption check box, the file format is .backup.
- If you clear the File Backup Encryption check box, the file format is .csv. In this case, there might be a risk of data leakage.
Importing IP Address
You can add remote devices by importing IP address information.
Insert the USB storage device
Insert the USB storage device to the USB port of the Device.
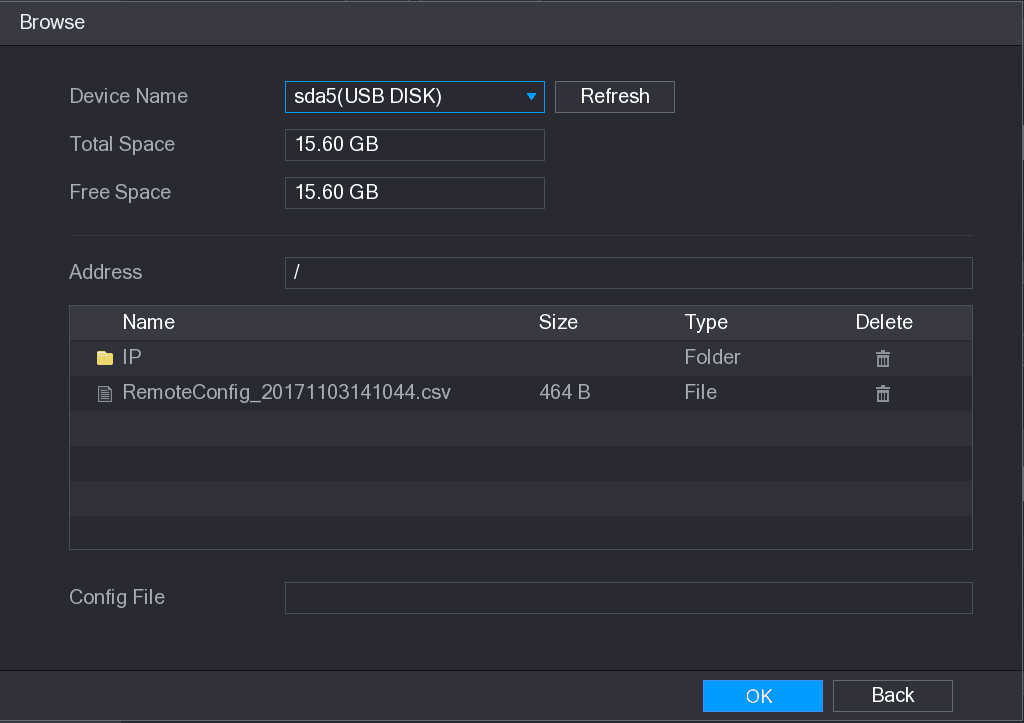
Select the file
Select the file that you want to import.
Start importing
Click OK to start importing.
After importing is completed, a pop-up message indicating "The import succeeded" is displayed.
If the IP address that you want to import already exists in the Device, the system will pop up a message to ask you whether to overwrite the existing content.
- Click OK to replace the existing one.
- Click Cancel to add it as a separate device in the Added Device area.
- You can edit the exported .csv file and be cautious not to change the file format; otherwise the file cannot be imported as it will be judged as invalid.
- The language of .csv file must match the Device language.
- The import and export through customized protocol is not supported.
Managing Remote Devices
You can view the status of remote devices and upgrade.
Viewing Status
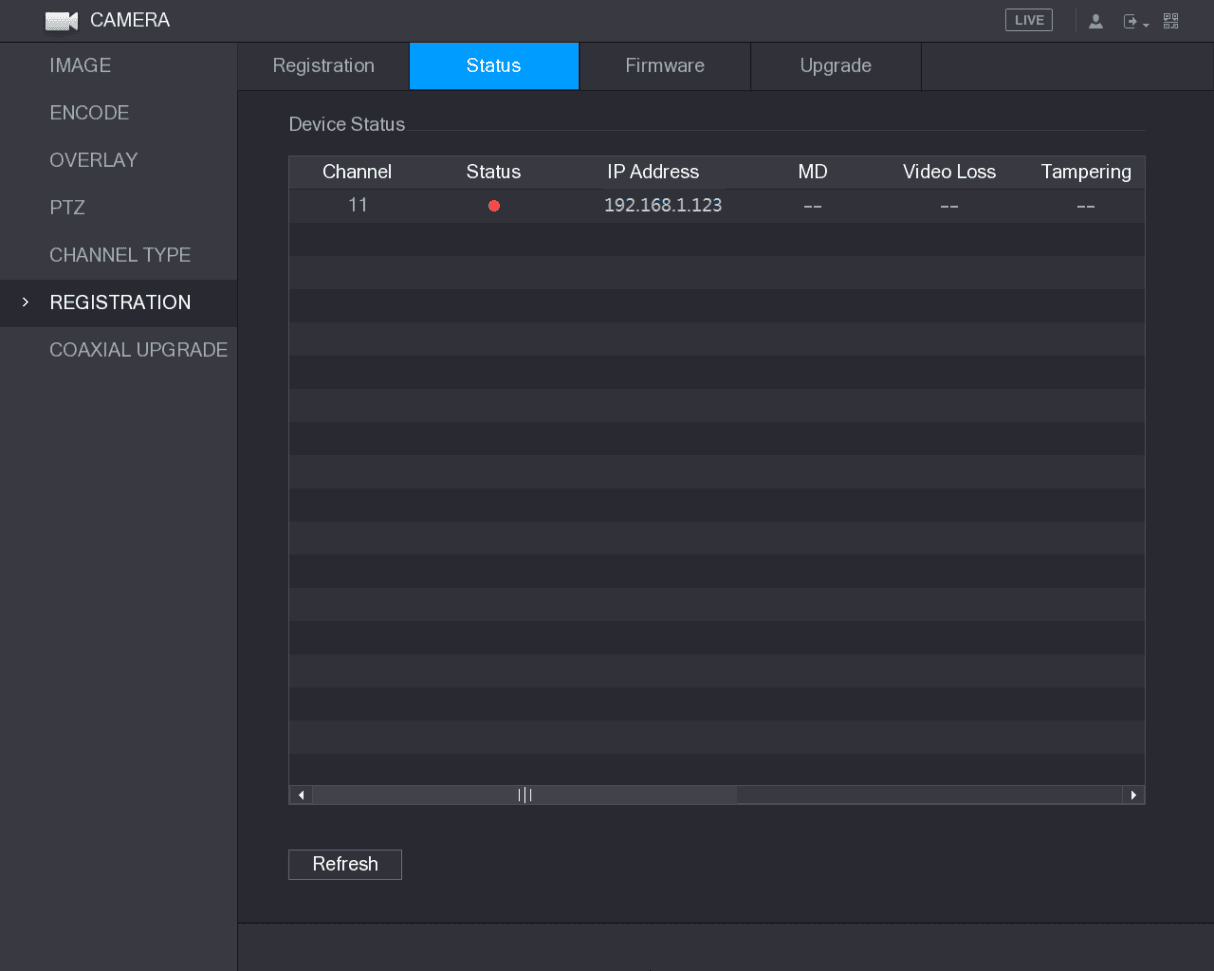
You can view the device information such as connection status, IP address, motion detection, video loss detection, camera name, and manufacturer.
Select Main Menu > CAMERA > REGISTRATION > Status, the Status interface is displayed. See Figure 5-90.
Viewing Firmware Information
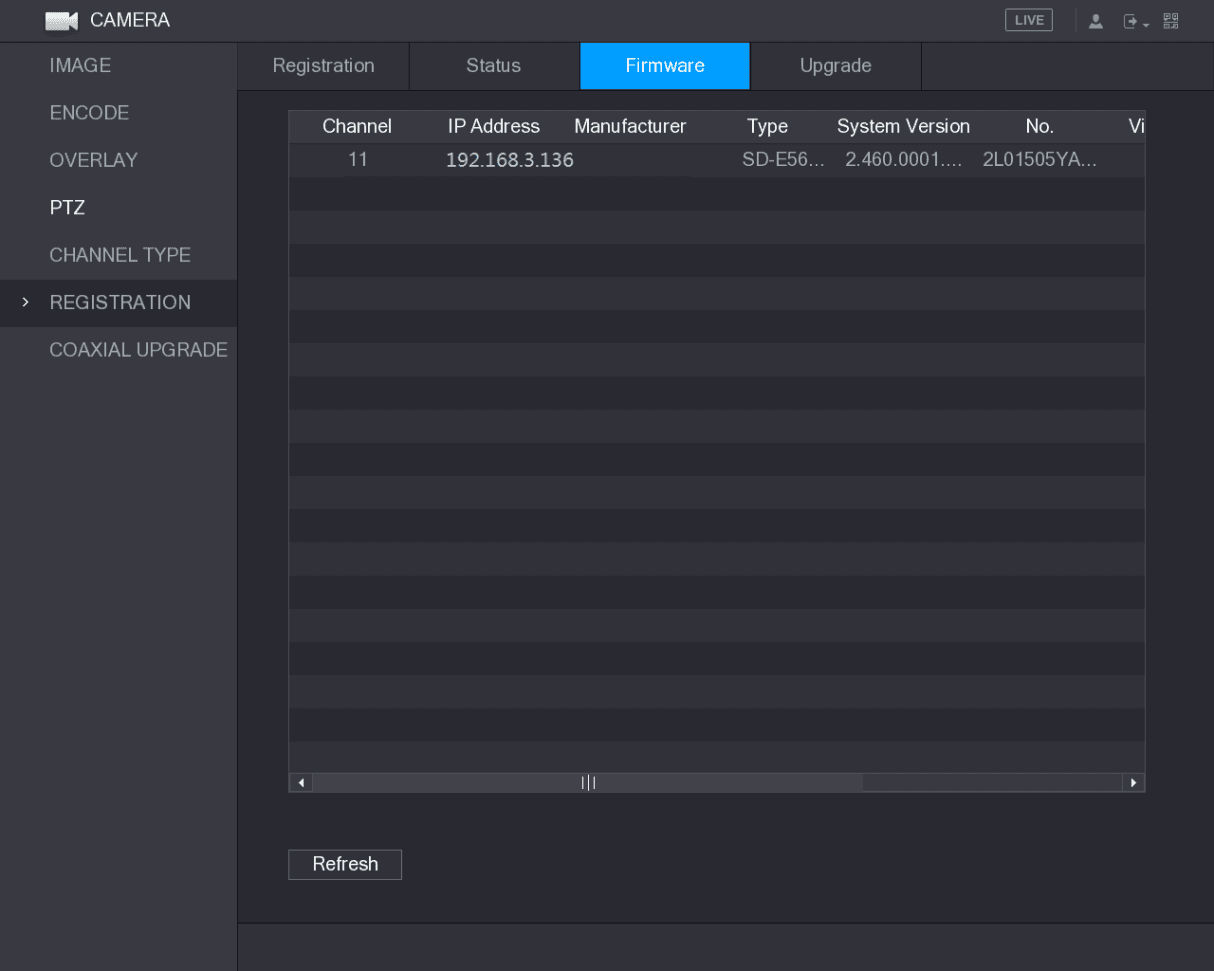
You can view the device firmware information such as channel number, IP address, manufacturer, system version, video input, audio input, and alarm in.
Select Main Menu > CAMERA > REGISTRATION > Firmware, the Firmware interface is displayed. See Figure 5-91.
Upgrading Remote Devices
Open the Upgrade interface
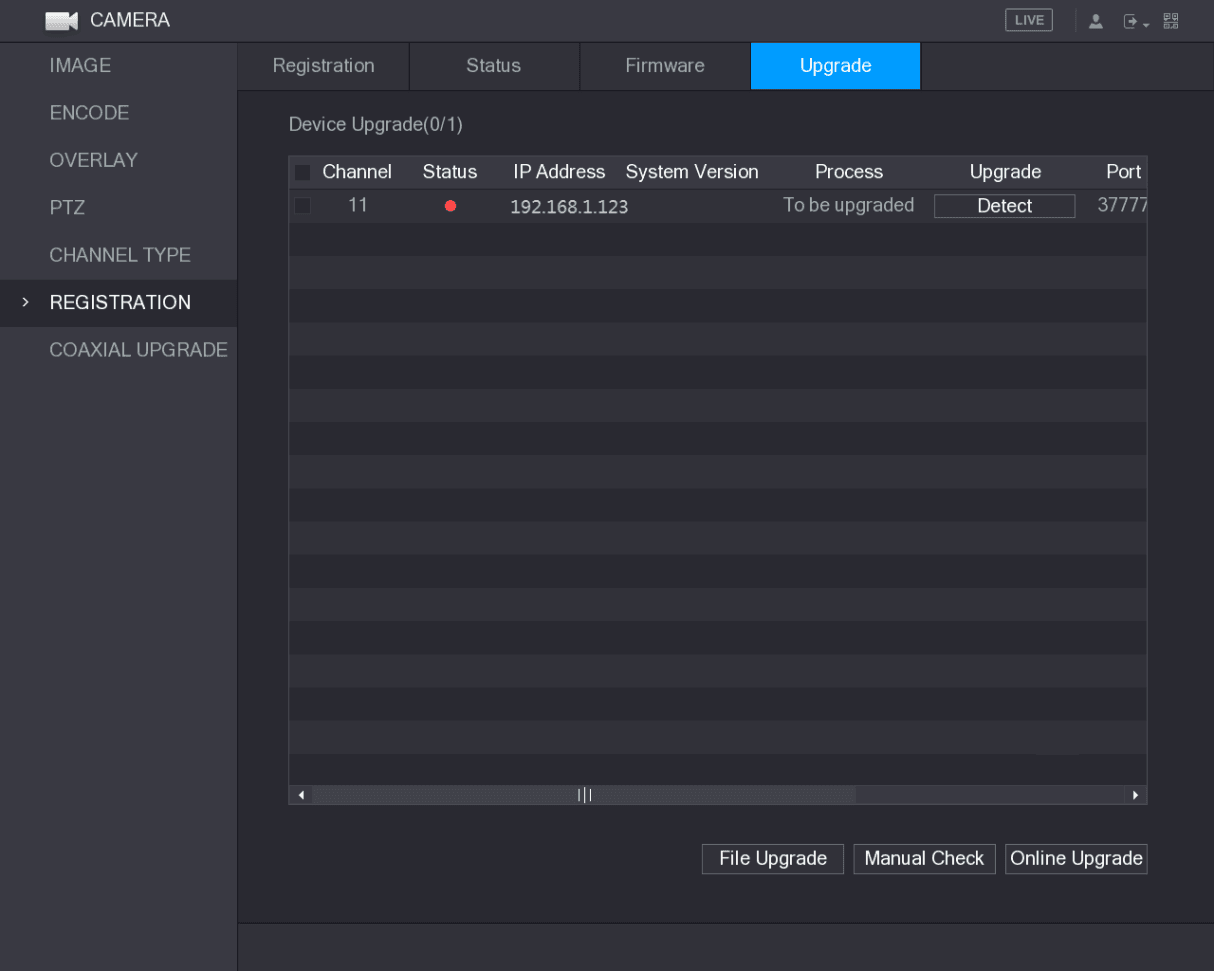
Select Main Menu > CAMERA > REGISTRATION > Upgrade.
The Upgrade interface is displayed. See Figure 5-92.
Camera Settings
Configure image, encode, snapshot, overlay, covered area, channel type, and coaxial camera upgrade settings for each connected camera on the Sapphire Series CVI DVR.
Record and Snapshot Settings
Configure manual and automatic recording, record control parameters, and scheduled, event triggered, and face detection triggered snapshots, including backing up snapshots to FTP.