 LTS Connect ヘルプセンター
Storage
Configure storage devices, HDD groups, quota mode, recording schedules, picture capture, holiday recording, redundant recording, and 1080p Lite mode on the Turbo HD DVR GUI 4.0.
Storage Device Management
Install the HDD
Before startup of the device, install and connect the HDD to the device. Refer to the Quick Start Guide for the installation instructions.
Add the Network Disk
You can add the allocated NAS or disk of IP SAN to device, and use it as network HDD. Up to 8 network disks can be added.
Adding NAS
Go to Storage Device
Go to Storage > Storage Device.
Open the Custom Add interface
Click Add to enter the Custom Add interface.
Select NetHDD type
Select the type to NetHDD.
Select NAS
Select the type to NAS.
Enter IP address
Enter NetHDD IP in the text field.
Search for NAS disks
Click Search to search the available NAS disks.
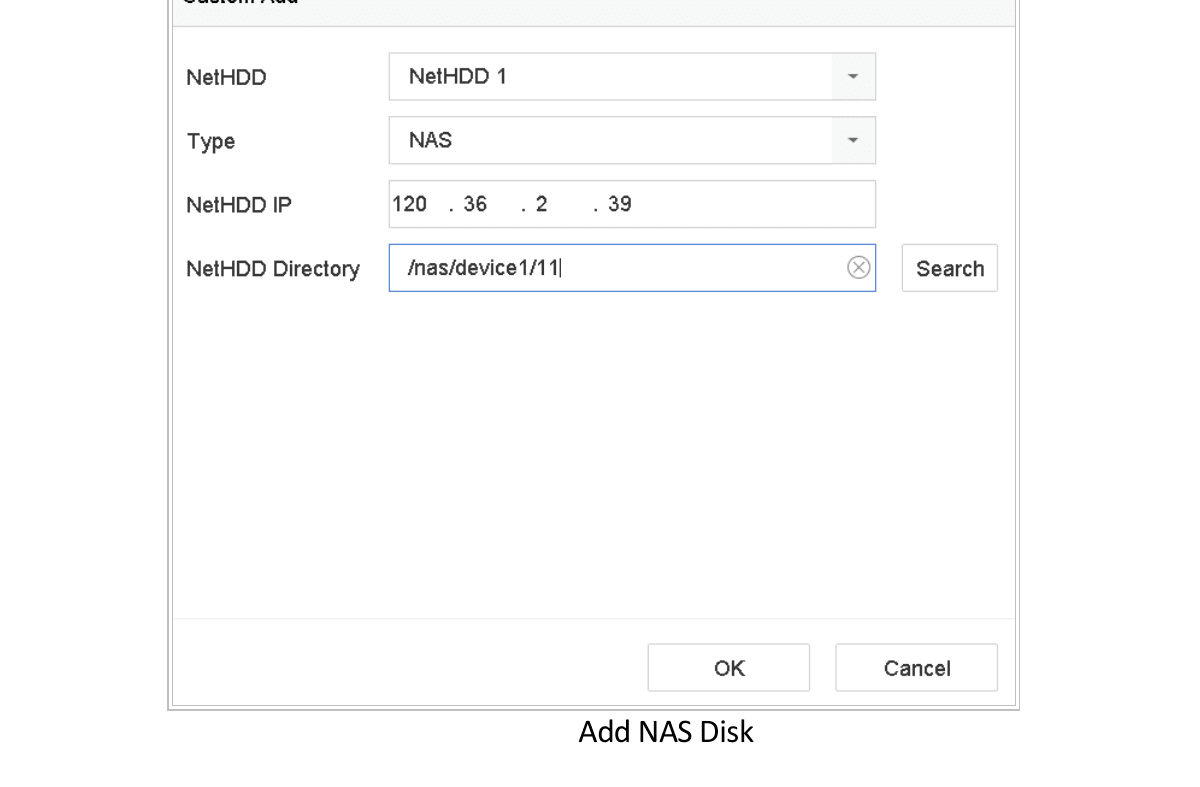
Figure 7-1 Add NAS Disk
Select the NAS disk
Select the NAS disk from the list, or you can manually enter the directory in the text field of NetHDD Directory.
Confirm
Click OK to complete the adding of the NAS disk.
Result: After having successfully added the NAS disk, return to the HDD Information menu. The added NetHDD will be displayed in the list.
Adding IP SAN
Go to Storage Device
Go to Storage > Storage Device.
Open the Custom Add interface
Click Add to enter the Custom Add interface.
Select NetHDD
Select NetHDD from the drop-down list.
Select IP SAN
Select Type to IP SAN.
Enter IP address
Enter NetHDD IP in the text field.
Search for IP SAN disks
Click Search to search the available IP SAN disks.
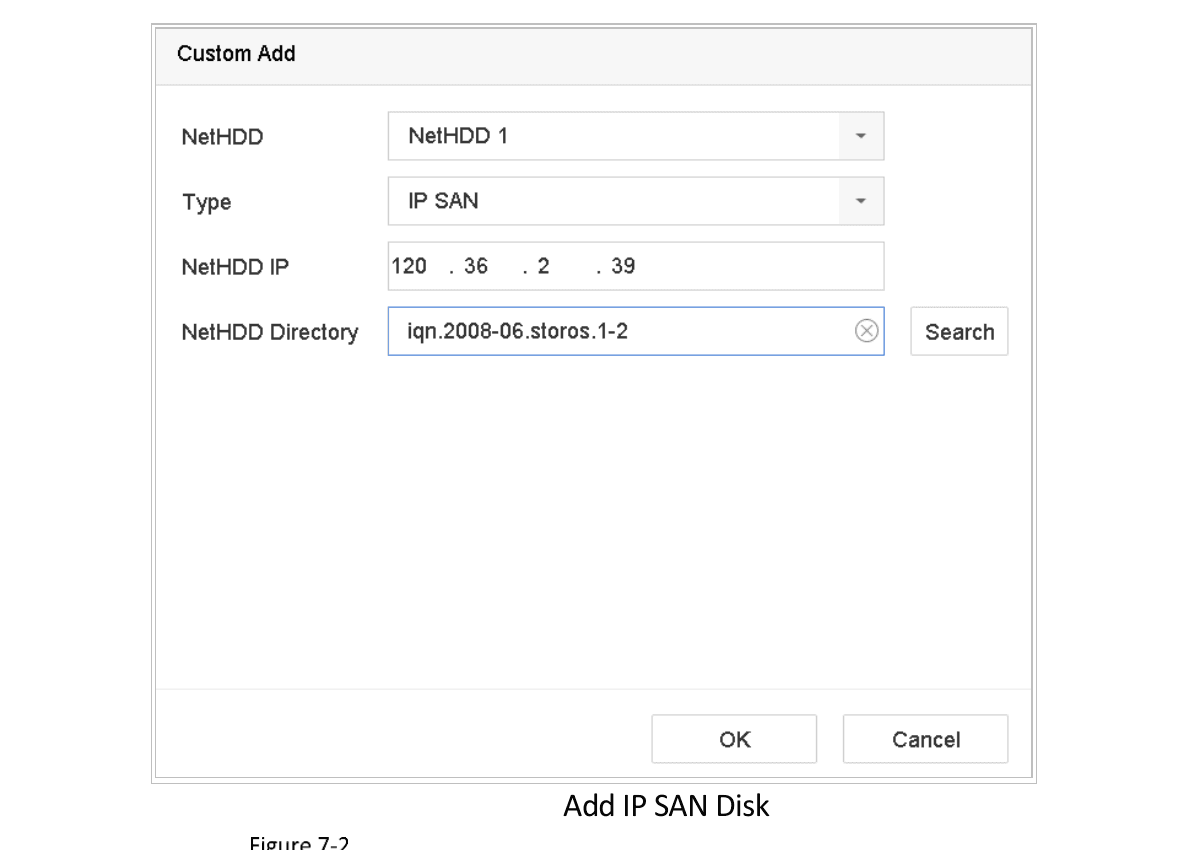
Figure 7-2 Add IP SAN Disk
Select the disk
Select the IP SAN disk from the list.
Confirm
Click OK to complete the adding of the IP SAN disk.
Up to 1 IP SAN disk can be added.
Result: After having successfully added the IP SAN disk, return to the HDD Information menu. The added NetHDD will be displayed in the list.
If the installed HDD or NetHDD is uninitialized, please select it and click Init for initialization.
Configure eSATA for Data Storage
When there is an external eSATA device connected to device, you can configure eSATA for the data storage, and you can manage the eSATA in the device.
Open the Advanced settings
Click Storage > Advanced.
Select the usage type
Select the usage type to Export or Record/Capture from the dropdown list of Usage.
- Export: Use the eSATA for backup.
- Record/Capture: Use the eSATA for record/capture. Refer to the following steps for operating instructions.
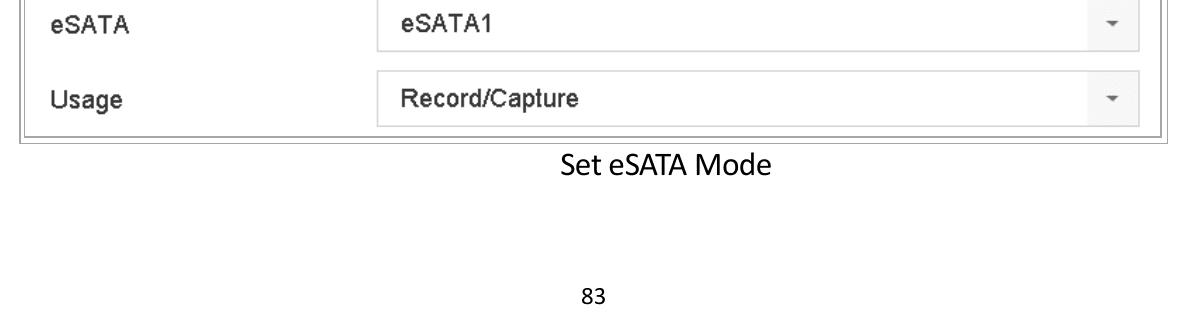
Figure 7-3 Set eSATA Mode
Enter the storage device interface
When Usage type is selected to Record/Capture, enter the storage device interface.
Edit or initialize the eSATA
Edit the property of the selected eSATA, or initialize it as required.
Storage Mode
Configure HDD Group
Purpose: Multiple HDDs can be managed in groups. Video from specified channels can be recorded onto a particular HDD group through HDD settings.
Go to Storage Device
Go to Storage > Storage Device.
Select the HDD
Select the HDD to set the group.
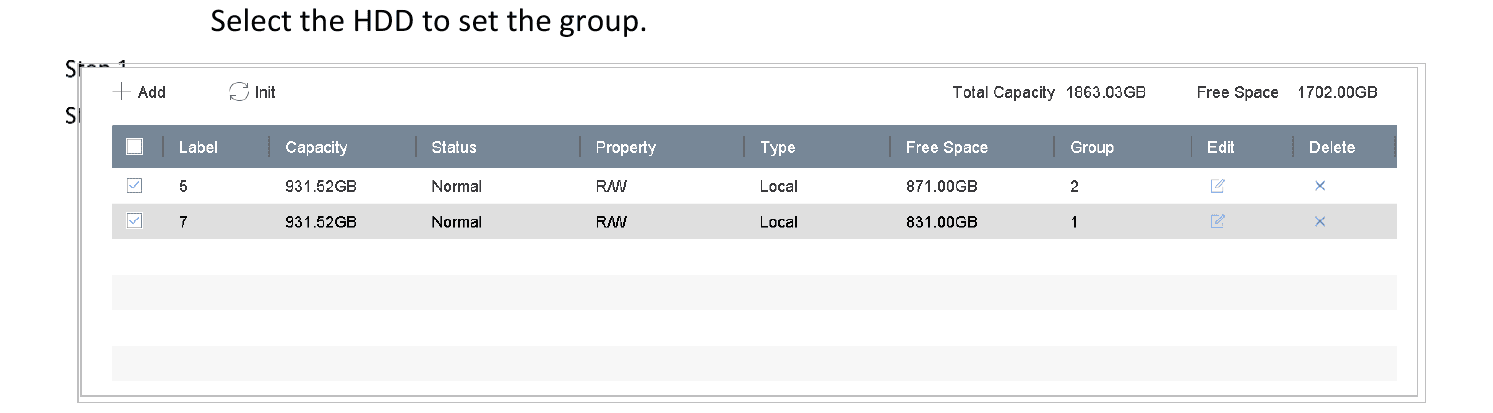
Figure 7-4 Storage Device
Open Local HDD Settings
Click  to enter the Local HDD Settings interface.
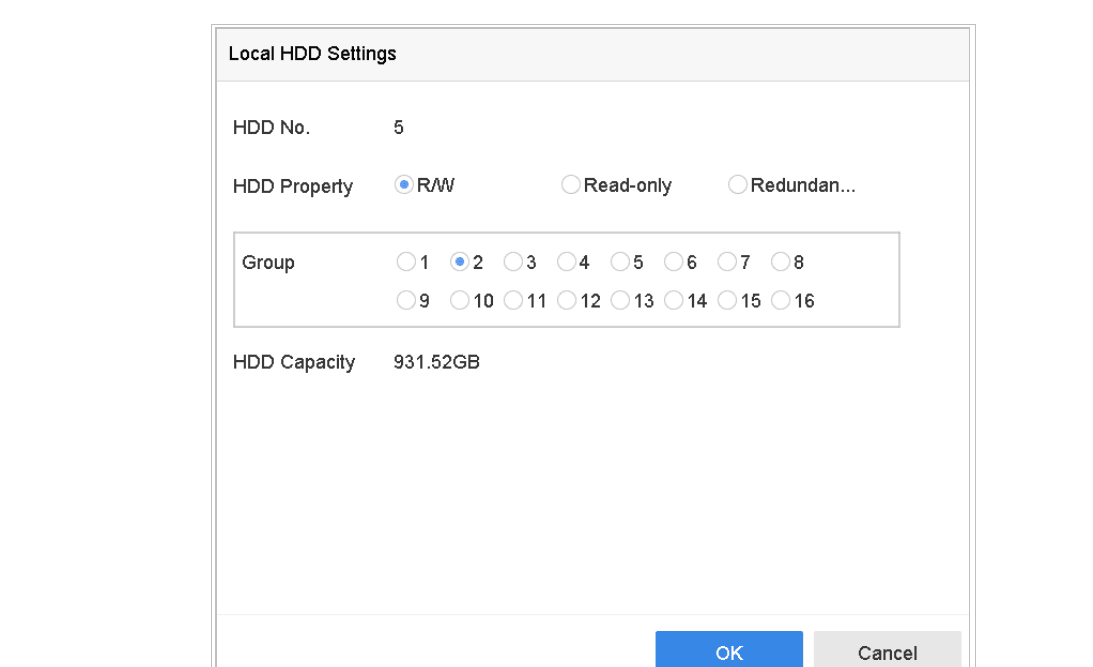
Figure 7-5 Local HDD Settings
Select the Group number
Select the Group number for the current HDD.
Confirm
Click OK.
Regroup the cameras for HDD if the HDD group number is changed.
Go to Storage Mode
Go to Storage > Storage Mode.
Select Group mode
Select Mode to Group.
Select the group number
Select the group No. from Record on HDD Group.
Select cameras
Select the IP camera(s) to record/capture on the HDD group.
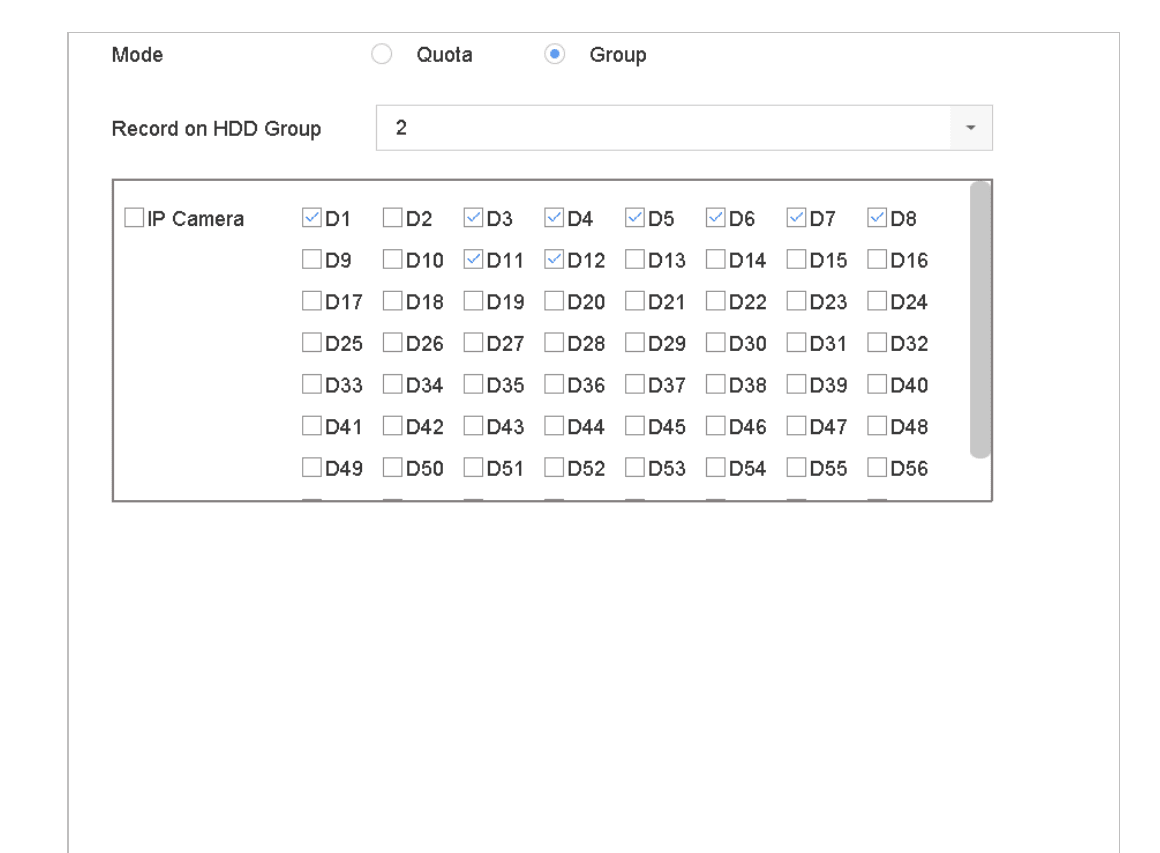
Figure 7-6 Storage Mode-HDD Group
Apply
Click Apply.
Reboot the device to activate the new storage mode settings.
Configure HDD Quota
Purpose: Each camera can be configured with allocated quota for the storage of recorded files or captured pictures.
Go to Storage Mode
Go to Storage > Storage Mode.
Select Quota mode
Select Mode to Quota.
Select a camera
Select a camera to set quota.
Enter storage capacities
Enter the storage capacity of Max. Record Capacity (GB) and Max. Picture Capacity (GB).
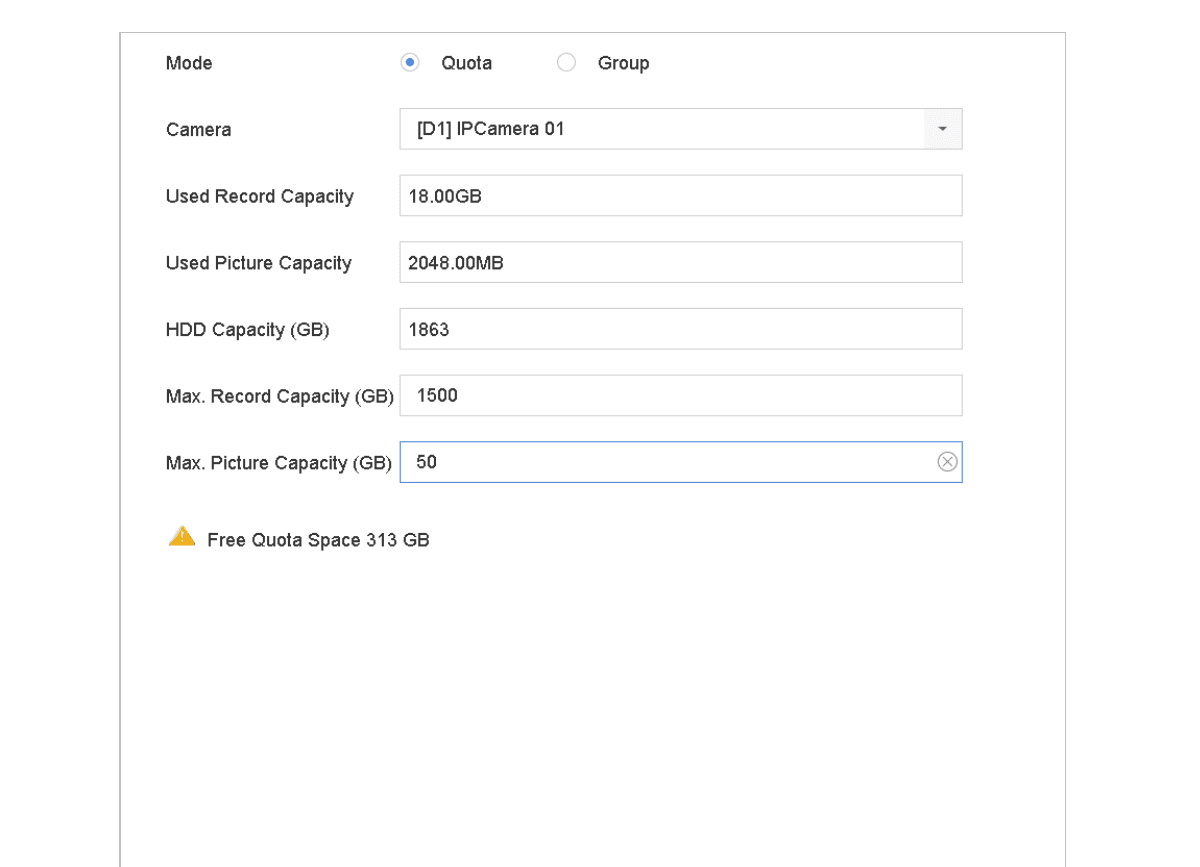
Figure 7-7 Storage Mode-HDD Quota
Copy to other cameras (optional)
(Optional) You can click Copy to if you want to copy the quota settings of the current camera to other cameras.
Apply
Click Apply to apply the settings. Reboot the device to activate the new storage mode settings.
When the quota capacity is set to 0, all cameras will use the total capacity of HDD for record and picture capture.
Recording Parameters
Main Stream
The Main Stream refers to the primary stream that affects data recorded to the hard disk drive and will directly determine your recording quality and image size.
Comparing with the sub-stream, the main stream can provide a higher quality video with higher resolution and frame rate.
- Frame Rate (FPS — Frames Per Second): refers to how many frames are captured each second. A higher frame rate is advantageous when there is movement in the video stream, as it maintains image quality throughout.
- Resolution: Image resolution is a measure of how much detail a digital image can hold: the greater the resolution, the greater the level of detail. Resolution can be specified as the number of pixel-columns (width) by the number of pixel-rows (height), e.g., 1024×768.
- Bitrate: The bit rate (in kbit/s or Mbit/s) is often referred to as speed, but actually defines the number of bits/time unit and not distance/time unit.
- Enable H.264+ Mode: The H.264+ mode helps to ensure the high video quality with a lowered bitrate. It can effectively reduce the need of bandwidth and HDD storage space.
A higher resolution, frame rate and bitrate setting will provide you the better video quality, but it will also require more internet bandwidth and use more storage space on the hard disk drive.
Sub-Stream
The sub-stream is a second codec that runs alongside the mainstream. It allows you to reduce the outgoing internet bandwidth without sacrificing your direct recording quality.
The sub-stream is often exclusively used by smartphone applications to view live video. Users with limited internet speeds may benefit most from this setting.
Picture
The picture refers to the live picture capture in continuous or event recording type.
- Picture Quality: set the picture quality to low, medium or high. The higher picture quality results in more storage space requirement.
- Interval: the interval of capturing live picture.
Configure Advanced Recording Settings
Go to Record Schedule
Go to Storage > Record Schedule.
Enable scheduling
Check Enable Schedule to enable scheduled recording.
Open Advanced settings
Click Advanced to set the recording parameters.
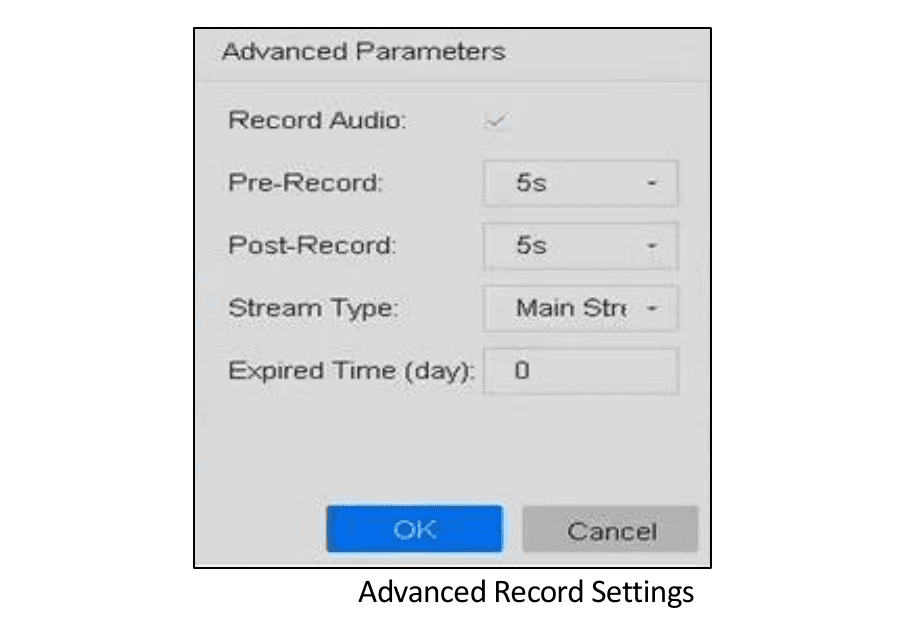
Figure 7-8 Advanced Record Settings
- Record Audio: Check the checkbox to enable or disable audio recording.
- Pre-record: The time you set to record before the scheduled time or event. For example, when an alarm triggers the recording at 10:00, and if you set the pre-record time as 5 seconds, the camera records at 9:59:55.
- Post-record: The time you set to record after the event or the scheduled time. For example, when an alarm triggered recording ends at 11:00, and if you set the post-record time as 5 seconds, it records till 11:00:05.
- Expired Time: The expired time is period for a recorded file to be kept in the HDD. When the deadline is reached, the file will be deleted. If you set the expired time to 0, the file will not be deleted. The actual keeping time for the file should be determined by the capacity of the HDD.
- Redundant Record/Capture: By enabling redundant record or capture you save the record and captured picture in the redundant HDD. See Configure Redundant Recording and Capture.
- Stream Type: Main stream and sub-stream are selectable for recording. When you select sub-stream, you can record for a longer time with the same storage space. For iDS-7200HQHI-K/S and iDS-7200HUHI-K/S series, the default value is dual stream, this value cannot be edited.
Confirm
Click OK to save the settings.
Configure Recording Schedule
Set the record schedule, and then the camera automatically starts/stops recording according to the configured schedule.
Before you start:
Make sure you have installed the HDDs to the device or added the network disks before you storing the video files, pictures and log files. Refer to the Quick Start Guide for the HDD installation. Refer to Add the Network Disk for network HDD connections.
Go to Recording Schedule
Go to Storage > Recording Schedule.
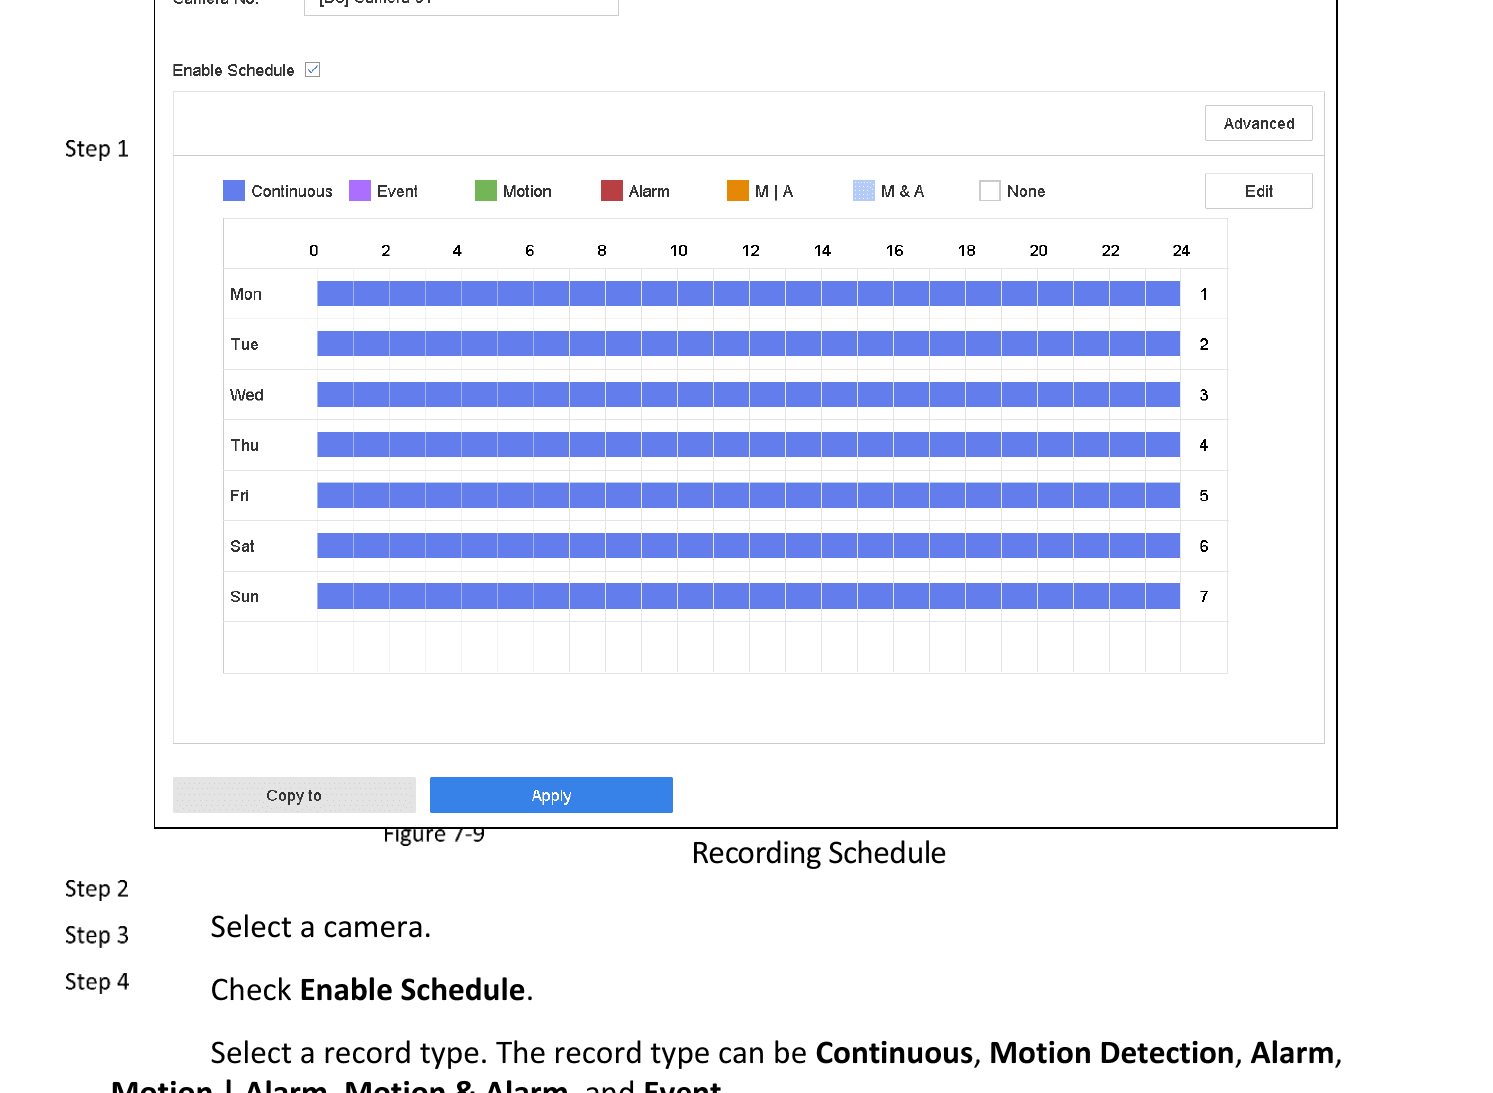
Figure 7-9 Recording Schedule
Select a camera
Select a camera.
Enable the schedule
Check Enable Schedule.
Select a record type
Select a record type. The record type can be Continuous, Motion Detection, Alarm, Motion | Alarm, Motion & Alarm, and Event.
Different recording types are configurable:
- Continuous: scheduled recording.
- Event: recording triggered by all event triggered alarm.
- Motion: recording triggered by motion detection.
- Alarm: recording triggered by alarm.
- M/A: recording triggered by either motion detection or alarm.
- M&A: recording triggered by motion detection and alarm.
Draw the schedule
Select a day and click-and-drag the mouse on the time bar to set the record schedule.
Repeat for other days
Repeat the above steps to schedule recording or capture for other days in the week.
Apply
Click Apply to save the settings.
The all-day continuous recording is configured for the device by factory default.
To enable Motion, Alarm, M | A (motion or alarm), M & A (motion and alarm) and Event triggered recording and capture, you must configure the motion detection settings, alarm input settings and other events as well.
Configure Continuous Recording
Set encoding parameters
Go to Camera > Encoding Parameters > Recording Parameters. Set the parameters for the camera.
Go to Recording Schedule
Go to Storage > Recording Schedule.
Select Continuous type
Select the recording type to Continuous.
Draw the schedule
Drag the mouse on the time bar to set the continuous recording schedule. Refer to Configure Recording Schedule for details.
Configure Motion Detection Triggered Recording
You can configure the recording triggered by the motion detection event.
Configure motion detection
Go to System > Event > Normal Event > Motion Detection. Configure the motion detection and select the channel(s) to trigger the recording when motion event occurs.
Set recording parameters
Go to Camera > Encoding Parameters > Recording Parameters. Set the event main stream/sub-stream recording parameters for the camera.
Go to Recording Schedule
Go to Storage > Recording Schedule.
Select Motion type
Select the recording type to Motion.
Draw the schedule
Drag the mouse on the time bar to set the motion detection recording schedule. Refer to Configure Recording Schedule for details.
Configure Event Triggered Recording
You can configure the recording triggered by the motion detection, motion detection and alarm, face detection, vehicle detection, line crossing detection, etc.
Configure event detection
Go to System > Event. Configure the event detection and select the channel(s) to trigger the recording when event occurs.
Set recording parameters
Go to Camera > Encoding Parameters > Recording Parameters. Set the event main stream/sub-stream recording parameters for the camera.
Go to Recording Schedule
Go to Storage > Recording Schedule.
Select Event type
Select the recording type to Event.
Draw the schedule
Drag the mouse on the time bar to set the event detection recording schedule. Refer to Configure Recording Schedule for details.
Configure Alarm Triggered Recording
You can configure the recording triggered by the motion detection, face detection, vehicle detection, line crossing detection, etc.
Configure alarm input
Go to System > Event > Normal Event > Alarm Input. Configure the alarm input and select the channel(s) to trigger the recording when alarm occurs.
Set recording parameters
Go to Camera > Encoding Parameters > Recording Parameters. Set the event main stream/sub-stream recording parameters for the camera.
Go to Recording Schedule
Go to Storage > Recording Schedule.
Select Alarm type
Select the recording type to Alarm.
Draw the schedule
Drag the mouse on the time bar to set the alarm recording schedule. Refer to Configure Recording Schedule for details.
Configure Picture Capture
The picture refers to the live picture capture in continuous or event recording type.
Set picture parameters
Go to Camera > Encoding Parameters > Capture. Set the picture parameters:
- Resolution: set the resolution of the picture to capture.
- Picture Quality: set the picture quality to low, medium or high. The higher picture quality results in more storage space requirement.
- Interval: the interval of capturing live picture.
Go to Capture Schedule
Go to Storage > Capture Schedule.
Select the camera
Select the camera to configure the picture capture.
Set the capture schedule
Set the picture capture schedule.
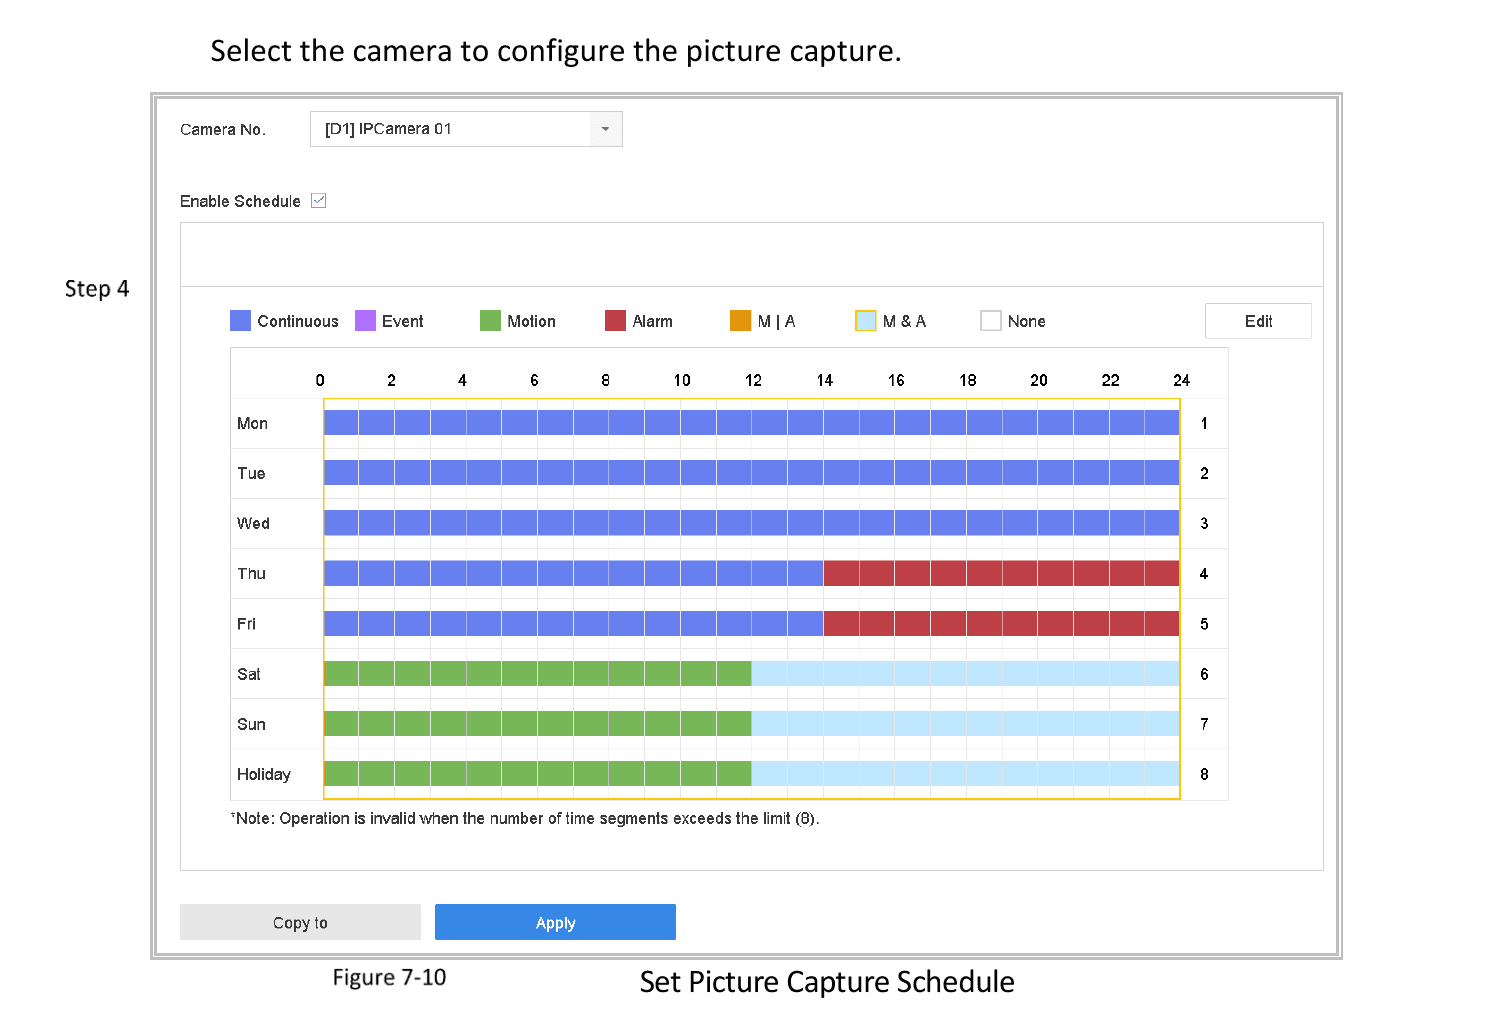
Figure 7-10 Set Picture Capture Schedule
Apply
Set the picture capture schedule. Refer to Configure Recording Schedule for details.
Configure Holiday Recording and Capture
Purpose: Follow the steps to configure the record or capture schedule on holiday for that year. You may want to have different plan for recording and capture on holiday.
Go to Holiday settings
Go to System > Holiday.
Select and edit a holiday
Select a holiday item from the list and click .
Enable and configure the holiday
Check the Enable to configure the holiday.
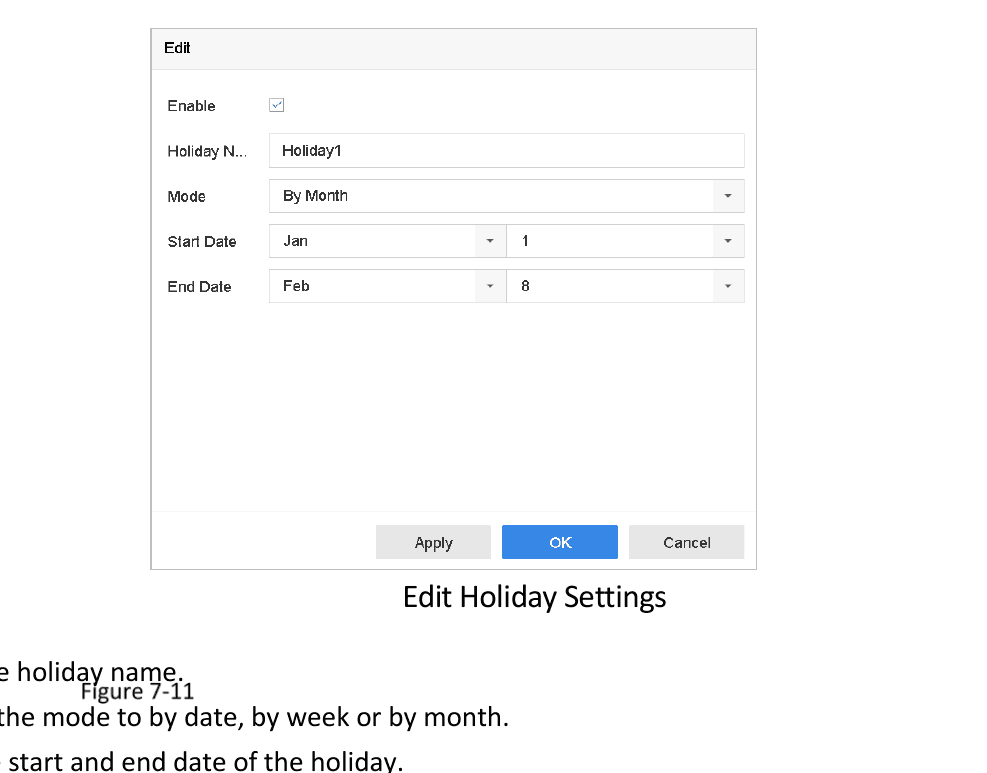
Figure 7-11 Edit Holiday Settings
- Edit the holiday name.
- Select the mode to by date, by week or by month.
- Set the start and end date of the holiday.
- Click OK.
Set the holiday schedule
Set the schedule for the holiday recording. Refer to Configure Recording Schedule for details.
Configure Redundant Recording and Capture
Purpose: Enabling redundant recording and capture, which means saving the record files and captured pictures not only in the R/W HDD but also in the redundant HDD, will effectively enhance the data safety and reliability.
You must set the storage mode to Group before you set the HDD property to Redundancy. For detailed information, please refer to Configure HDD Group. There should be at least another HDD which is in Read/Write status.
Go to Storage Device
Go to Storage > Storage Device.
Set HDD property to Redundancy
Select a HDD from the list and click to enter the Local HDD Settings interface. Set the HDD property to Redundancy.
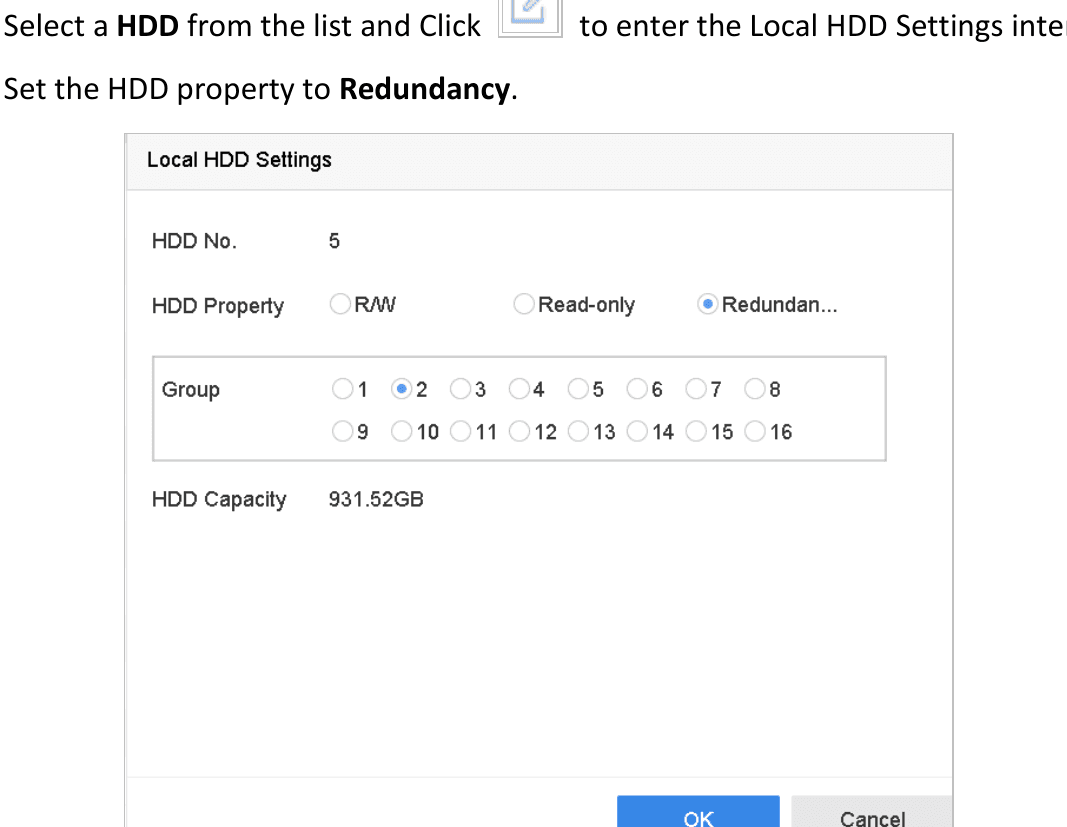
Figure 7-12 HDD Property-Redundancy
Go to Record/Capture Schedule
Go to Storage > Schedule Settings > Record Schedule/Capture Schedule.
Open Advanced recording parameters
Click Advanced to set the camera recording parameters.
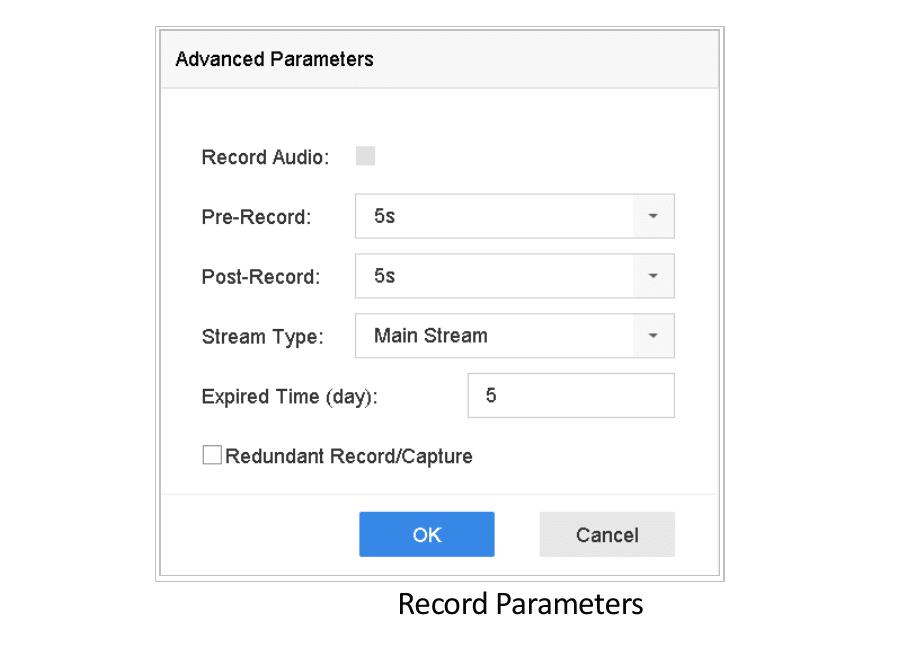
Figure 7-13 Record Parameters
Enable Redundant Record/Capture
Check the checkbox of Redundant Record/Capture.
Confirm
Click OK to save settings.
Configure 1080p Lite
Purpose: When the 1080P Lite Mode is enabled, the encoding resolution at 1080P Lite (real-time) is supported. If not, up to 1080P (non-real-time) is supported.
This section is applicable to HQHI series DVR.
Enable the 1080P Lite Mode
Open the Advanced interface
Go to Menu > Record > Advanced.
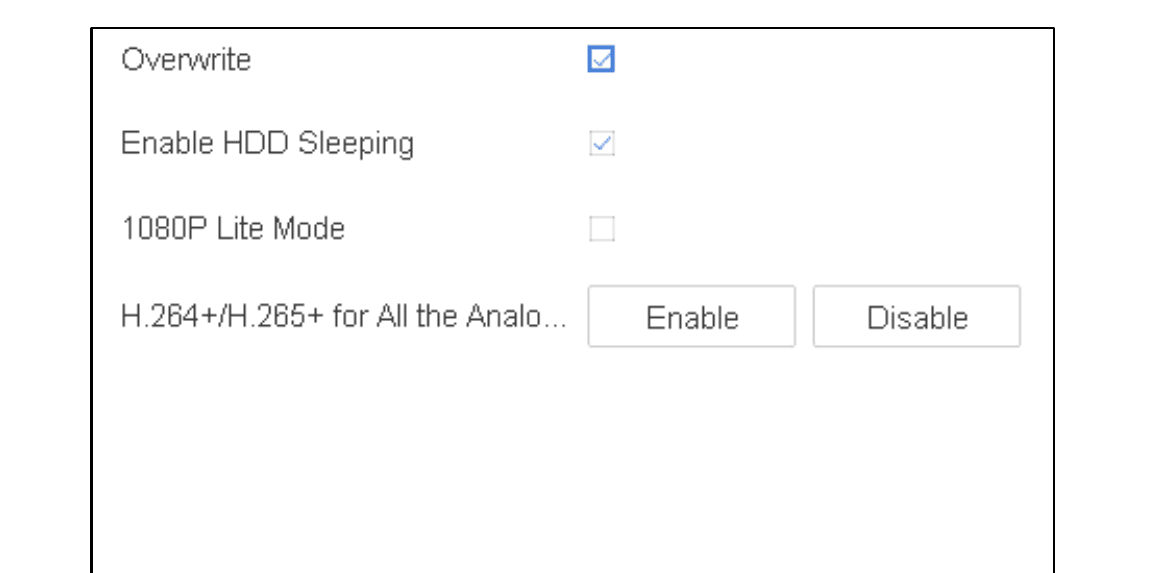
Figure 7-14 Advanced Interface
Enable 1080P Lite Mode
Check the checkbox of 1080P Lite Mode and click Apply to pop up the attention box. After enabling 1080p lite mode, the 3 MP signal is not accessible to analog channel.
Reboot
Click Yes in popup message box to reboot the device to have new settings taken effect.
Disable the 1080P Lite Mode
Open the Advanced interface
Go to Menu > Record > Advanced.
Disable 1080P Lite Mode
Uncheck the checkbox of 1080P Lite Mode and click Apply. The following attention box pops up.
Confirm or revert
Click Yes in popup message box to reboot the device to activate the new settings or No to restore the old settings.
PTZ Control
Complete guide to PTZ Control for the Turbo HD DVR GUI 4.0, covering the PTZ Control Wizard, configuring PTZ parameters, presets, patrols, patterns, linear scan limits, one-touch park, and auxiliary functions.
Disk Array
Configure software RAID disk arrays on the Turbo HD DVR: create, rebuild, delete arrays, manage hot spare disks, and check firmware.