 Centrum pomocy LTS Connect
Camera
Register and manage remote network cameras on the Sapphire NVR, including changing IP addresses, importing and exporting device lists, remote device initialization, image, encode and snapshot settings, channel name, remote upgrade, and remote device status and firmware information.
Camera
Connection
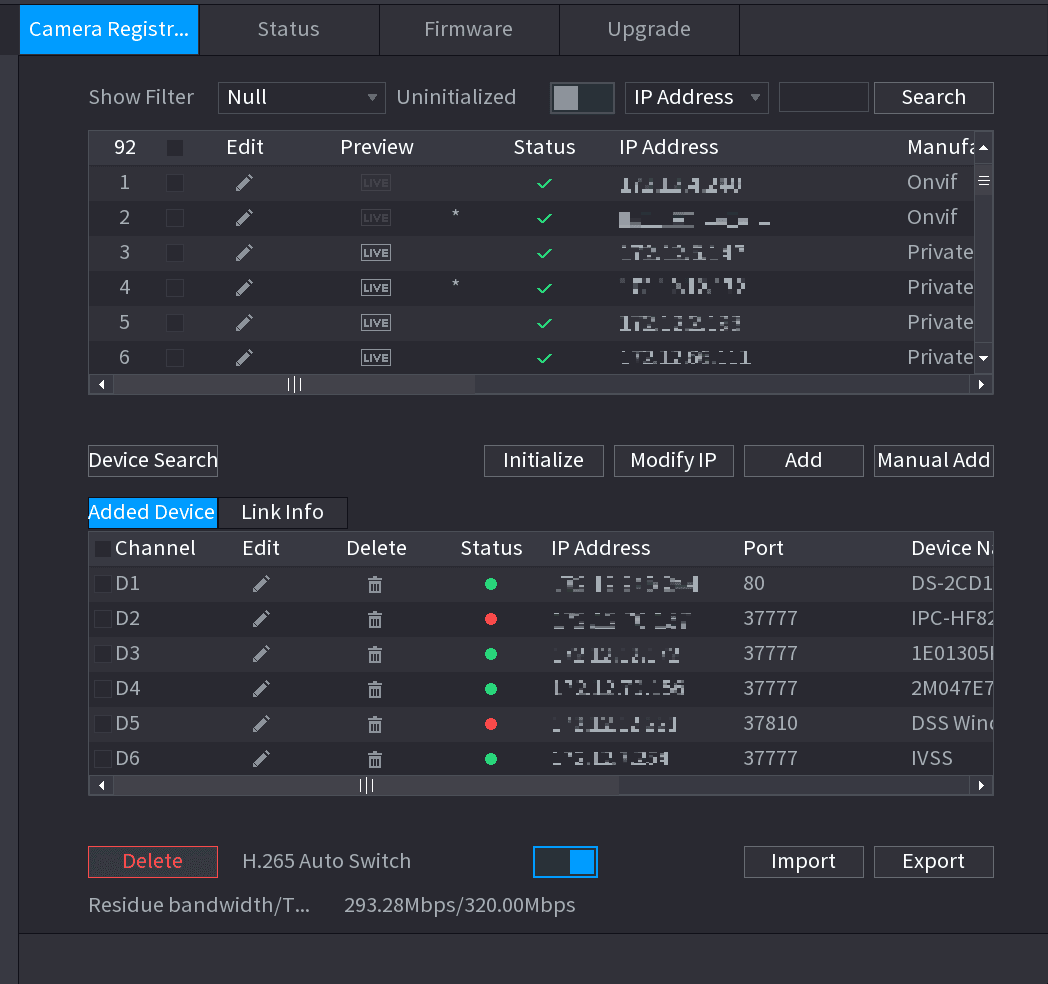
Select Main menu > REGISTRATION > Camera Registration, you can register the remote device. See Figure 4-43.
After register the remote device to the NVR, you can view the video on the NVR, and manage and storage the video file. Different series products support different remote device amount.
Changing IP address
Open the Modify IP interface
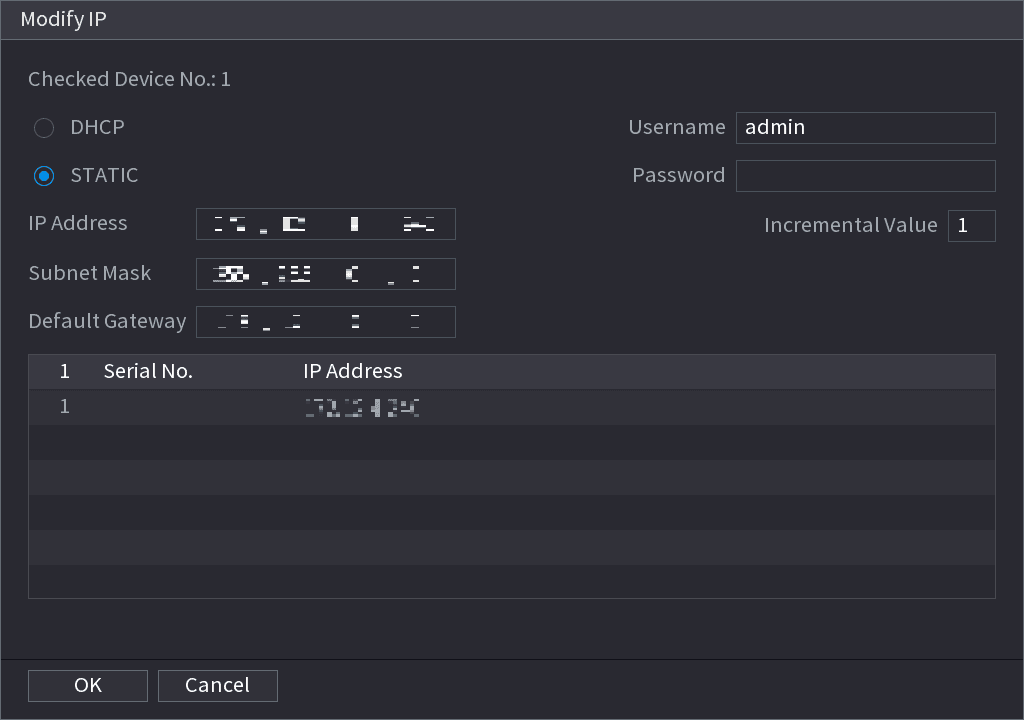
Select Main Menu > REGISTRATION > Camera Registration, check the box before the camera name and then click Modify IP or click the pencil icon before the camera name. Enter Modify IP interface. See Figure 4-44.
Check the box before several cameras, change the IP addresses of several cameras at the same time.
Select IP mode
- Check DHCP, there is no need to input IP address, subnet mask, and default gateway. Device automatically allocates the IP address to the camera.
- Check Static, and then input IP address, subnet mask, default gateway and incremental value.
- If it is to change several devices IP addresses at the same time, input incremental value. Device can add the fourth address of the IP address one by one to automatically allocate the IP addresses.
- If there is IP conflict when changing static IP address, device pops up IP conflict dialogue box. If batch change IP address, device automatically skips the conflicted IP and begin the allocation according to the incremental value.
Input remote device user name and password
When change IP addresses of several devices at the same time, make sure the cameras user name and passwords are the same.
Save the settings
Click OK button to save settings.
After the modification and then search again, device displays new IP address.
Auto Changing H.265
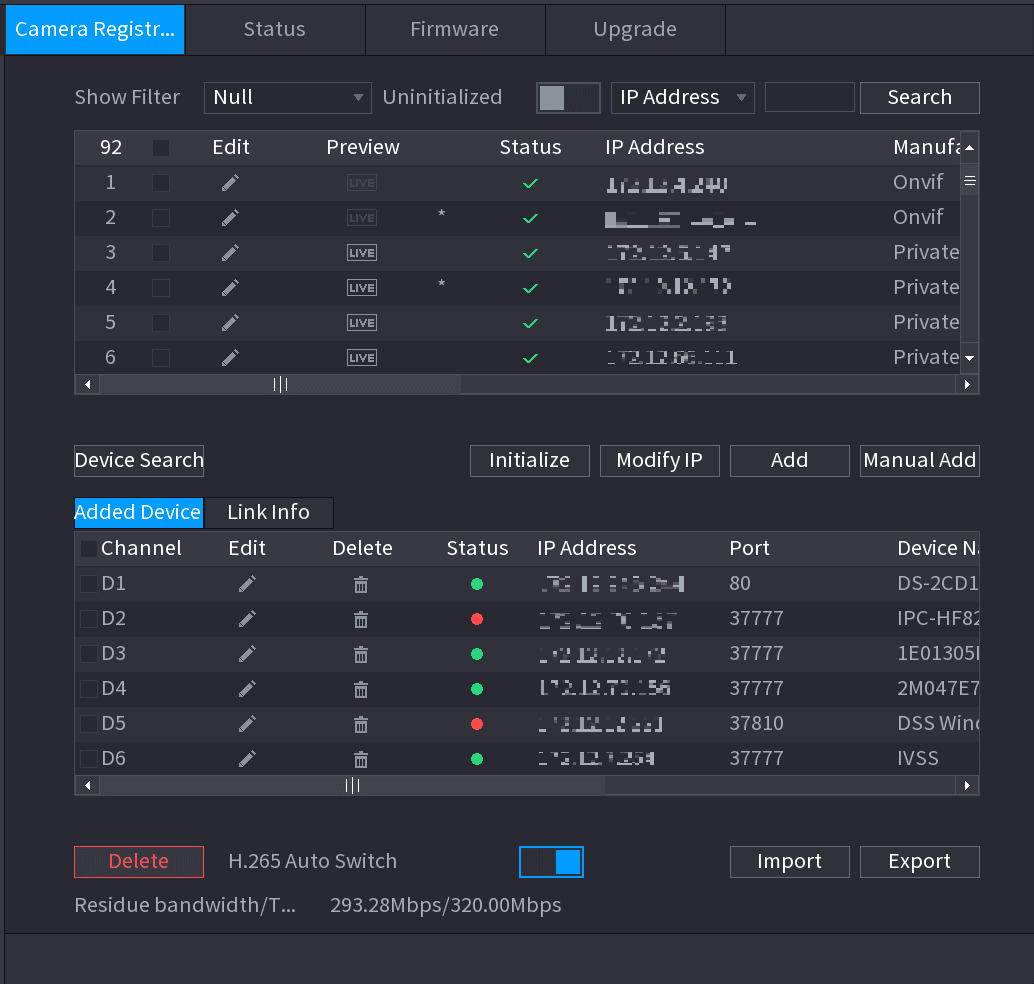
For the remote device that first registered to the system, it can automatically adopts encode format as H.265 if you enable H.265 Auto switch function.
Click H.265 Auto Switch button at the bottom of the interface, it changes from off to on. The function is enabled. See Figure 4-45.
IP Export
Device can export the Added device list to your local USB device.
Open the Browse interface
Insert the USB device and then click the Export button.
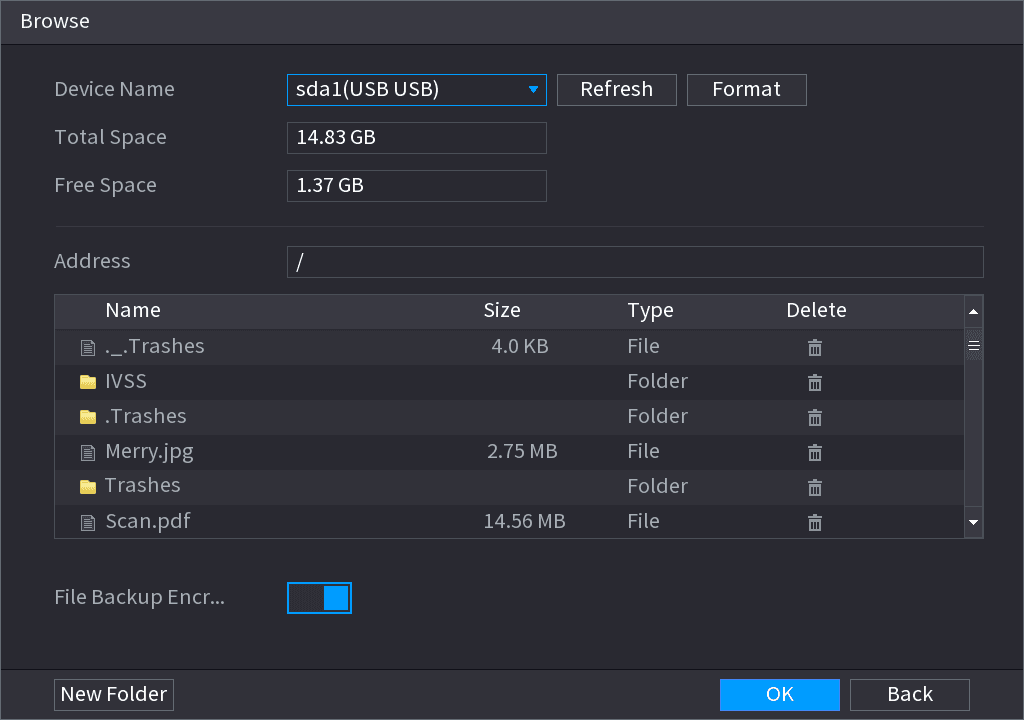
The Browse interface is displayed. See Figure 4-46.
Select the address
Select Address to save export file.
Confirm the export
Click the OK button.
Device pops up a dialogue box to remind you successfully exported.
When exporting IP address, the File Backup Encryption check box is checked by default. The file information includes IP address, port, channel number, manufacturer, user name, and password.
- If you select the File Backup Encryption check box, the file format is .backup.
- If you clear the File Backup Encryption check box, the file format is .csv. In this case, there might be a risk of data leakage.
IP Import
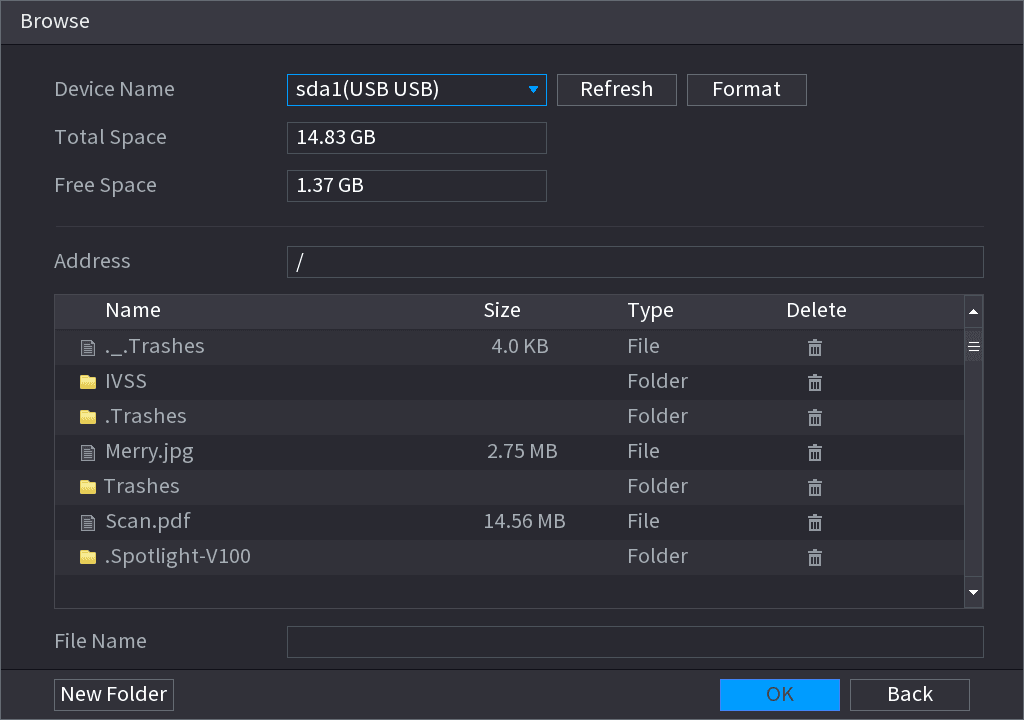
Select the import file
Go to Address to select the import file and then click the OK button.
System pops up a dialogue box to remind you successfully imported.
If the imported IP has conflicted with current added device, system pops up a dialogue box to remind you. You have two options.
Remote Device Initialization
Remote device initialization can change remote device login password and IP address.
- When connect a camera to the NVR via PoE port, NVR automatically initialize the camera. The camera adopts NVR current password and email information by default.
- When connect a camera to the NVR via PoE port after NVR upgraded to the new version, the NVR may fail to initialize the camera. Go to the Registration interface to initialize the camera.
Open the Camera Registration interface
Select Main Menu > CAMERA > Camera Registration.
The Camera Registration interface is displayed.
Search for uninitialized cameras
Click Device Search and then click Uninitialized.
Device displays camera(s) to be initialized.
Initialize the camera
Select a camera to be initialized and then click Initialize.
The Enter Password interface is displayed. See Figure 4-48.
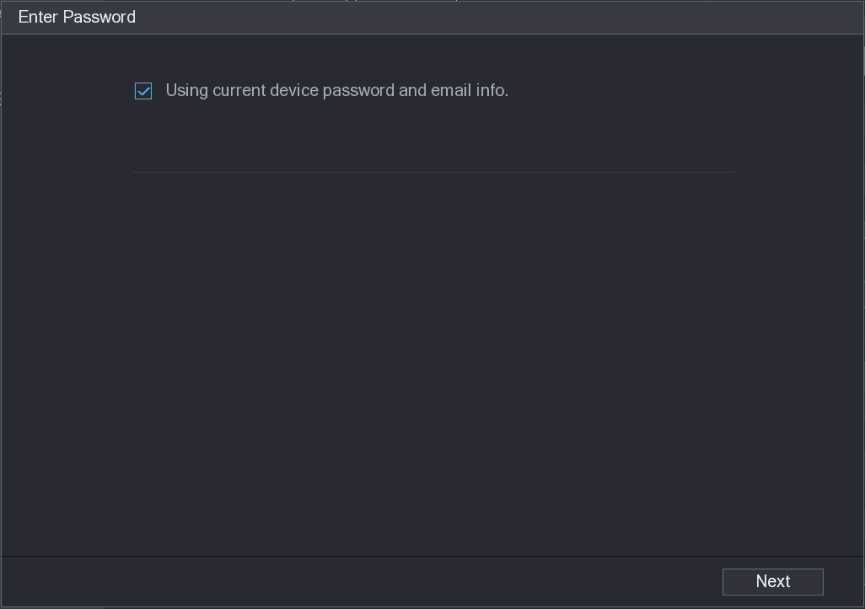
Set remote device password and email information
If you want to use current device password and email information, the remote device automatically uses NVR admin account information (login password and email). There is no need to set password and email. Go to step 6.
-
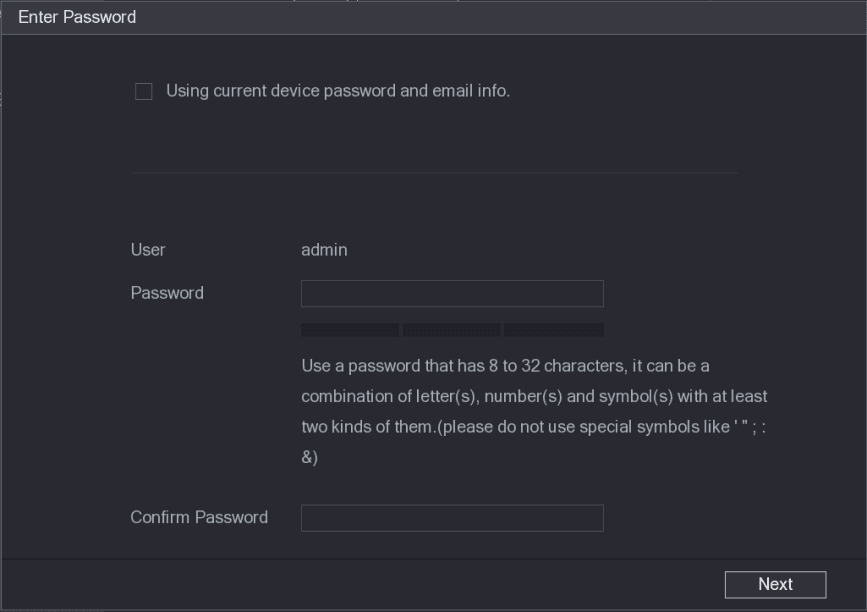
Cancel Using current device password and email info.
The Enter Password interface is displayed. See Figure 4-49.
-
Configure parameters. See Table 4-10.
| Parameter | Description |
|---|---|
| User | The default is admin. |
| Password | The new password can be set from 8 characters through 32 characters and contains at least two types from number, letter and special characters (excluding "'", """, ";", ":" and "&"). |
| Confirm Password | Enter a strong password according to the password strength bar indication. |
For your device own safety, create a strong password of your own choosing. We also recommend you change your password periodically especially in the high security system.
Open the Password Protection interface
Click Next button.
The Password Protection interface is displayed. See Figure 4-50.
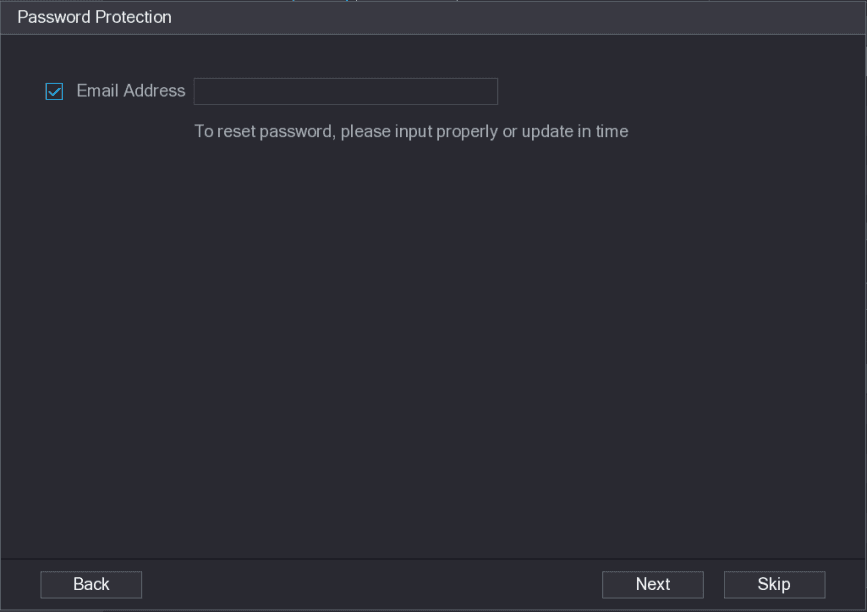
Set email information
Input an email address for reset password purpose.
Cancel the box and then click Next or Skip if you do not want to input email information here.
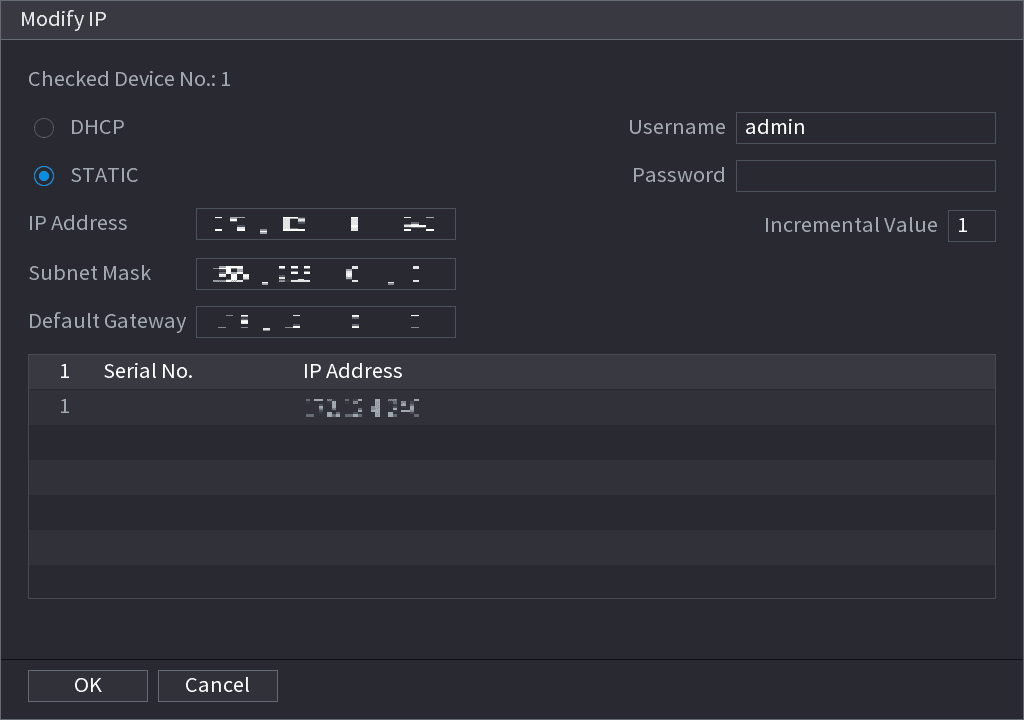
Set camera IP address
- Check DHCP, there is no need to input IP address, subnet mask, and default gateway. Device automatically allocates the IP address to the camera.
- Check Static, and then input IP address, subnet mask, default gateway and incremental value.
- If it is to change several devices IP addresses at the same time, input incremental value. Device can add the fourth address of the IP address one by one to automatically allocate the IP addresses.
- If there is IP conflict when changing static IP address, device pops up IP conflict dialogue box. If batch change IP address, device automatically skips the conflicted IP and begin the allocation according to the incremental value.
Open the Device Initialization interface
Click Next button.
The Device Initialization interface is displayed. See Figure 4-52.
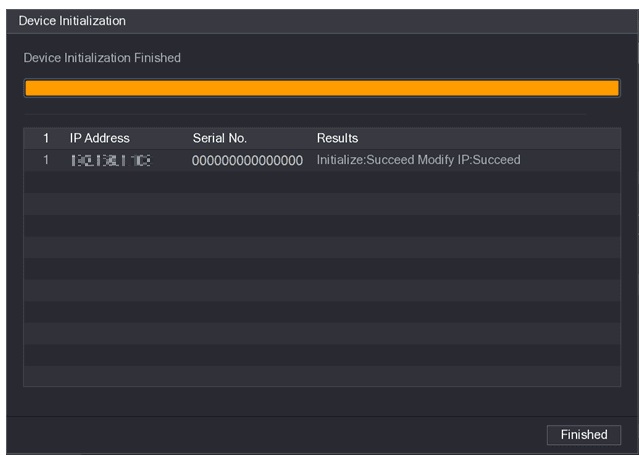
Complete the setup
Click Finished to complete the setup.
Short-Cut Menu to Register Camera
If you have not registered a remote device to a channel, go to the preview interface to add.
Move the mouse to the window
On the Preview interface, Move your mouse to window.
There is an icon "+" on the channel window. See Figure 4-53.

Add the network camera
Click "+", device pops up interface to add network camera. Refer to 4.1.4.4 Registration for detailed information.
Image
You can set network camera parameters according to different environments. It is to get the best video effect.
Open the IMAGE interface
Select Main Menu > CAMERA > IMAGE.
The IMAGE interface is displayed. See Figure 4-54.
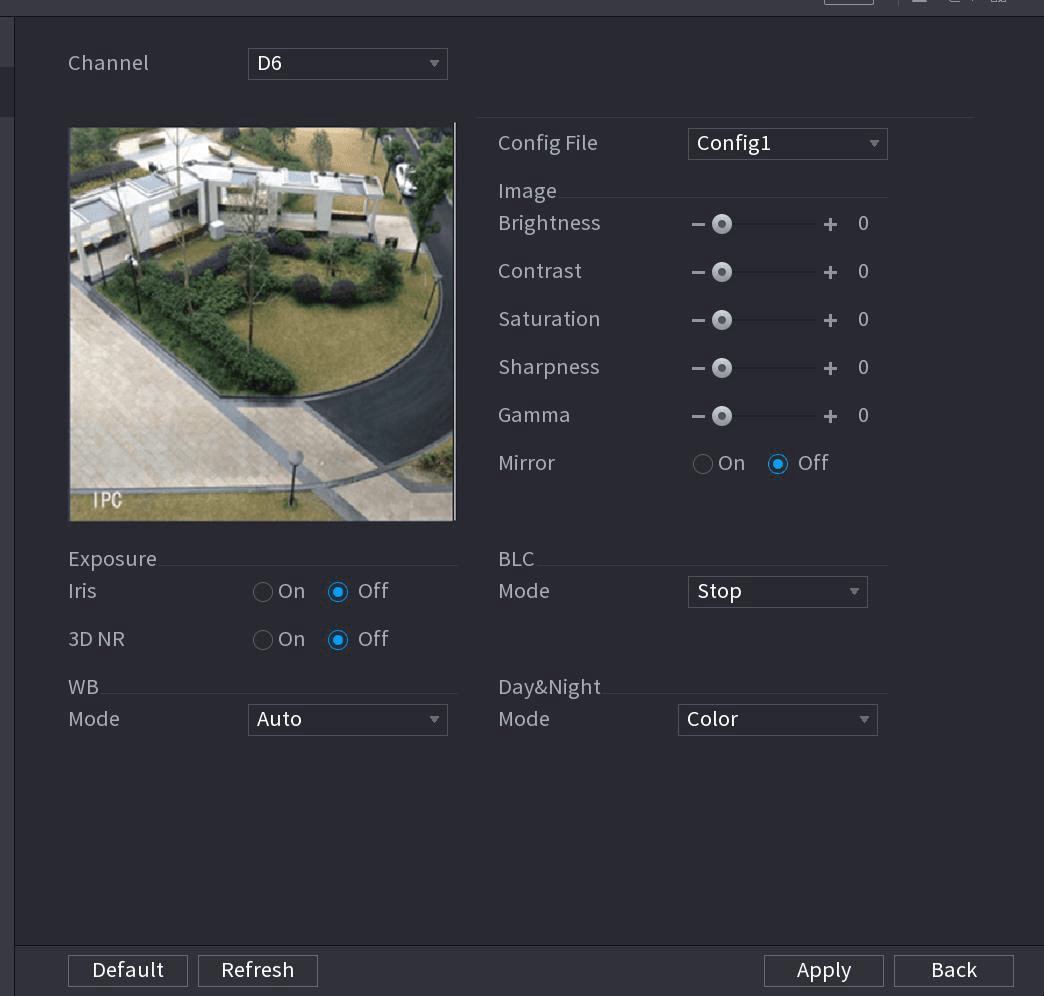
Configure parameters
Configure parameters. See Table 4-11.
Different series network camera displays different parameters. The actual product shall prevail.
| Parameter | Description |
|---|---|
| Channel | In the Channel list, select the channel that you want to configure. |
| Config File | There are three config files for you. System has configured the corresponding parameters for each file, you can select according to your actual situation. |
| Brightness | Adjusts the image brightness. The bigger the value is, the brighter the image will become. Adjusts the brightness according to actual environment. |
| Contrast | Adjusts the image contrast. The bigger the value is, the more obvious the contrast between the light area and dark area will become. Adjusts the contrast according to actual environment. |
| Saturation | Adjusts the color shades. The bigger the value, the lighter the color will become. Adjusts the saturation according to actual environment. |
| Sharpness | Adjusts the sharpness of image edge. The bigger the value is, the more obvious the image edge is. Adjusts the sharpness according to actual environment. |
| Gamma | It is to adjust image brightness and enhance the image dynamic display range. The bigger the value is, the more bright the video is. |
| Mirror | Enable the function, the left and right side of the video image will be switched. It is disabled by default. This function is for some series products only. |
| Field of view | It is to set monitor video display direction. It includes normal, reflection, lobby 1, lobby 2. |
| Exposure |
|
| BLC | You can set camera BLC mode.
|
| WB |
|
| Day & Night | Configure the color and black&white mode of the image. This setting is not affected by the configuration files. The default setting is Auto.
|
Apply the settings
Click Apply.
Encode
You can set video bit stream and image parameters.
Encode
You can set video bit stream parameters such as bit stream type, compression, resolution.
Some series products support three streams: main stream, sub stream 1, sub stream 2. The sub stream maximally supports 1080P.
Open the ENCODE interface
Select Main menu > CAMERA > ENCODE > ENCODE.
The ENCODE interface is displayed. See Figure 4-55.
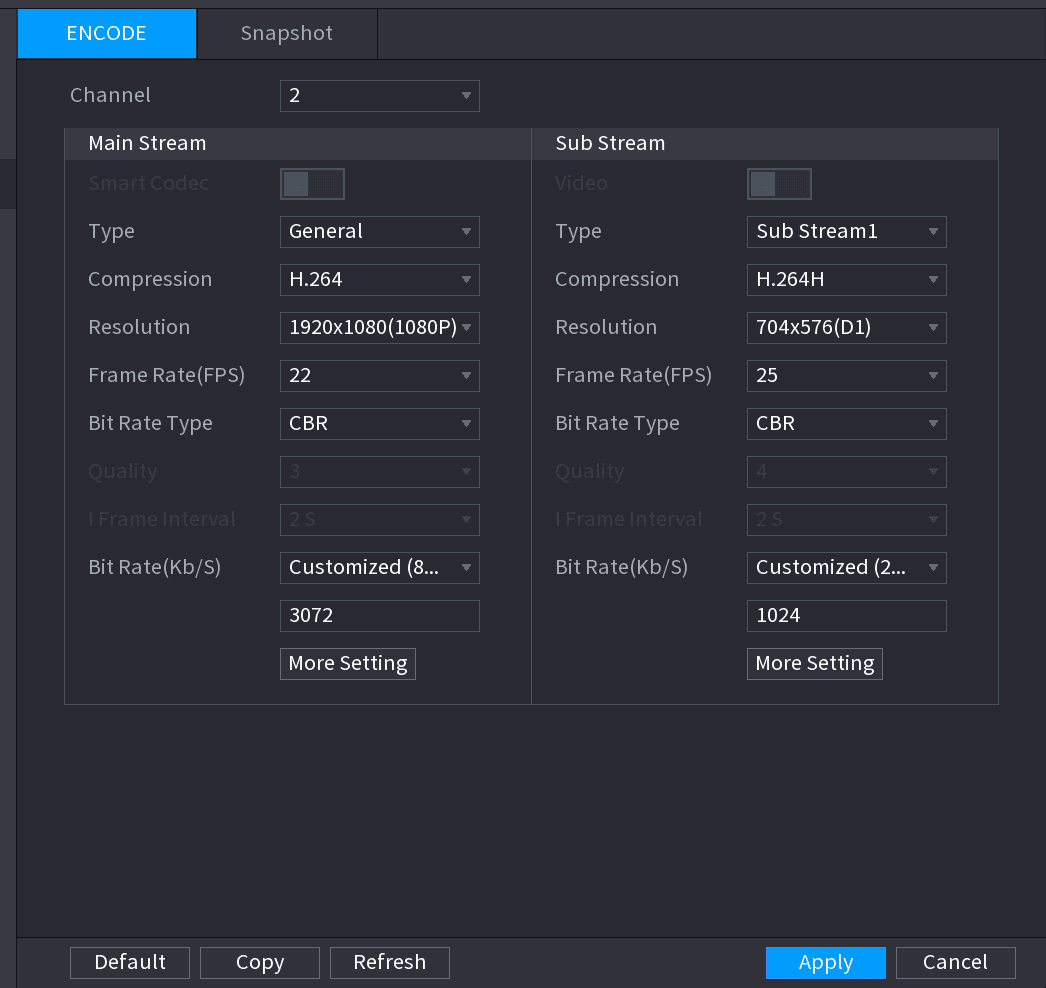
Configure parameters
Configure parameters. See Table 4-12.
| Parameter | Description |
|---|---|
| Channel | In the Channel list, select the channel that you want to configure the settings for. |
| Smart Codec | Enable the smart codec function. This function can reduce the video bit stream for non-important recorded video to maximize the storage space.
|
| Type |
|
| Compression | In the Compression list, select the encode mode.
|
| Resolution | In the Resolution list, select resolution for the video. The maximum video resolution might be different dependent on your device model. |
| Frame Rate (FPS) | Configure the frames per second for the video. The higher the value is, the clearer and smoother the image will become. Frame rate changes along with the resolution. Generally, in PAL format, you can select the value from 1 through 25; in NTSC format, you can select the value from 1 through 30. However, the actual range of frame rate that you can select depends on the capability of the Device. |
| Bit Rate Type | In the Bit Rate Type list, select CBR (Constant Bit Rate) or VBR (Variable Bit Rate). If you select CBR, the image quality cannot be configured; if you select VBR, the image quality can be configured. |
| Quality | This function is available if you select VBR in the Bit Rate List. The bigger the value is, the better the image will become. |
| I Frame Interval | The interval between two reference frames. |
| Bit Rate (Kb/S) | In the Bit Rate list, select a value or enter a customized value to change the image quality. The bigger the value is, the better the image will become. |
Open the More Setting interface
Click More Setting.
The More Setting interface is displayed. See Figure 4-56.
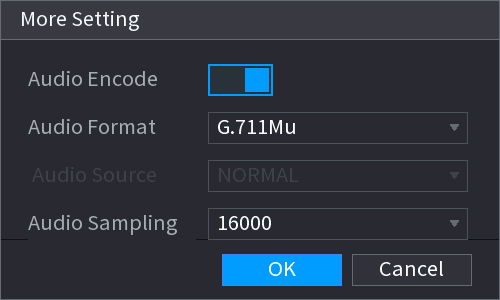
Configure parameters
Configure parameters. See Table 4-13.
| Parameter | Description |
|---|---|
| Audio Encode | This function is enabled by default for main stream. You need to manually enable it for sub stream 1. Once this function is enabled, the recorded video file is composite audio and video stream. |
| Audio Format | In the Audio Format list, select a format: G711a, G711u, PCM, AAC. |
| Audio Sampling | In the Audio Sampling list, you can select audio sampling rate. |
Apply the settings
Click Apply.
Snapshot
You can set snapshot mode, image size, quality and interval.
Open the SNAPSHOT interface
Select Main menu > CAMERA > ENCODE > Snapshot.
The SNAPSHOT interface is displayed. See Figure 4-57.
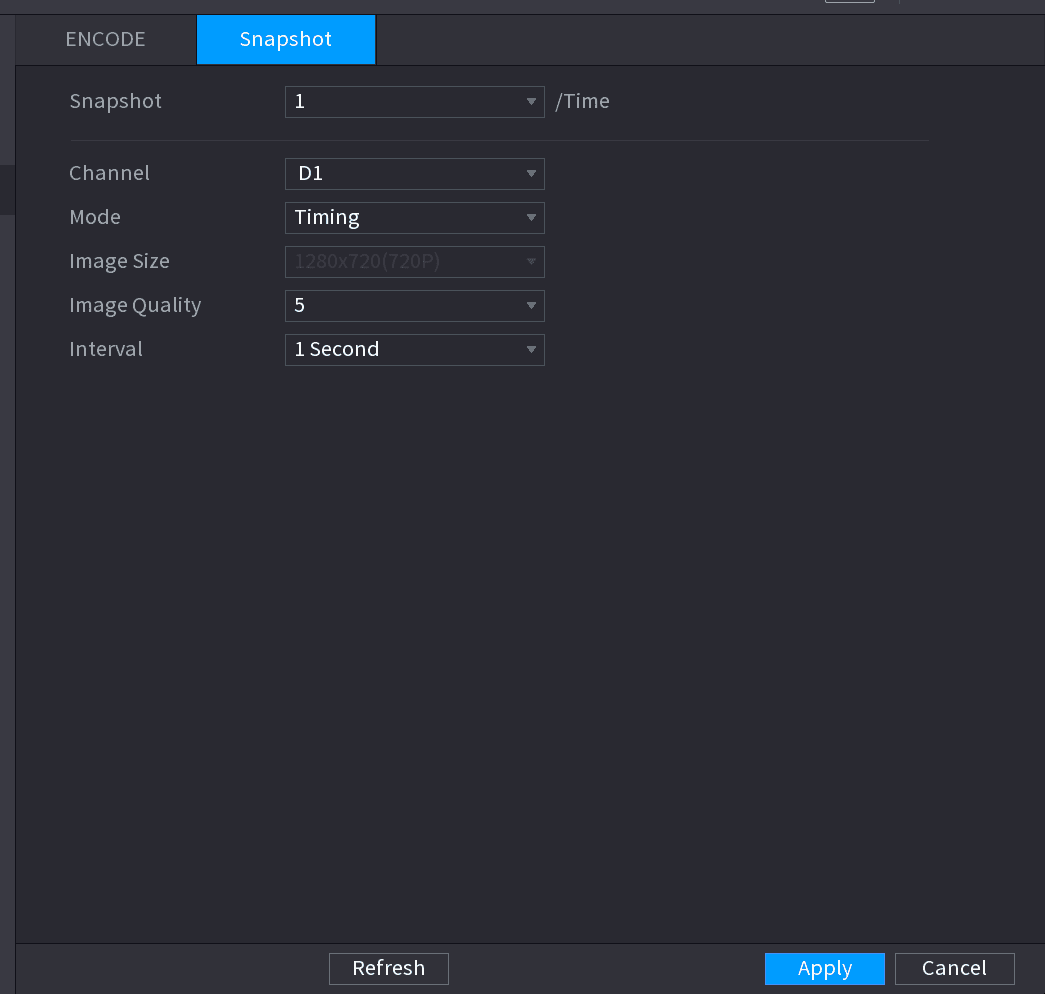
Configure parameters
Configure parameters. See Table 4-14.
| Parameter | Description |
|---|---|
| Manual Snap | In the Manual Snap list, select how many snapshots you want to take each time. |
| Channel | In the Channel list, select the channel that you want to configure the settings for. |
| Mode | In the Mode list, you can select Timing, or Trigger.
|
| Image Size | In the Image Size list, select a value for the image. The bigger the value is, the better the image will become. |
| Image Quality | Configure the image quality by 6 levels. The higher the level is, the better the image will become. |
| Interval | Configure or customize the snapshot frequency. Max. supports 3600 seconds/image. |
Apply the settings
Click Apply.
Channel Name
You can set customized channel name.
Open the CAM NAME interface
Select Main Menu > CAMERA > CAM NAME.
The CAM NAME interface is displayed. See Figure 4-58.
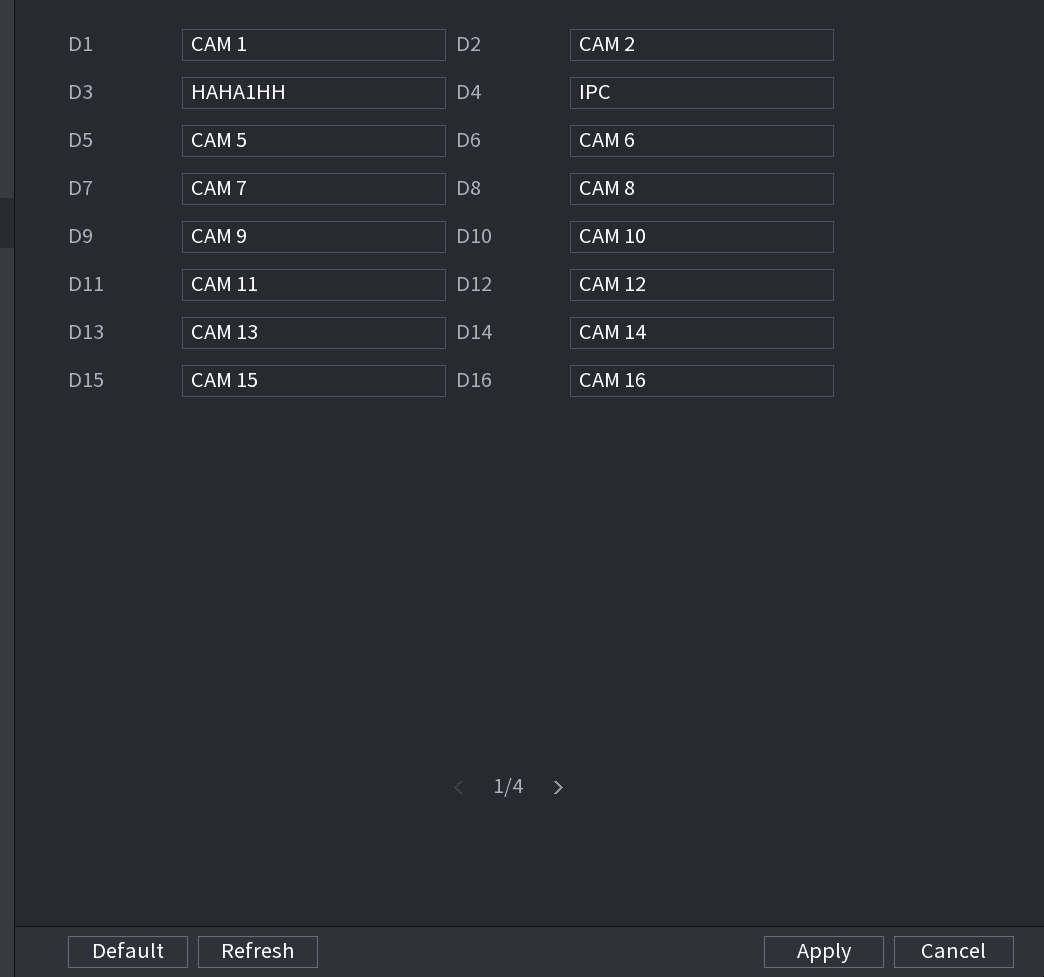
Modify a channel name
- You can only change the camera connected via the private protocol.
- The channel name supports 63 English characters.
Apply the settings
Click Apply.
Remote Upgrade
You can upgrade the connected network camera firmware. It includes online upgrade and file upgrade.
Open the Upgrade interface
Select Main Menu > CAMERA > REGISTRATION > Upgrade.
The Upgrade interface is displayed. See Figure 4-59.
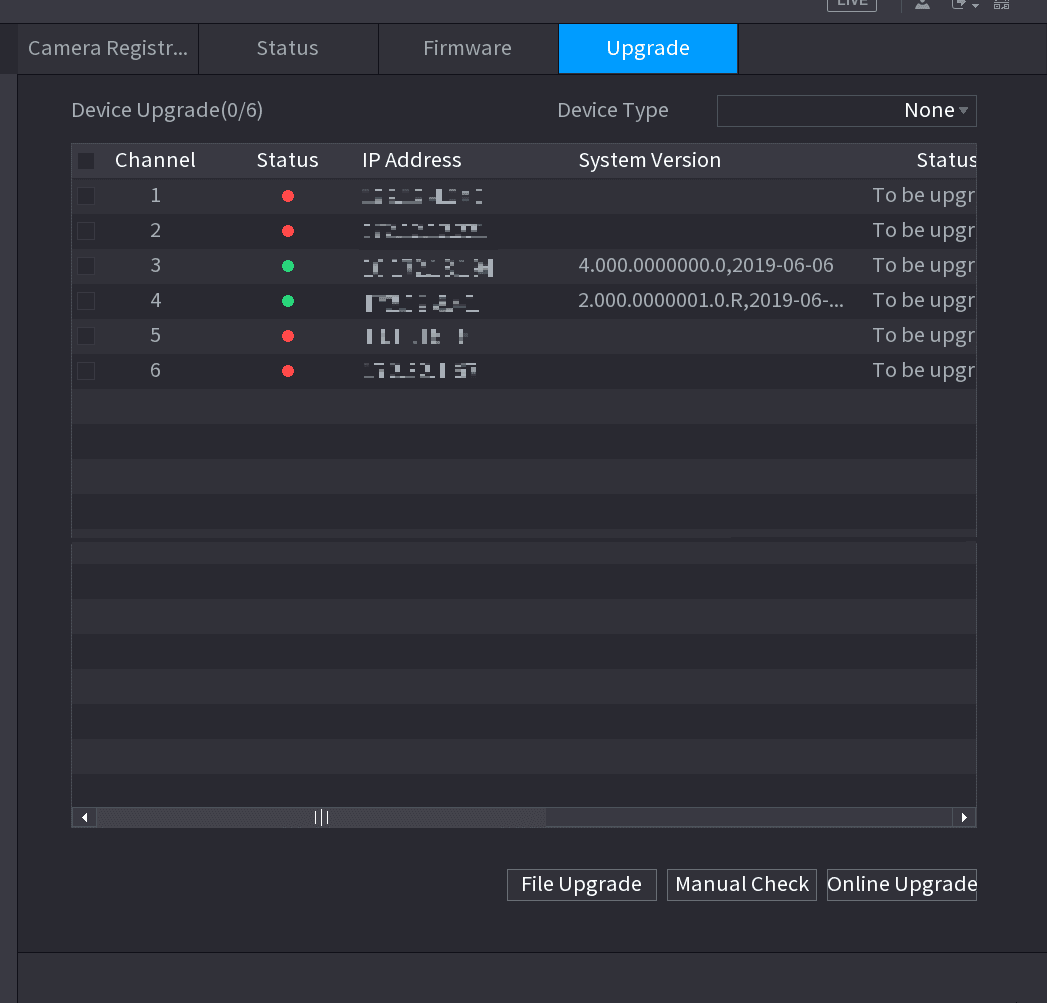
Update the firmware of the connected remote device
Online Upgrade
-
Select a remote device and then click the Detect button on the right side, or check a box to select a remote device and then click Manual Check.
System detects the new version on the cloud.
-
Select a remote device that has new version and then click online upgrade.
After successful operation, system pops up upgrade successful dialogue box.
File upgrade
-
Select a channel and then click File Upgrade.
-
Select upgrade file on the pop-up interface.
-
Select the upgrade file and then click OK button.
After successful operation, system pops up upgrade successful dialogue box.
If there are too much remote devices, select Device Type from the drop-down list to search the remote device you desire.
Remote Device Info
Device Status
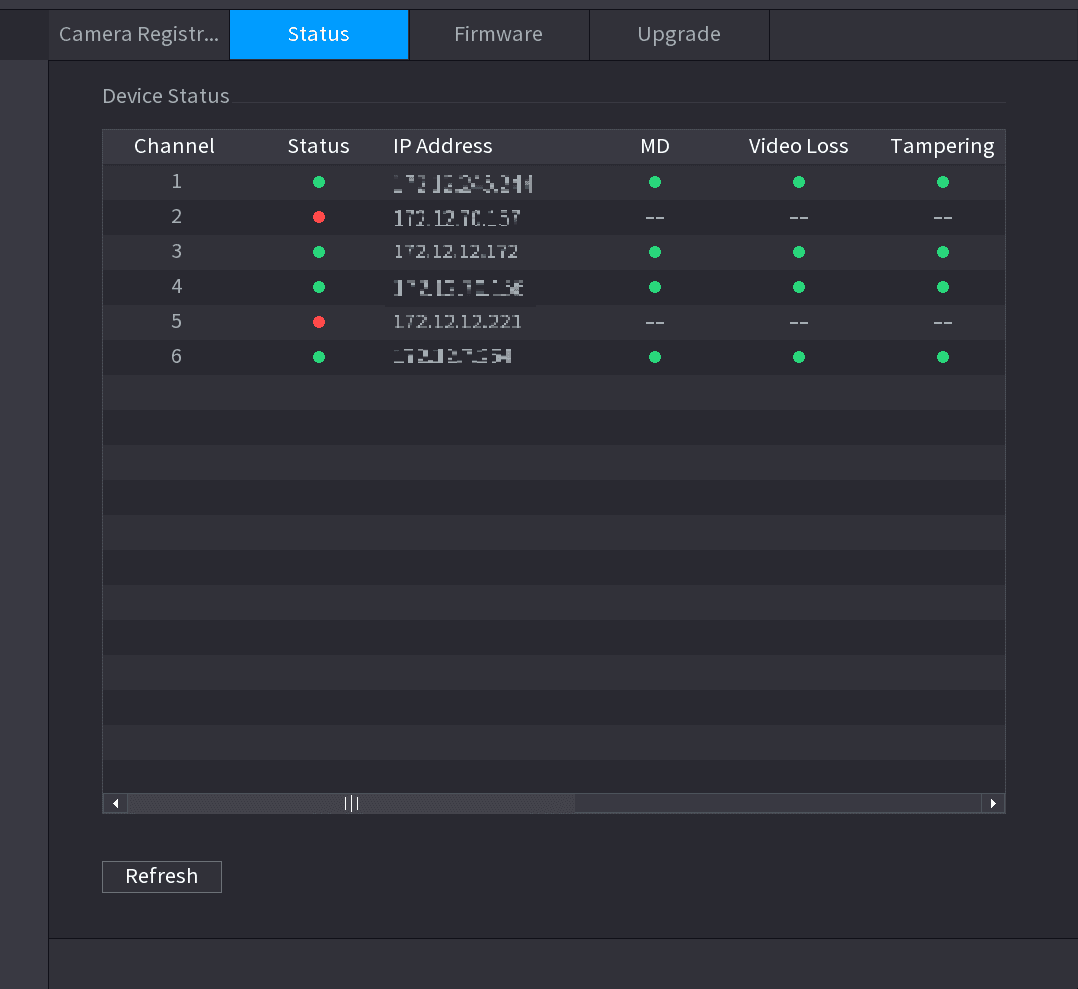
You can view the connection and alarm status of the corresponding channel.
Select Main Menu > CAMERA > REGISTRATION > Status, the Status interface is displayed. See Figure 4-60. Refer to Table 4-15 for detailed information.
| Icon | Description | Icon | Description |
|---|---|---|---|
 | IPC works properly. |  | IPC does not support. |
 | There is an alarm. |  | Video loss occurs. |
Firmware
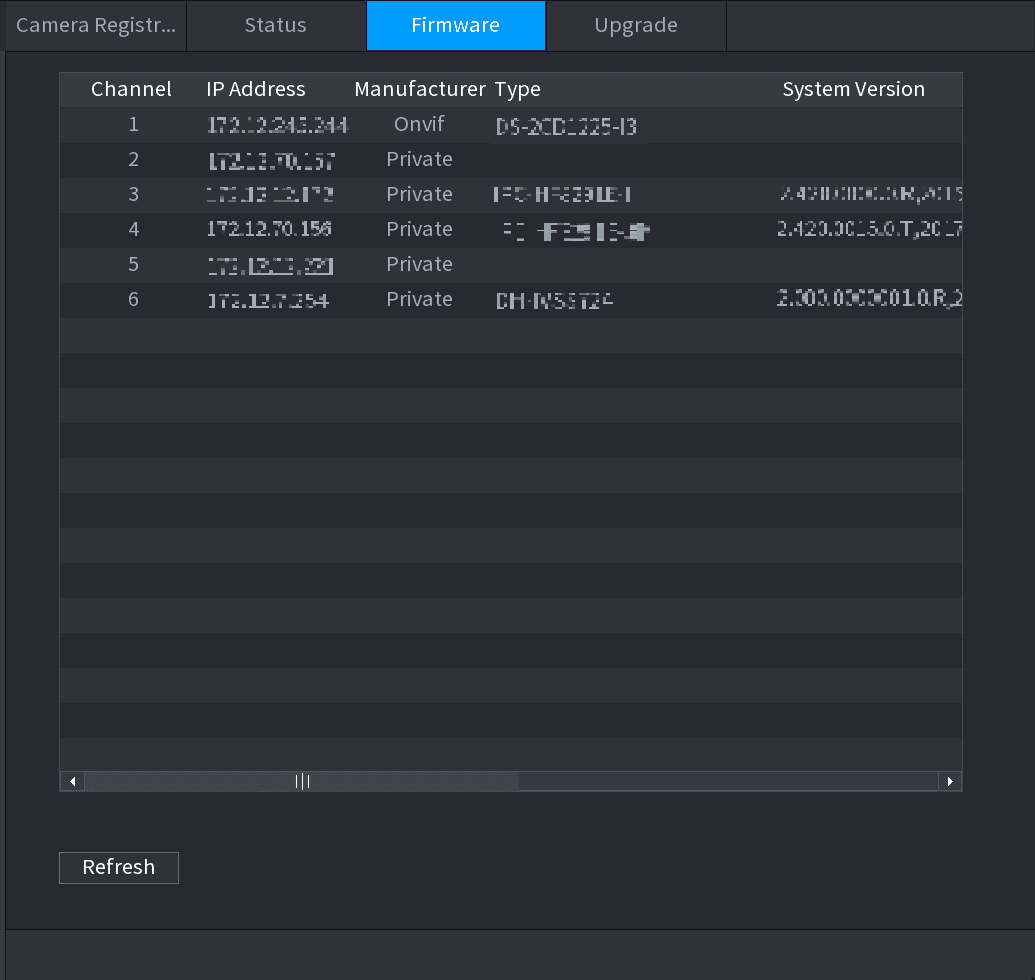
You can view IP address, manufacturer, type, system version of the connected remote device.
Select Main Menu > CAMERA > REGISTRATION > Firmware, the Firmware interface is displayed. See Figure 4-61.
Quick Settings
Use the NVR startup wizard to configure general settings, date and time, holidays, basic network and P2P, remote device registration, RAID, and the record and snapshot schedules.
Live View
Use the Sapphire NVR Live View to preview channel video, operate the navigation bar and shortcut menu, perform instant replay, digital zoom, fisheye de-warp, temperature test, and AI preview.