 Centrul de ajutor LTS Connect
Storage
Manage NVR storage resources and space, including basic settings, schedule, HDD manager, advanced HDD groups, HDD detect, RAID, record estimate, and FTP.
You can manage the storage resources (such as record file) and storage space. So that it is easy for you to use and enhance storage space usage.
Basic
You can set basic storage parameters.
Open the Basic interface
Select Main Menu > STORAGE > BASIC.
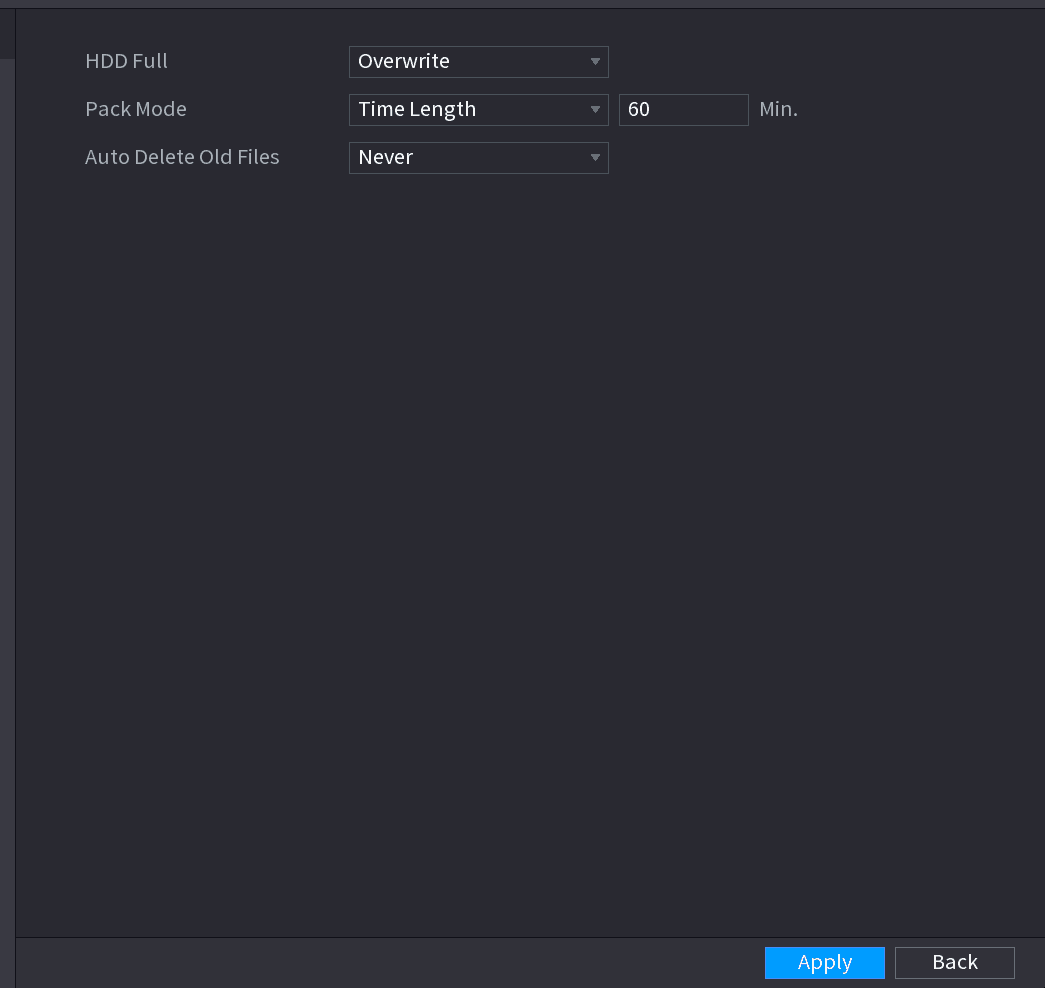
The Basic interface is displayed. See Figure 4-217.
Set parameters
Set parameters. See Table 4-63.
| Parameter | Description |
|---|---|
| HDD Full | Configure the settings for the situation all the read/write discs are full, and there is no more free disc. ⚫ Select Stop Record to stop recording. ⚫ Select Overwrite to overwrite the recorded video files always from the earliest time. |
| Pack Mode | Configure the time length and file length for each recorded video. |
| Auto-Delete Old Files | Configure whether to delete the old files and if yes, configure the days. |
The auto delete file cannot be recovered!
Complete setup
Click Apply or Save to complete setup.
Schedule
You can set schedule record and schedule snapshot. NVR can record or snapshot as you specified. For detailed information, refer to Schedule Record and Schedule Snapshot.
HDD
You can view and set HDD properties and format HDD.
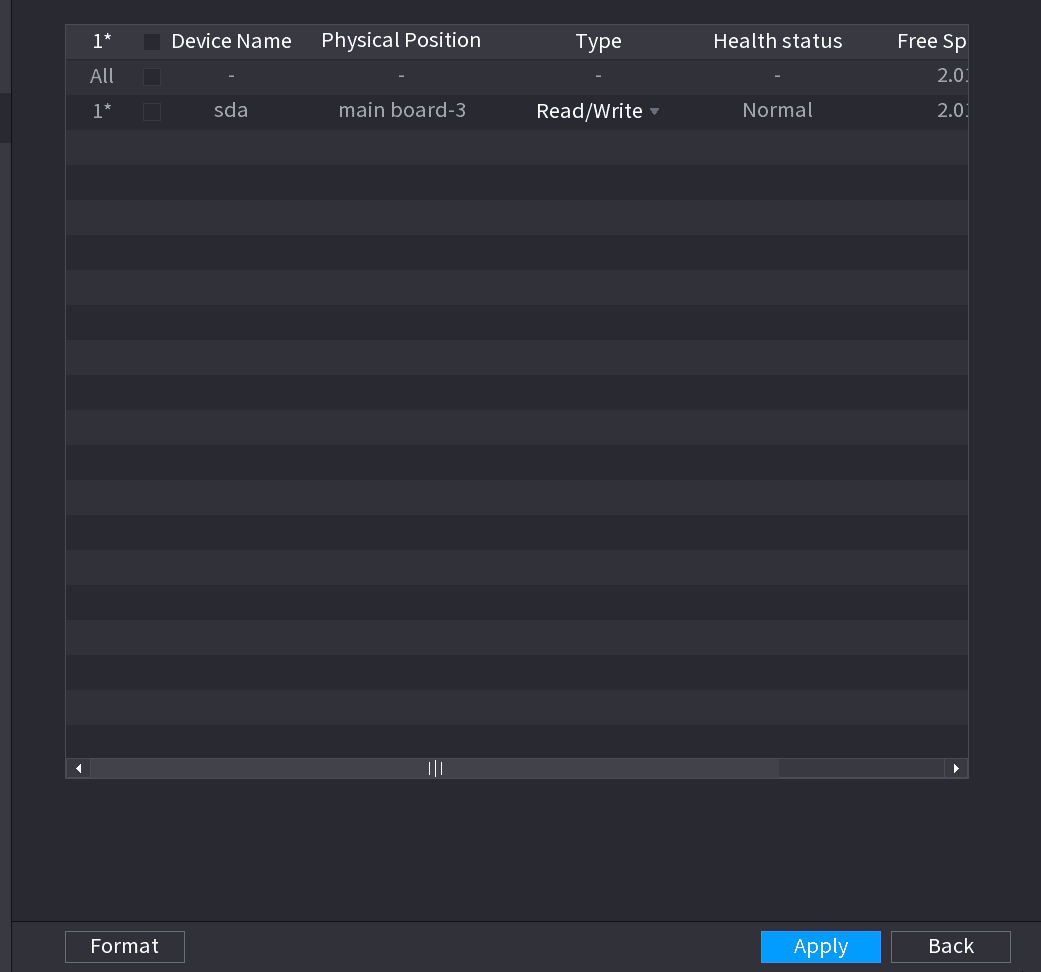
You can view current HDD type, status, capacity and etc. The operation includes format HDD, and change HDD property (read and write/read-only/redundancy).
⚫ To prevent files be overwritten in the future, you can set HDD as read-only.
⚫ To backup recorded video file, you can set HDD as redundant HDD.
Open the HDD Manager interface
Select Main Menu > Storage > HDD MANAGER.
The HDD MANAGER interface is displayed. See Figure 4-218.
Select HDD and property
Select a HDD and then select a time from the dropdown list.
Apply
Click Apply button to complete the setup. System needs to restart to activate current setup if you want to format the HDD.
Record Control
After you set schedule record or schedule snapshot function, set auto record/snapshot function so that the NVR can automatically record or snapshot. For detailed information, refer to Record Control.
Advance (HDD Group)
You can set HDD group, and HDD group setup for main stream, sub stream and snapshot operation.
When you are setting HDD group, set a HDD for each channel, otherwise NVR cannot save current setup.
Open the Advanced interface
Select Main Menu > STORAGE > ADVANCED.
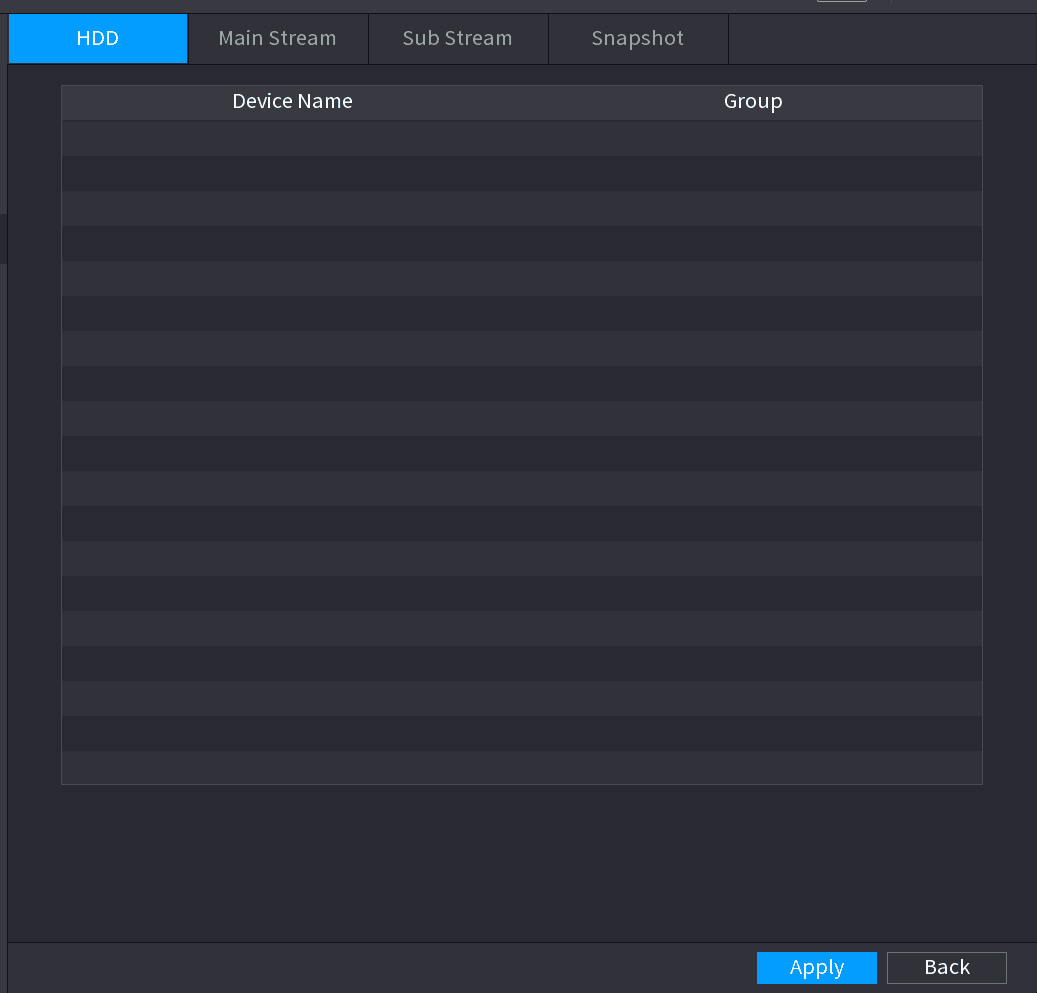
The ADVANCED interface is displayed. See Figure 4-219.
Assign groups and save
Select the group for each HDD group, and then click Save to save the settings.
After configuring HDD group, under the Main Stream tab, Sub Stream tab and Snapshot tab, configure settings to save the main stream, sub stream and snapshot to different HDD group as selected by you.
HDD Detect
This function is for some series product only.
The HDD detect function is to detect HDD current status so that you can clearly understand the HDD performance and replace the malfunction HDD.
There are two detect types:
⚫ Quick detect is to detect via the universal system files. System can quickly complete the HDD scan. If you want to use this function, make sure the HDD is in use now. If the HDD is removed from other device, make sure the HDD once storage the record files when installed on current device.
⚫ Global detect adopts Windows mode to scan. It may take a long time and may affect the HDD that is recording.
Manual Detect
Open the Manual Detect interface
Select Main Menu > STORAGE > HDD DETECT > Manual Detect.
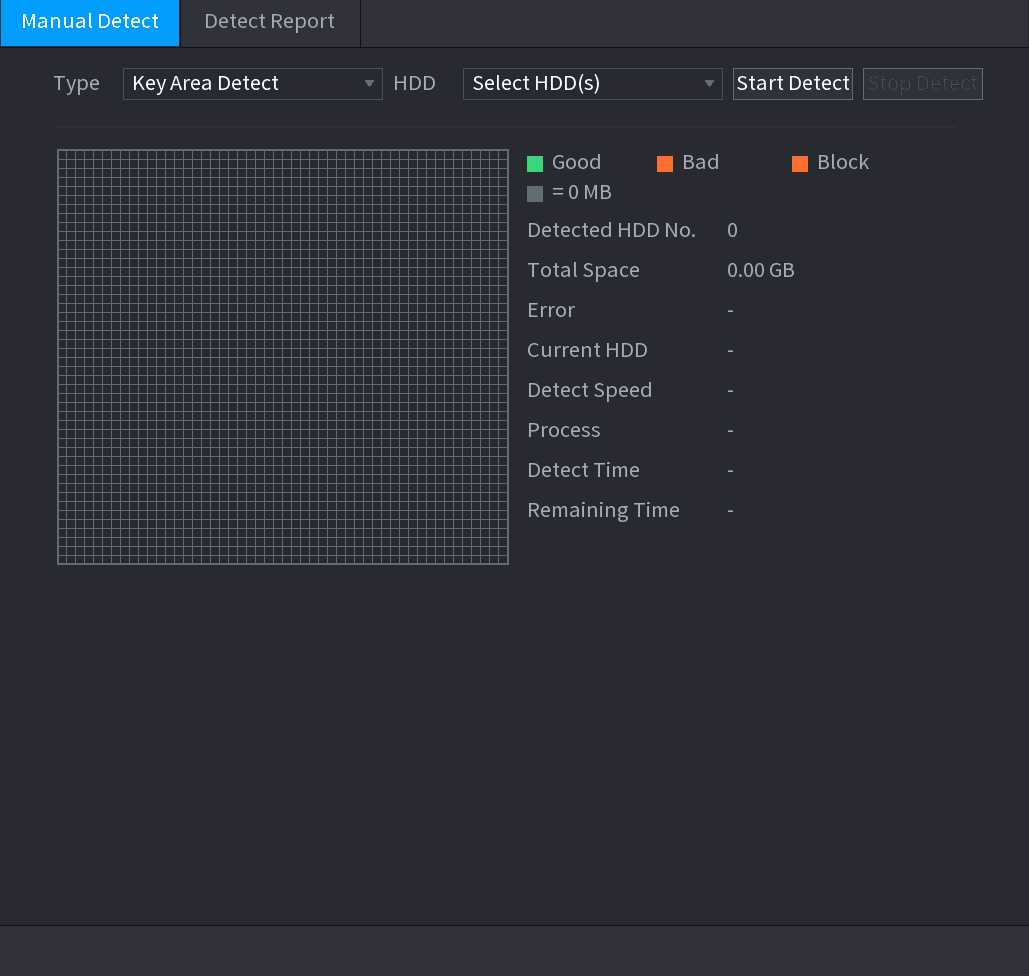
The Manual Detect interface is displayed. See Figure 4-220.
Select detect type and HDD
In the Type list, select Key Area Detect or Global Detect; and in the HDD list, select the HDD that you want to detect.
Start detect
Click Start Detect.
The system starts detecting the HDD and displays the detection information.
When system is detecting HDD, click Stop Detect to stop current detection. Click Start Detect to detect again.
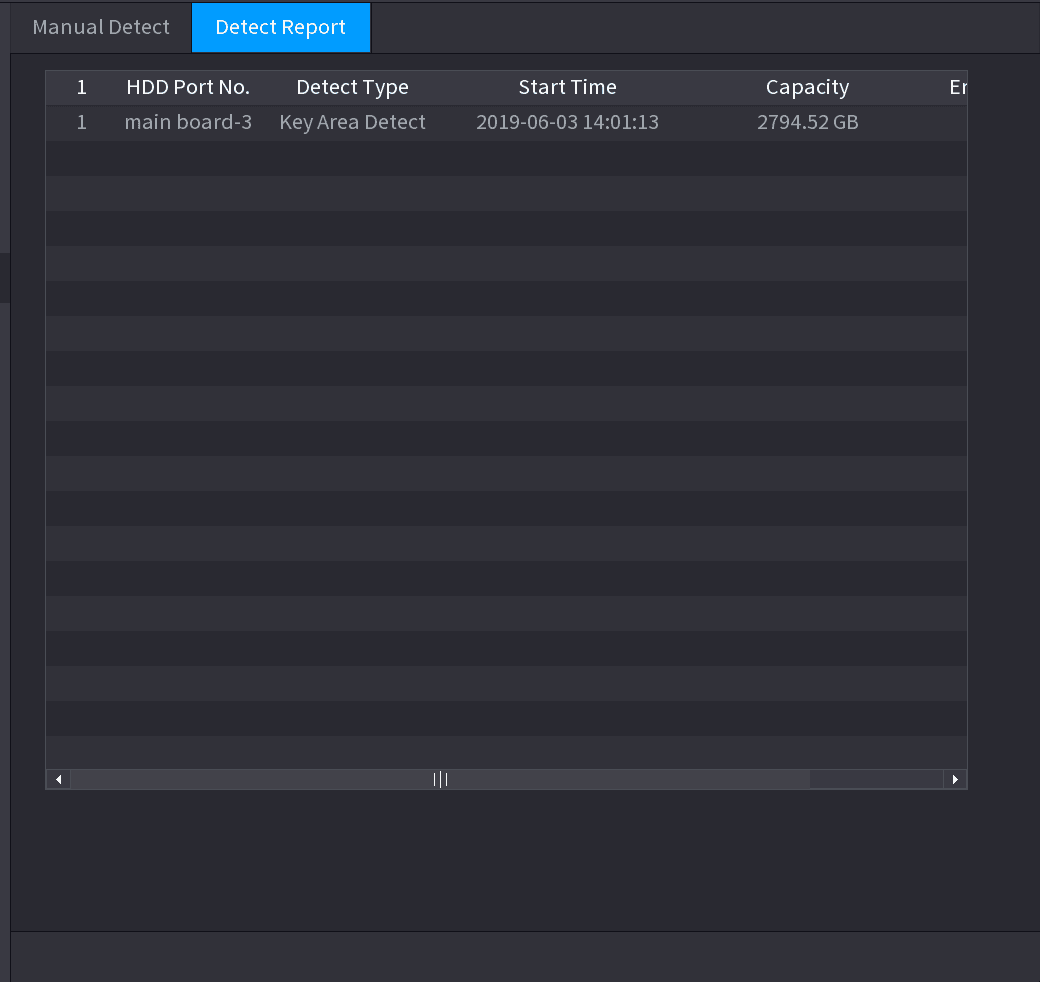
Detect Report
After the detect operation, you can go to the detect report to view corresponding information. Replace the malfunction HDD in case there is data loss.
Open the Detect Report interface
Select Main Menu > STORAGE > HDD DETECT > Detect Report.
The Detect Report interface is displayed. See Figure 4-221.
View details
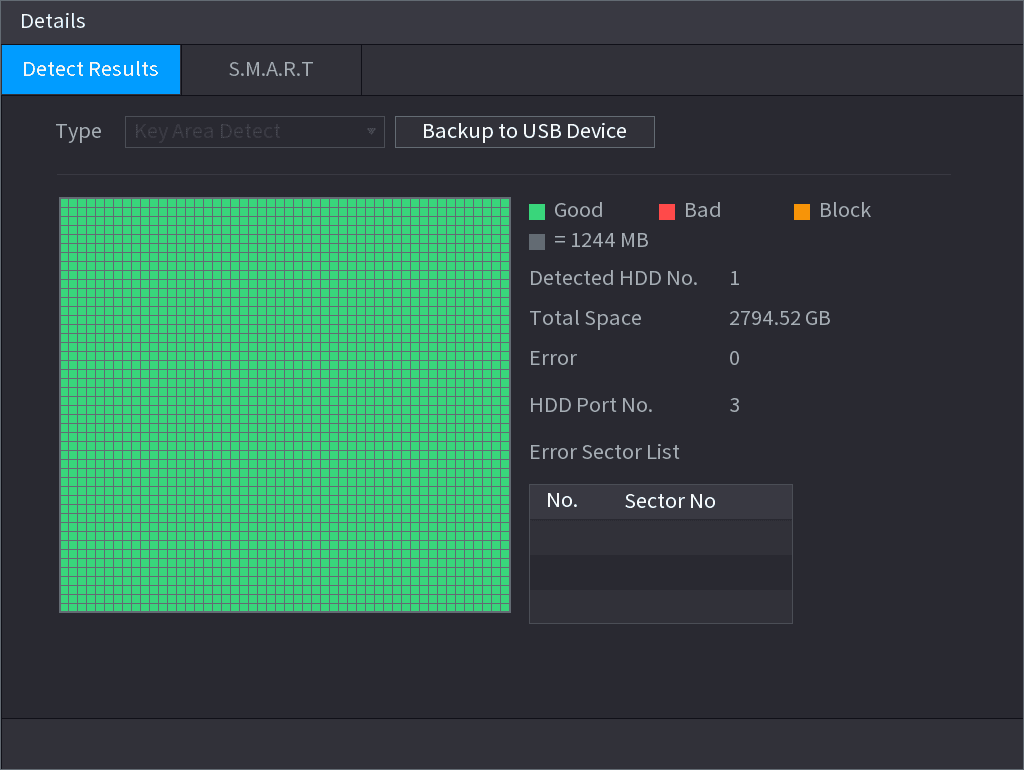
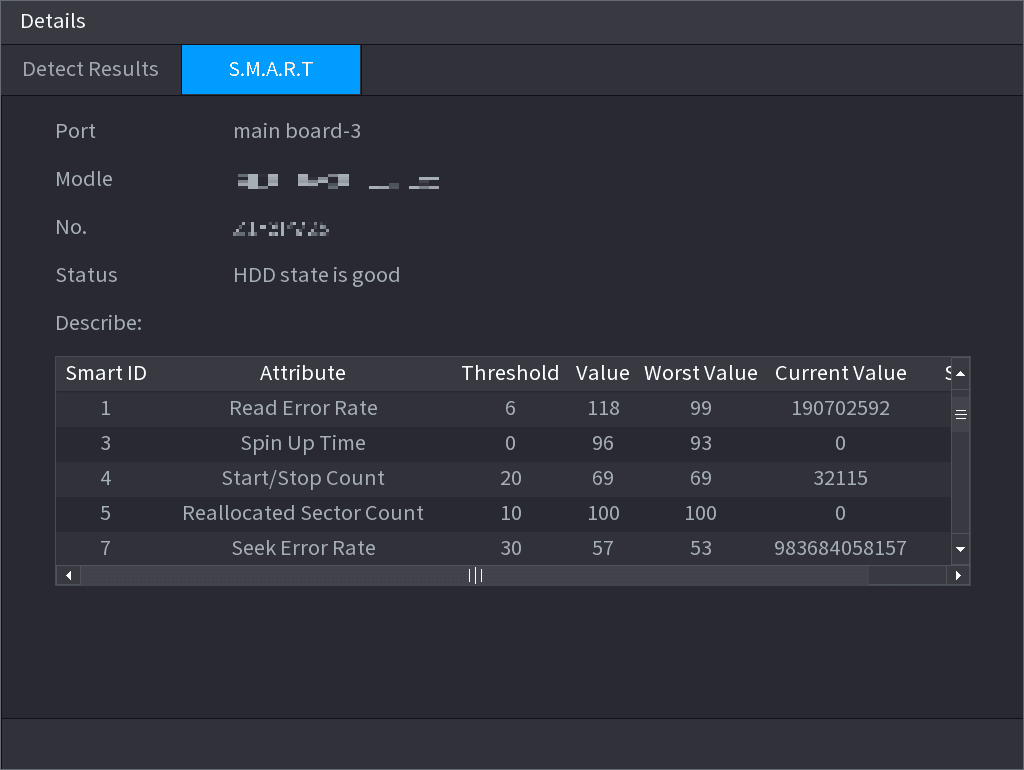
Click the details icon.
The Details interface is displayed. You can view detecting results and S.M.A.R.T reports. See Figure 4-222 and Figure 4-223.
RAID
RAID (redundant array of independent disks) is a data storage virtualization technology that combines multiple physical HDD components into a single logical unit for the purposes of data redundancy, performance improvement, or both.
⚫ RAID function is for some series products only. Slight difference may be found on the user interface.
⚫ The NVR supports RAID0, RAID1, RAID5, RAID6, and RAID 10. Local hot spare supports RAID1, RAID5, RAID6, and RAID10.
For the disk quantity required for each RAID type. See Table 4-64.
| RAID type | Required disk quantity |
|---|---|
| RAID0 | At least 2. |
| RAID1 | Only 2. |
| RAID5 | At least 3, and using 4 disks to 6 disks is recommended. |
| RAID6 | At least 4. |
| RAID10 | At least 4. |
Creating Manager
RAID has different levels (such as RAID5, RAID6). Each level has different data protection, data availability, and performance grade.
You can manually create RAID or just one click one button to create RAID. For create RAID function, you can select the physical HDD that does not included in the RAID group or the created disk array to create a RAID5. You can refer to the following situations:
⚫ There is no RAID, no hotspare disk: System directly creates the RAID5 and creates one hotspare disk at the same time.
⚫ There is no RAID, but there is a hotspare disk: System creates the RAID5 only. It uses previous hotspare disk.
⚫ There is RAID: System cancel the previous RAID setup and then create the new RAID5. System creates the hotspare disk if there is no one. System uses previous hotspare disk if there is hotspare disk available.
⚫ The background will format the virtual disk.
You can create different types of RAID as needed.
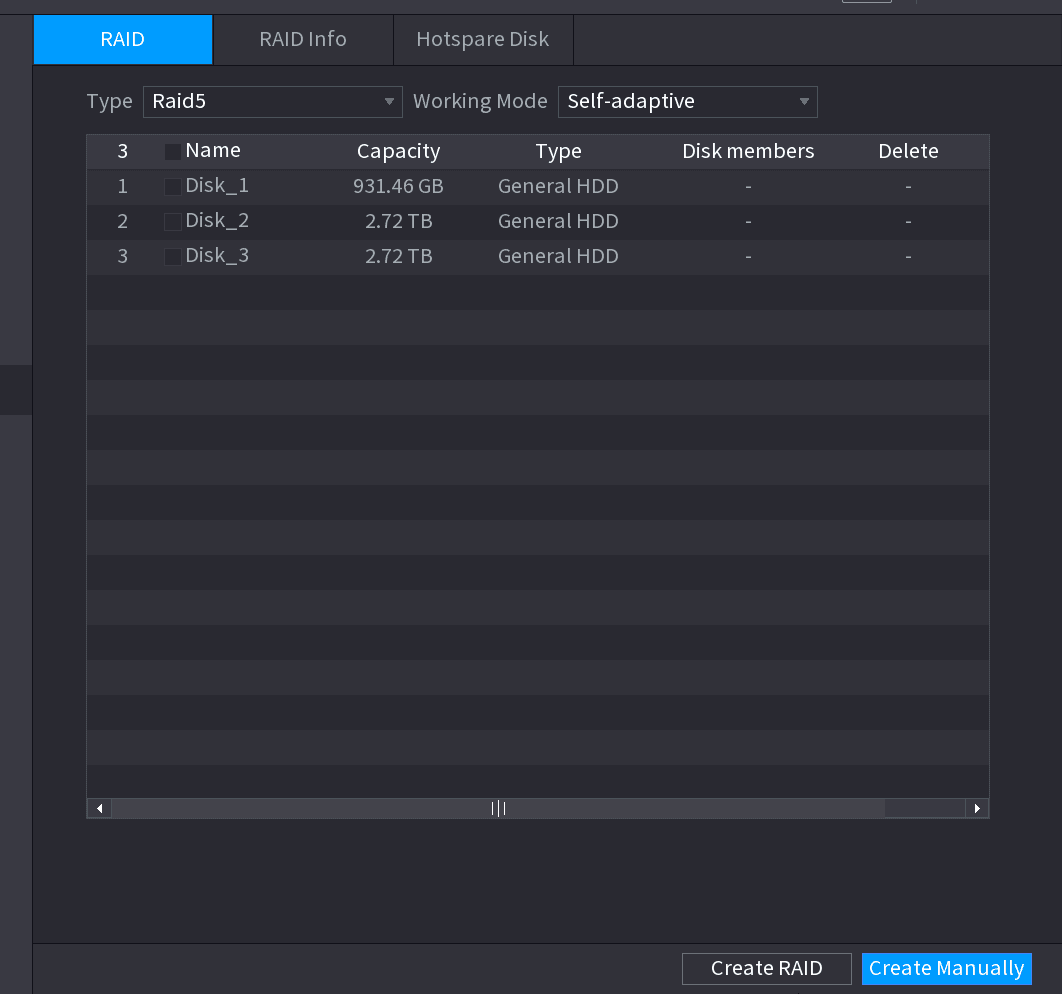
Open the RAID interface
Select Main Menu > STORAGE > RAID > RAID.
The RAID interface is displayed. See Figure 4-224.
Create RAID
You can click Create RAID or Create Manually, and all the disks involved will be formatted.
⚫ Click Create RAID, the system will create RAID automatically.
- If there is no existing RAID and no hot spare disk, the system will create RAID5 and a hot spare disk automatically.
- If there is no existing RAID, but existing hot spare disk, the system will only create RAID5 and use the existing hot spare disk automatically.
- If there is existing RAID and existing hot spare disk, the system will delete the original RAID and create RAID5 with all the disks and use the existing hot spare disk automatically.
⚫ Click Create Manually.
- Select RAID type and disks as system instructed.
- Click Create Manually, and then the format disk notice is displayed.
- Click OK.
Select working mode
After creating RAID, the disks need to sync with each other to finish the process. For RAID5 and RAID6, you can select different working mode.
⚫ Self-Adaptive: Automatically adjust the RAID sync speed according to the business status.
- When there is no business running, sync is performed at a high speed.
- When there is business running, sync is performed at a low speed.
⚫ Sync First: Resource priority is assigned to RAID sync.
⚫ Business First: Resource priority is assigned to business operations.
⚫ Balance: Resource is evenly distributed to RAID sync and business operations.
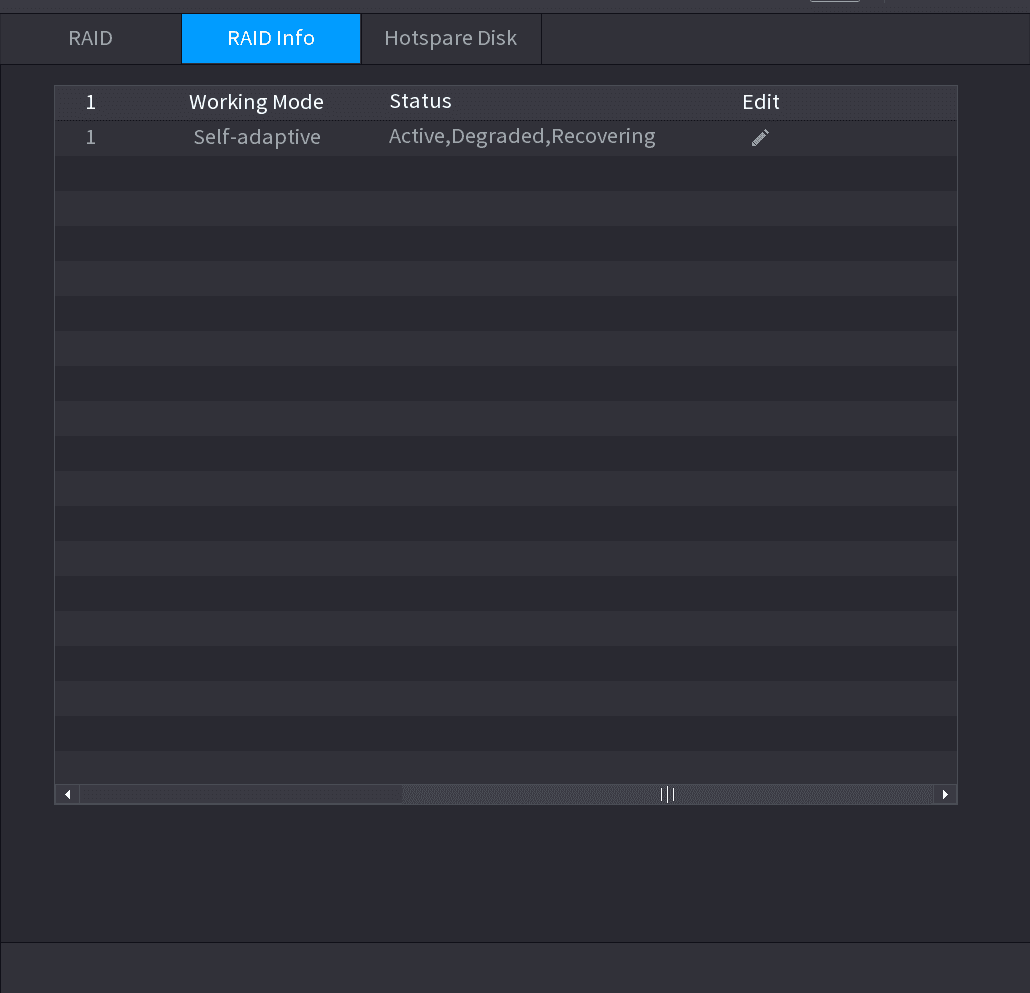
Raid Info
You can view the existing RAID information, including type, disk space, hot spare, and status.
Select Main Menu > STORAGE > RAID > RAID Info.
The RAID Info interface is displayed. See Figure 4-225.
Hot Spare Disk
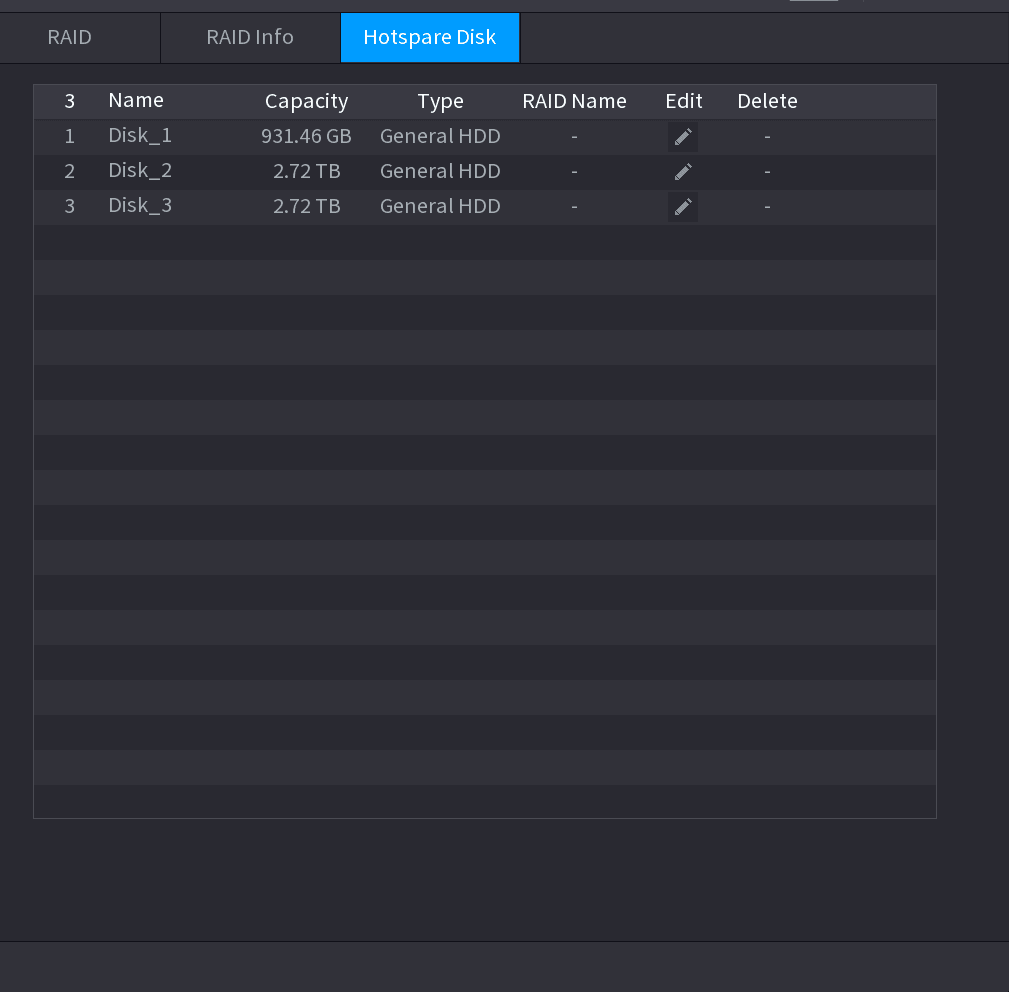
You can add a hot spare disk to a specific disk in the RAID or to the entire RAID, and the hot spare disk is switched into operation if any disk fails.
Open the Hotspare Disk interface
Select Main Menu > STORAGE > RAID > Hotspare Disk.
The Hotspare Disk interface is displayed. See Figure 4-226.
Add a hot spare disk
Click the add icon behind a disk.
Open the New Hotspare interface
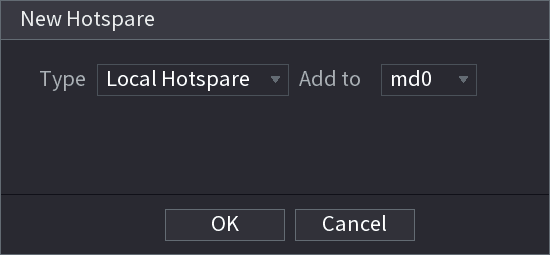
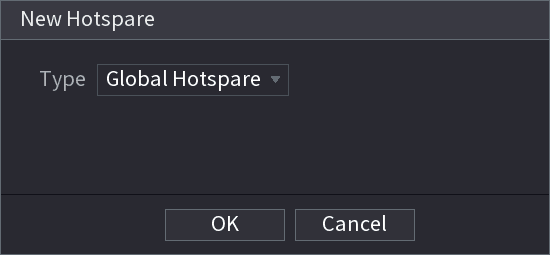
The New Hotspare interface is displayed. See Figure 4-227 (New hot spare (local)) or Figure 4-228 (New hot spare (global)).
Select hotspare type
You can select Local Hotspare or Global Hotspare.
⚫ Local Hotspare: Select the target disk, and the new disk will serve as the hot spare disk of the selected disk.
⚫ Global Hotspare: the new disk will serve as the hot spare disk of the entire RAID.
Record Estimate
Record estimate function can calculate how long you can record video according to the HDD capacity, and calculate the required HDD capacity according to the record period.
Open the REC ESTIMATE interface
Select Main Menu > STORAGE > REC ESTIMATE.
The REC ESTIMATE interface is displayed. See Figure 4-229.
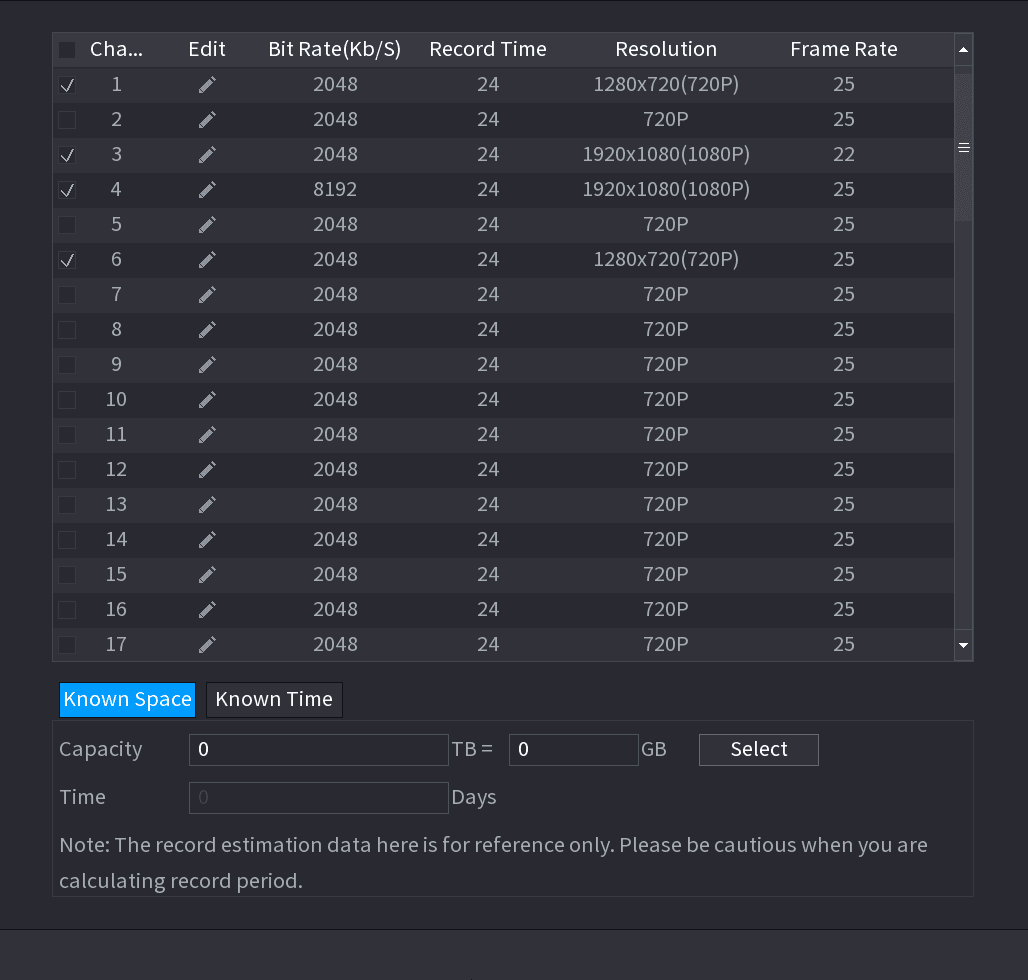
Edit channel settings
Click the edit icon.
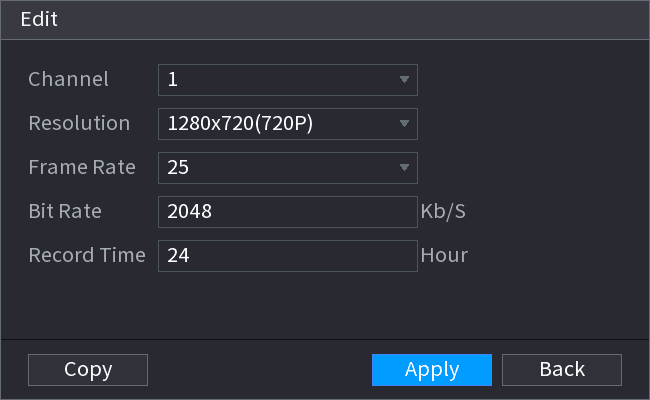
The Edit dialogue box is displayed. See Figure 4-230.
You can configure the Resolution, Frame Rate, Bit Rate and Record Time for the selected channel.
Save
Click Apply to save the settings.
Then the system will calculate the time period that can be used for storage according to the channels settings and HDD capacity.
Click Copy to copy the settings to other channels.
Calculating Recording Time
Open the Known Space tab
On the REC ESTIMATE interface, click the Known Space tab.
The Known Space interface is displayed. See Figure 4-231.
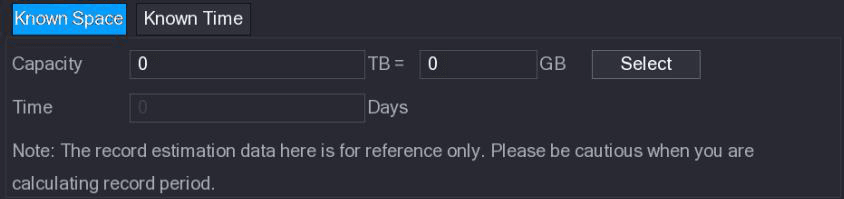
Select HDD
Select the check box of the HDD that you want to calculate.
In the Known Space tab, in the Time box, the recording time is displayed. See Figure 4-232.
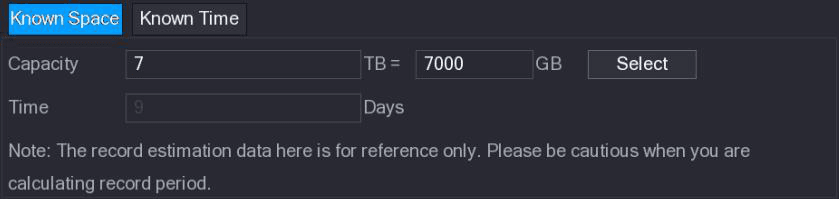
Calculating HDD Capacity for Storage
Open the Known Time tab
On the REC ESTIMATE interface, click the Known Time tab.
The Known Time interface is displayed. See Figure 4-233.
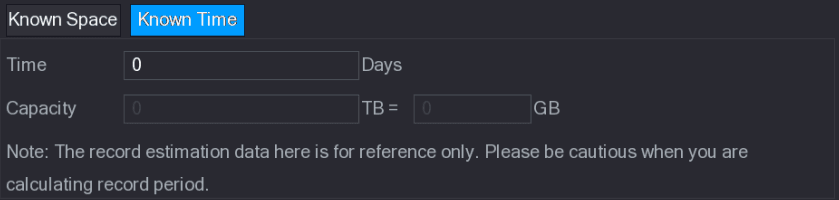
Enter the record time
In the Time box, enter the time period that you want to record.
In the Capacity box, the required HDD capacity is displayed.
FTP
You can store and view the recorded videos and snapshots on the FTP server.
Preparations
Purchase or download a FTP (File Transfer Protocol) server and install it on your PC.
For the created FTP user, you need to set the write permission; otherwise the upload of recorded videos and snapshots will be failed.
Open the FTP interface
Select Main Menu > STORAGE > FTP.
The FTP interface is displayed. See Figure 4-234.
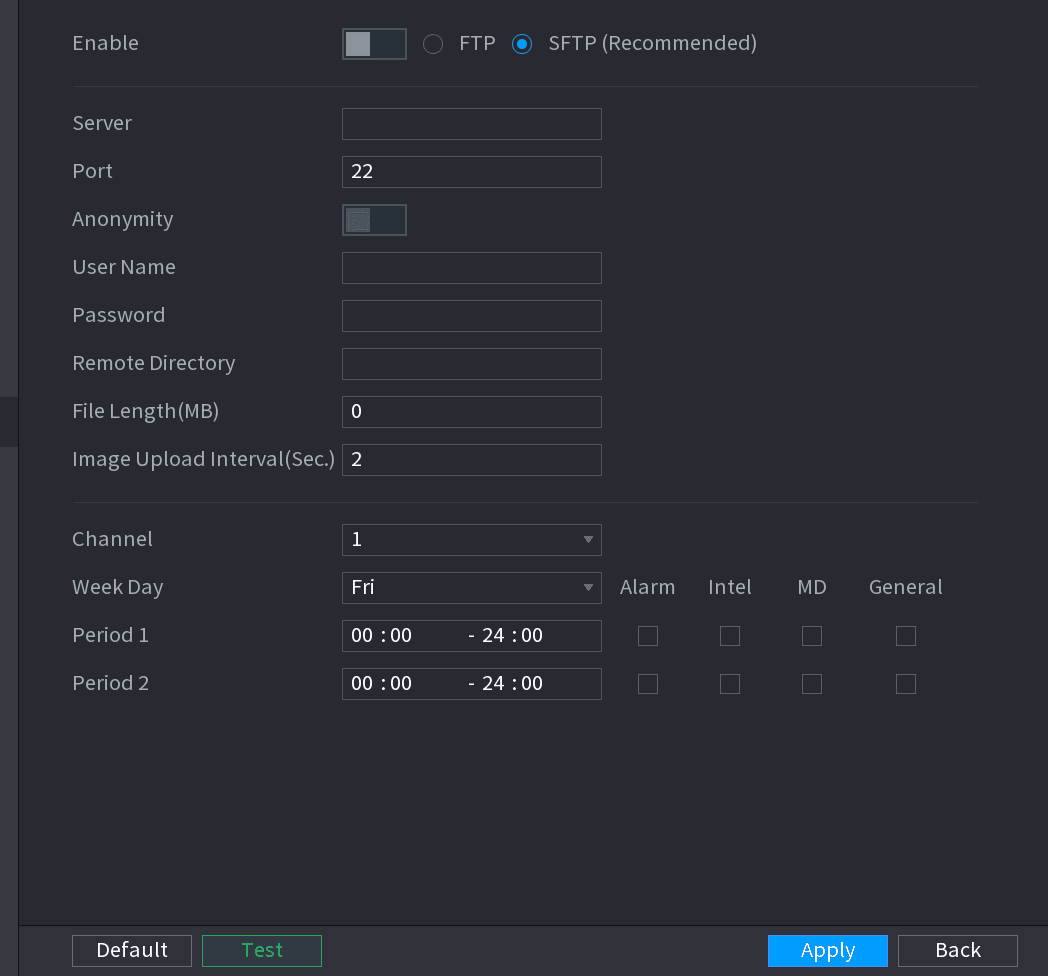
Configure FTP parameters
Configure the settings for the FTP settings parameters. See Table 4-65.
| Parameter | Description |
|---|---|
| Enable | ⚫ Enable the FTP upload function. ⚫ Select FTP type. |
| FTP type | ⚫ FTP: Plaintext transmission. ⚫ SFTP: Encrypted transmission (recommended). |
| Server | IP address of FTP server. |
| Port | ⚫ FTP: The default is 21. ⚫ SFTP: The default is 22. |
| Anonymity | Enable the anonymity function, and then you can login anonymously without entering the user name and password. |
| User Name | Enter the user name and password to login the FTP server. |
| Password | Enter the user name and password to login the FTP server. |
Network
Configure the Sapphire Series NVR network settings, including TCP/IP, port, PPPoE, DDNS, UPnP, email, SNMP, multicast, alarm centre, register, P2P, and 802.1X.
System
Configure the NVR's general system settings, RS-232 serial port, and security features including the firewall and internal system services.