 Centrum pomoci LTS Connect
General System Settings
Configure general display settings, date and time, DST, enhanced IP mode, and manage user accounts on the Turbo HD DVR GUI 4.0.
Configure General Settings
Purpose: You can configure the BNC output standard, VGA output resolution, mouse pointer speed through the System > General interface.
Go to General
Go to System > General.
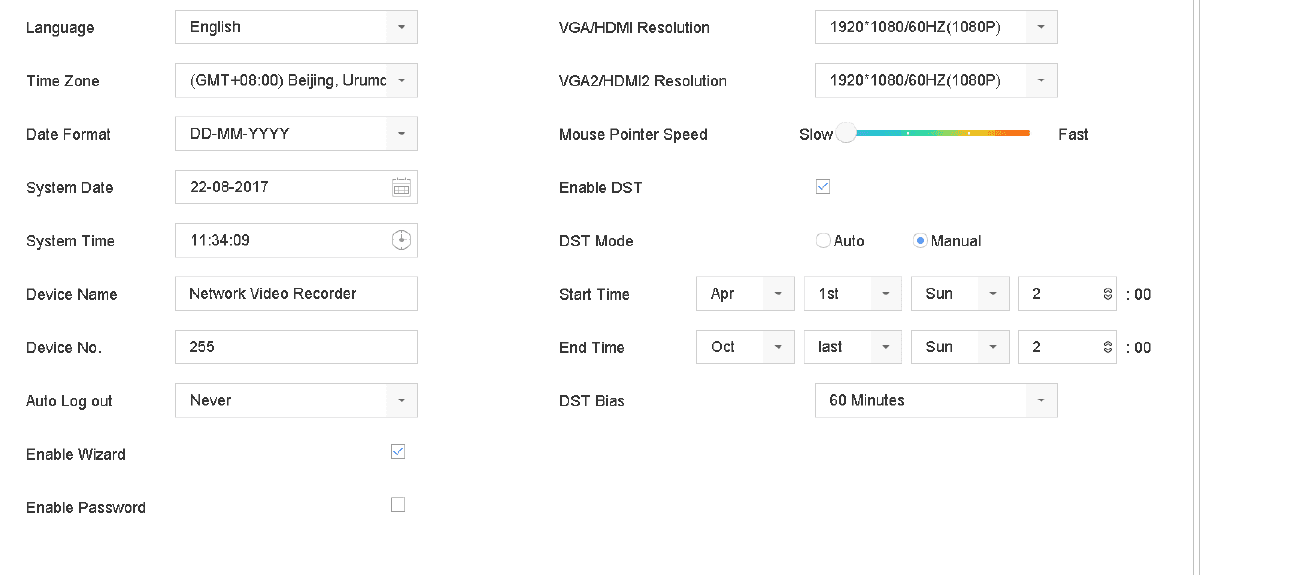
Figure 18-1 General Settings Interface
Configure the settings
Configure the following settings.
- Language: The default language used is English.
- Output Standard: Select the output standard to NTSC or PAL, which must be the same with the video input standard.
- Resolution: Configure the resolution of the video output.
- Device Name: Edit the name of the device.
- Device No.: Edit the serial number of the device. The Device No. can be set in the range of 1~255, and the default No. is 255. The number is used for the remote and keyboard control.
- Auto Logout: Set timeout time for menu inactivity. E.g., when the timeout time is set to 5 Minutes, then the system will exit from the current operation menu to live view screen after 5 minutes of menu inactivity.
- Mouse Pointer Speed: Set the speed of mouse pointer; 4 levels are configurable.
- Enable Wizard: Enable/disable the Wizard when the device starts up.
- Enable Password: Enable/disable the use of the login password.
Save
Click Apply to save the settings.
Configure Date & Time
Go to General
Go to System > General.
Configure the date and time
- Time Zone: Select the time zone.
- Date Format: Select the date format.
- System Date: Select the system date.
- System Time: Set the system time.
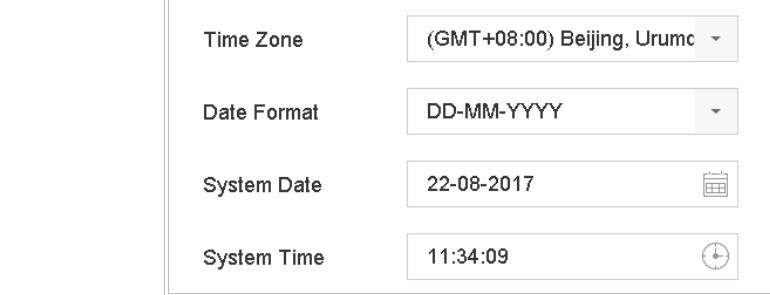
Figure 18-2 Date and Time Settings
Save
Click Apply to save the settings.
Configure DST Settings
The DST (daylight saving time) refers to the period of the year when clocks are moved one period ahead. In some areas worldwide, this has the effect of creating more sunlit hours in the evening during months when the weather is the warmest.
We advance our clocks ahead a certain period (depends on the DST bias you set) at the beginning of DST, and move them back the same period when we return to standard time (ST).
Go to General
Go to System > General.
Enable DST
Check Enable DST.
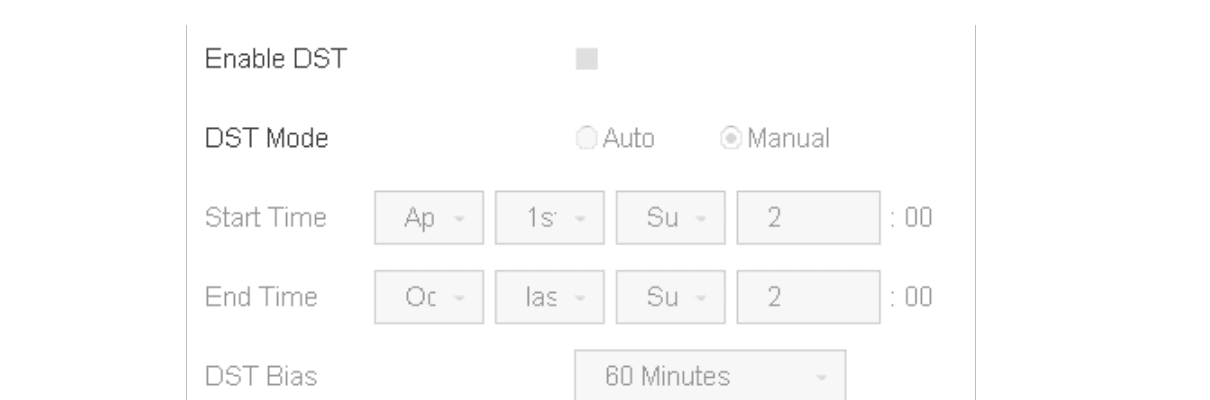
Figure 18-3 DST Settings Interface
Select DST mode
Select the DST mode to Auto or Manual.
- Auto: Automatically enable the default DST period according to the local DST rules.
- Manual: Manually set the start time and end time of the DST period, and the DST bias.
- DST Bias: Set the time (30/60/90/120 minutes) offset from the standard time.
- Example: The DST begins at 2:00 a.m. on the second Sunday of March and ends at 2:00 a.m. on the first Sunday of November, with 60 minutes ahead.
Save
Click the Apply button to save the settings.
Configure Enhanced IP Mode
Check Enhanced IP Mode.
Enabling Enhanced IP Mode will allow you to connect to the maximum number of cameras and make Smart Event unavailable in analog channel.
This function is only available for iDS-7200HQHI-K/S and iDS-7200HUHI-K/S series.
Manage User Accounts
Purpose: The Administrator user name is admin and the password is set when you start the device for the first time. The Administrator has the permission to add and delete user and configure user parameters.
Add a User
Go to User
Go to System > User.

Figure 18-4 User Management Interface
Open Add User
Click Add to enter the operation permission interface.
Enter admin password
Enter the admin password and click Next.
Fill in user details
In the Add User interface, enter the information for new user, including User Name, Password, Confirm (password), User Level (Operator/Guest) and User's MAC Address.
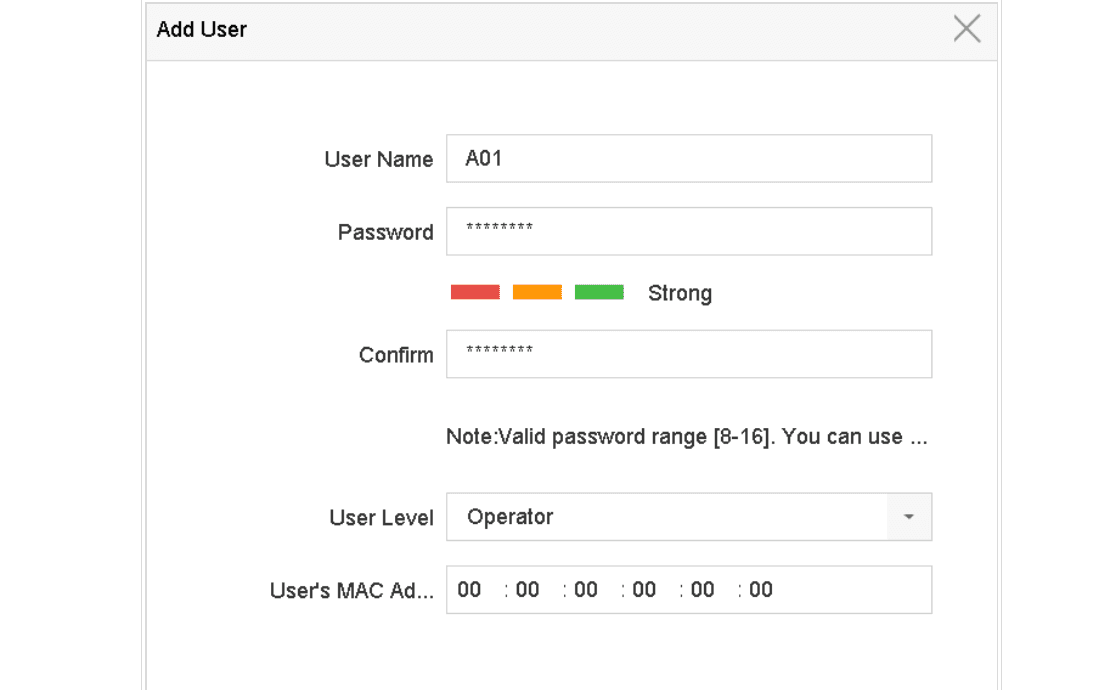
Figure 18-5 Add User
Strong Password recommended — We highly recommend you create a strong password of your own choosing (Using a minimum of 8 characters, including at least three of the following categories: upper case letters, lower case letters, numbers, and special characters.) in order to increase the security of your product. And we recommend you reset your password regularly, especially in the high security system, resetting the password monthly or weekly can better protect your product.
- User Level: Set the user level to Operator or Guest. Different user levels have different operating permission.
- Operator: The Operator user level has permission of Two-way Audio in Remote Configuration and all operating permission in Camera Configuration by default.
- Guest: The Guest user has no permission of Two-way Audio in Remote Configuration and only has the local/remote playback in the Camera Configuration by default.
- User's MAC Address: The MAC address of the remote PC which logs onto the device. If it is configured and enabled, it only allows the remote user with this MAC address to access the device.
Confirm
Click OK to finish the new user account adding.
Result: In the User Management interface, the added new user is displayed on the list.

Figure 18-6 User List
Set Permission for a User
For the added user, you can assign the different permissions, including the local and remote operation for the device.
Go to User
Go to System > User.
Open permission settings
Select a user from the list and then click the  button to enter the permission settings interface.
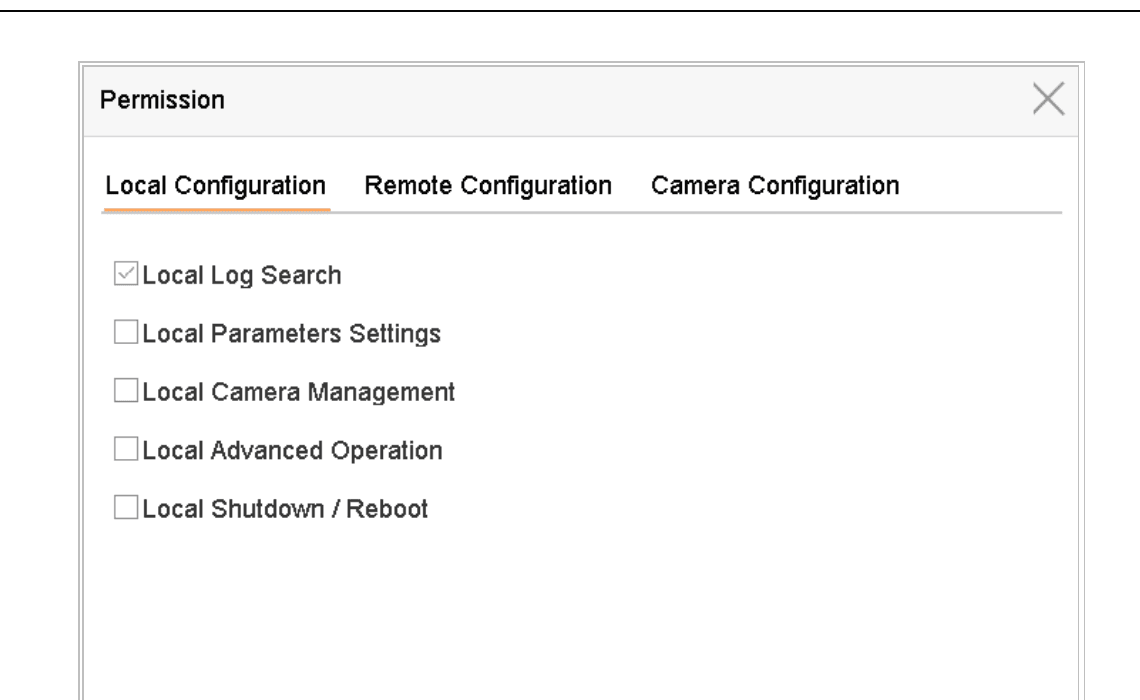
Figure 18-7 User Permission Settings Interface
Configure permissions
Set the operating permission of Local Configuration, Remote Configuration and Camera Configuration for the user.
Local Configuration
| Permission | Description |
|---|---|
| Local Log Search | Searching and viewing logs and system information of device. |
| Local Parameters Settings | Configuring parameters, restoring factory default parameters and importing/exporting configuration files. |
| Local Camera Management | The adding, deleting and editing of IP cameras. |
| Local Advanced Operation | Operating HDD management (initializing HDD, setting HDD property), upgrading system firmware, clearing I/O alarm output. |
| Local Shutdown Reboot | Shutting down or rebooting the device. |
Remote Configuration
| Permission | Description |
|---|---|
| Remote Log Search | Remotely viewing logs that are saved on the device. |
| Remote Parameters Settings | Remotely configuring parameters, restoring factory default parameters and importing/exporting configuration files. |
| Remote Camera Management | Remote adding, deleting and editing of the IP cameras. |
| Remote Serial Port Control | Configuring settings for RS-232 and RS-485 ports. |
| Remote Video Output Control | Sending remote button control signal. |
| Two-Way Audio | Realizing two-way radio between the remote client and the device. |
| Remote Alarm Control | Remotely arming (notify alarm and exception message to the remote client) and controlling the alarm output. |
| Remote Advanced Operation | Remotely operating HDD management (initializing HDD, setting HDD property), upgrading system firmware, clearing I/O alarm output. |
| Remote Shutdown/Reboot | Remotely shutting down or rebooting the device. |
Camera Configuration
| Permission | Description |
|---|---|
| Remote Live View | Remotely viewing live video of the selected camera(s). |
| Local Manual Operation | Locally starting/stopping manual recording and alarm output of the selected camera(s). |
| Remote Manual Operation | Remotely starting/stopping manual recording and alarm output of the selected camera(s). |
| Local Playback | Locally playing back recorded files of the selected camera(s). |
| Remote Playback | Remotely playing back recorded files of the selected camera(s). |
| Local PTZ Control | Locally controlling PTZ movement of the selected camera(s). |
| Remote PTZ Control | Remotely controlling PTZ movement of the selected camera(s). |
| Local Video Export | Locally exporting recorded files of the selected camera(s). |
Save
Click OK to save the settings.
Only the admin user account has the permission of restoring factory default parameters.
Set Local Live View Permission for Non-Admin Users
Go to User
Go to System > User.
Open admin user settings
Click  of admin user.
Enter admin password
Enter admin password and click OK.
Select cameras
Select cameras that non-admin user can view in local and click OK.
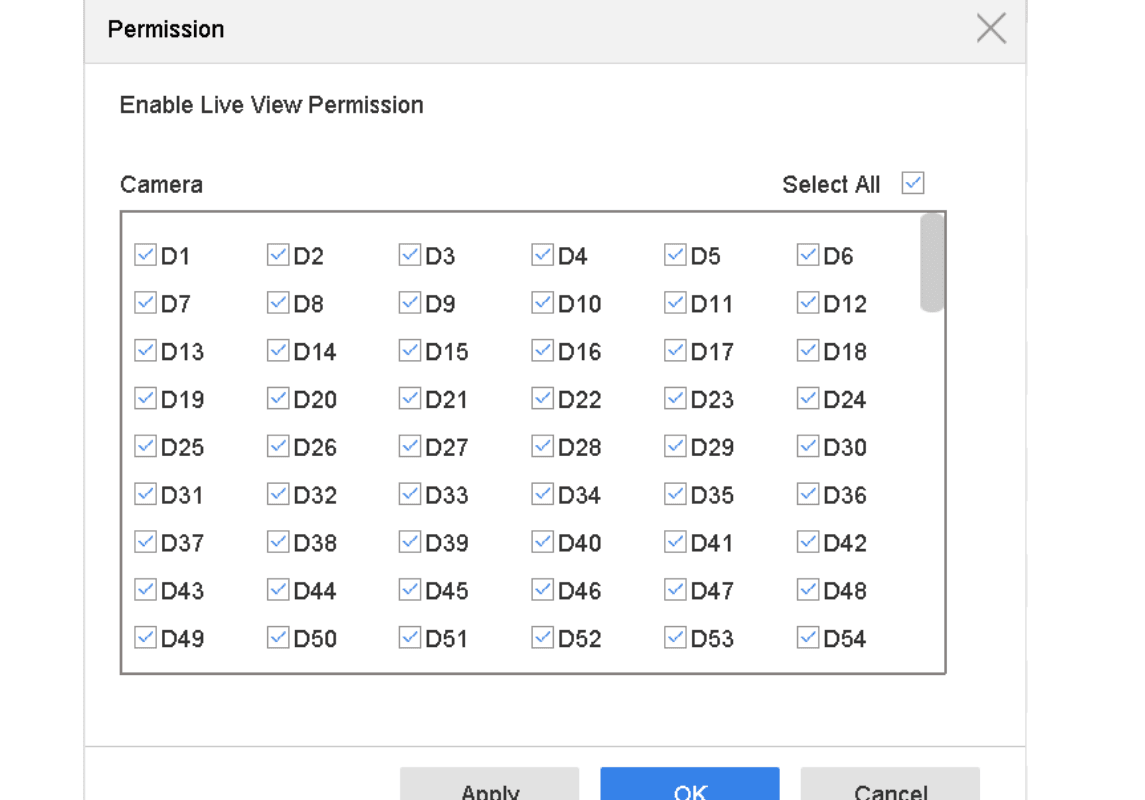
Figure 18-8 Enable Live View Permission
Configure non-admin user
Click of non-admin user.
Enter Camera Configuration
Enter Camera Configuration interface.
Set camera permission
Select Camera Permission as Local Live View.
Select cameras
Select cameras to live view.
Save
Click OK.
Edit the Admin User
For the admin user account, you can modify its password and the unlock pattern.
Go to User
Go to System > User.
Select admin user
Select the admin user from the list and click Modify.
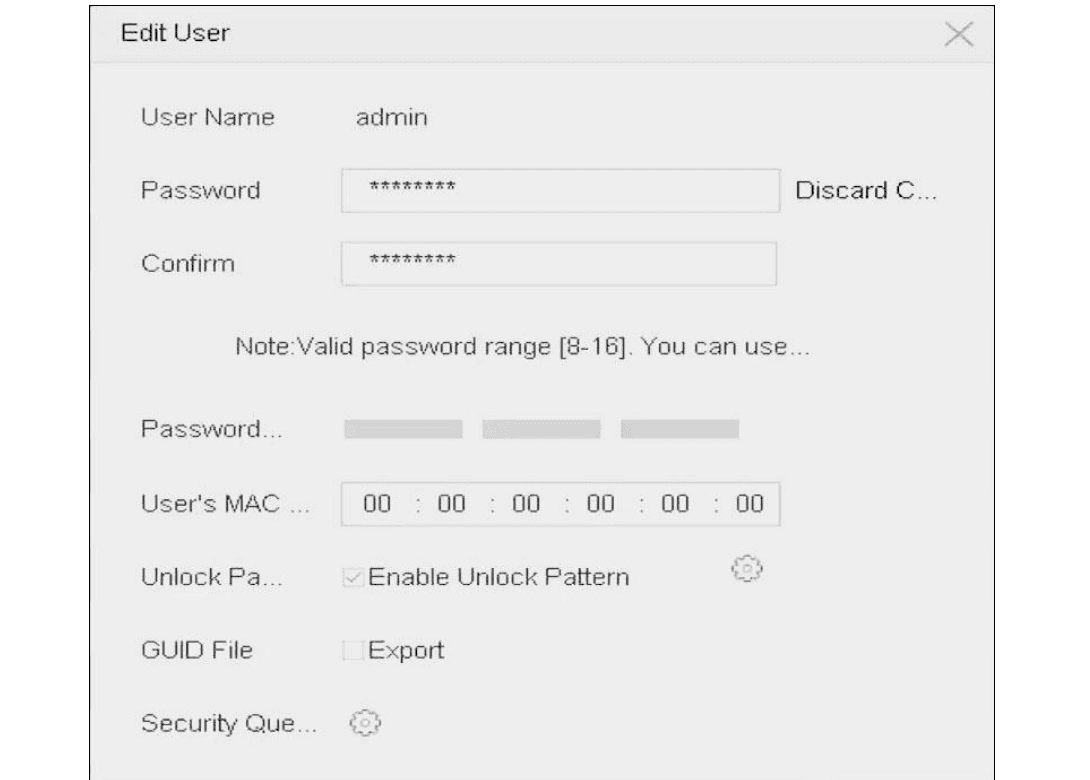
Figure 18-9 Edit User (Admin)
Edit user information
Edit the admin user information as demand, including the new admin password (strong password is required), and MAC address.
Edit unlock pattern
Edit the unlock pattern for the admin user account.
- Check the checkbox of Enable Unlock Pattern to enable the use of unlock pattern when logging in to the device.
- Use the mouse to draw a pattern among the 9 dots on the screen, and release the mouse when the pattern is done.
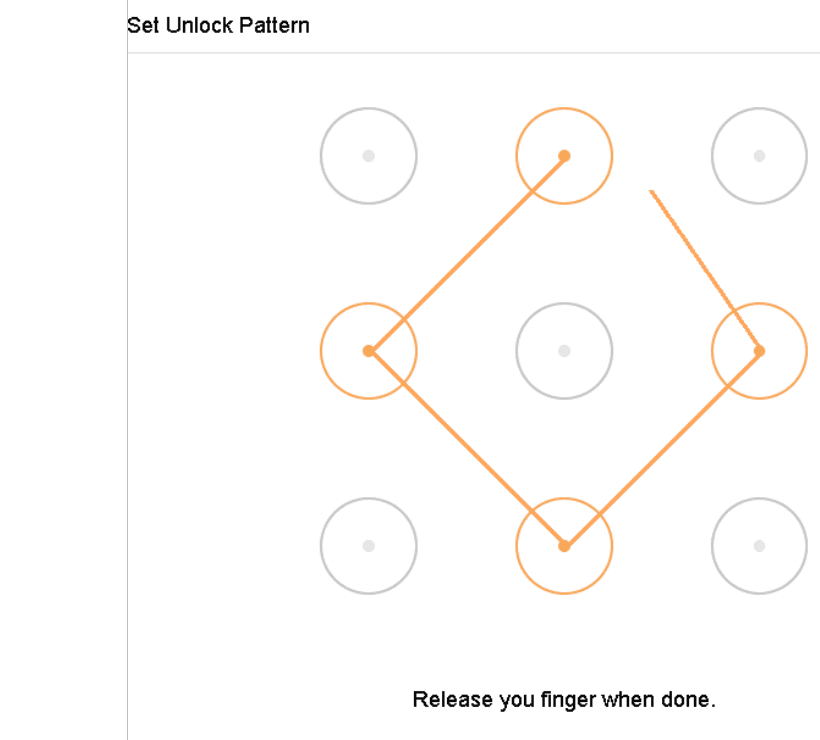
Figure 18-10 Set Unlock Pattern for Admin User
Configure security question
Configure security question for password resetting.
Please refer to Activate the Device for detailed instructions.
Export GUID
Click the  of Export GUID to enter the reset password interface to export the GUID file for the admin user account.
When the admin password is changed, you can export the new GUID to the connected U flash disk in the Import/Export interface for the future password resetting.
Save
Click the OK button to save the settings.
For the Operator or Guest user account, you can also click the button on the user management interface to edit the permission.
Edit the Operator/Guest User
You can edit the user information, including user name, password, permission level and MAC address. Check the checkbox of Change Password if you want to change the password, and input the new password in the text field of Password and Confirm. A strong password is recommended.
Go to User
Go to System > User.
Select user
Select a user from the list and click Modify.
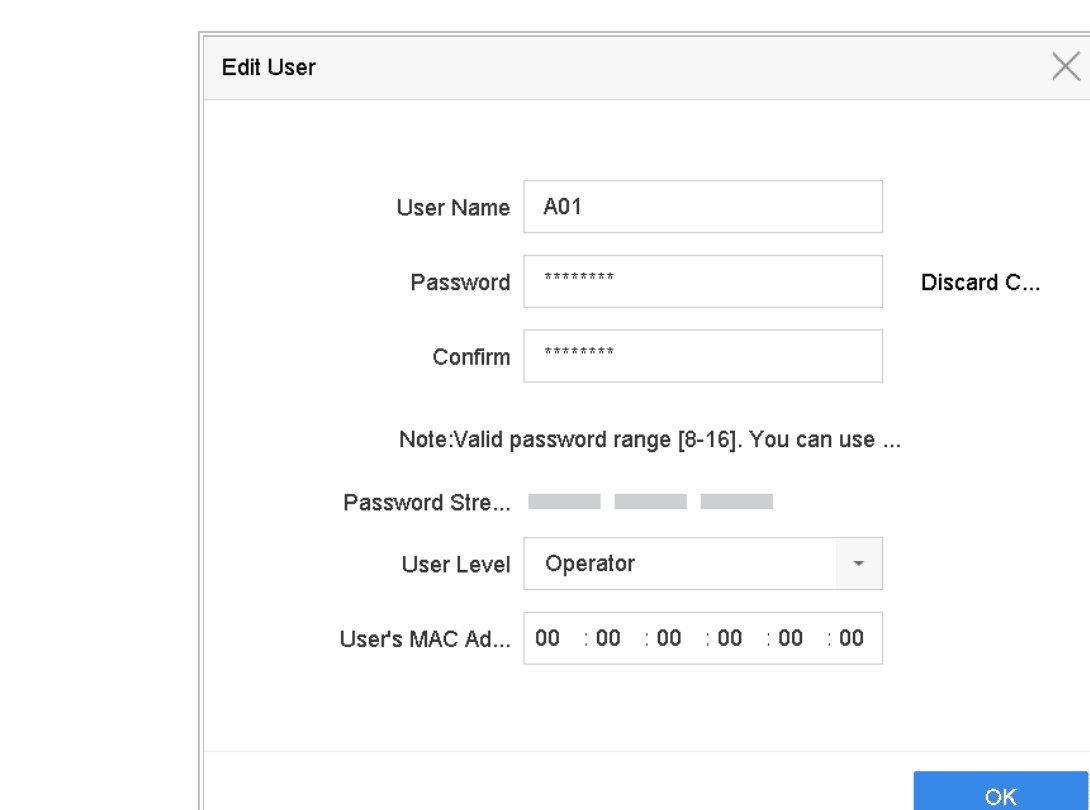
Figure 18-11 Edit User (Operator/Guest)
Edit user information
Edit the user information as demand, including the new password (strong password is required), and MAC address.
Delete a User
The admin user account has the permission to delete the operator/guest user account.
Go to User
Go to System > User.
Select user
Select a user from the list.
Delete
Click Delete to delete the selected user account.
System Maintenance
Procedures for storage device maintenance, log search and export, configuration import/export, firmware upgrade, restoring defaults, and system service settings on the Turbo HD DVR GUI 4.0.
Appendix
List of applicable power adapters approved for use with the Turbo HD DVR GUI 4.0, including model numbers, specifications, and manufacturer details.