 Center za pomoč LTS Connect
Initial Settings
Boot up, initialize, set passwords, reset a forgotten password, and complete the Startup Wizard for the Sapphire Series CVI DVR.
Read the following notes prior to using the Device.
- The interfaces in the Manual are used for introducing the operations and only for reference. The actual interface might be different dependent on the model you purchased. If there is inconsistency between the Manual and the actual product, the actual product shall govern.
- The Manual is a general document for introducing the product, so there might be some functions described for the Device in the Manual not apply to the model you purchased.
- Conventions for mouse operations on a menu.
- Click: On the menu, left-click the mouse once on an option to enter the option setting.
- Right-click: On any interface, right-click the mouse once to return to the previous level.
For details about mouse operations, see 3.4 Mouse Operations.
Booting up
- Ensure the input voltage corresponds to the power requirement of the Device. Power on the Device after the power cable is properly connected.
- To protect the Device, connect the Device with the power cable first, and then connect to the power source.
- To ensure the stable work of the Device and the external devices connected to the Device and to prolong the HDD life, it is recommended to refer to the national related standard to use the power source that provides stable voltage with less interference from ripples. UPS power source is recommended.
Connect to the monitor
Connect the Device to the monitor.
Plug in the power cable
Plug in the power cable to the Device.
Power on
Press the power button to turn on the Device. The power indicator light is on.
On the connected monitor, the live view screen is displayed by default. If you turn on the Device during the time period that is configured for recording, the system starts recording after it is turned on, and you will see the icon indicating recording status is working in the specific channels.
Initializing the Device
When booting up for the first time, you need to configure the password information for admin (by default).
To secure the Device, it is strongly recommended for you to properly keep the password for admin and modify it regularly.
Turn on the Device
Turn on the Device.
The Location, Language and Video Standard interface is displayed. See Figure 5-1.
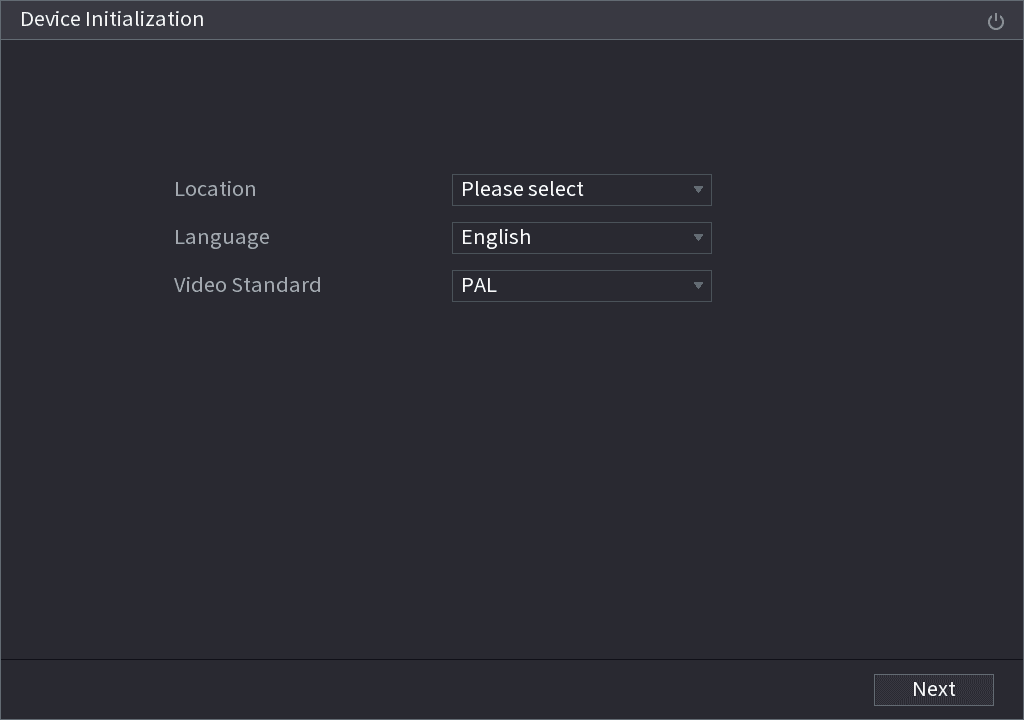
Select location
Select your location from the drop-down list, then language and video standard will match your location automatically. You can change the language and video standard manually.
Set system zone and time
Click Next.
The System Zone and System Time interface is displayed. See Figure 5-2.
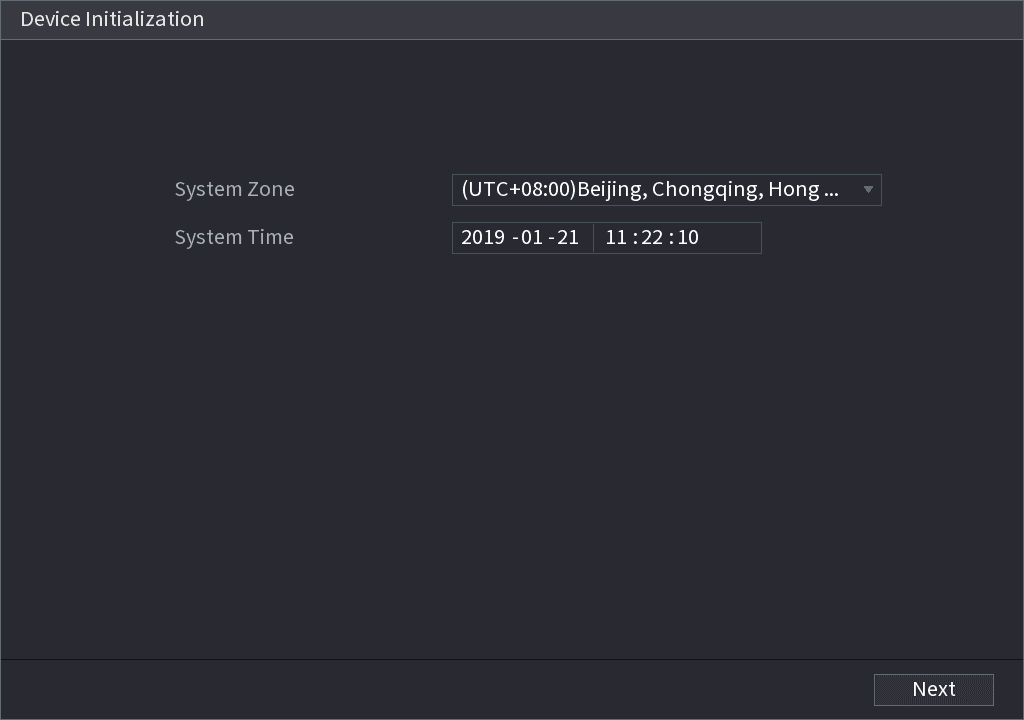
Select system zone, configure system time, and then click Next.
The Enter Password interface is displayed. See Figure 5-3.
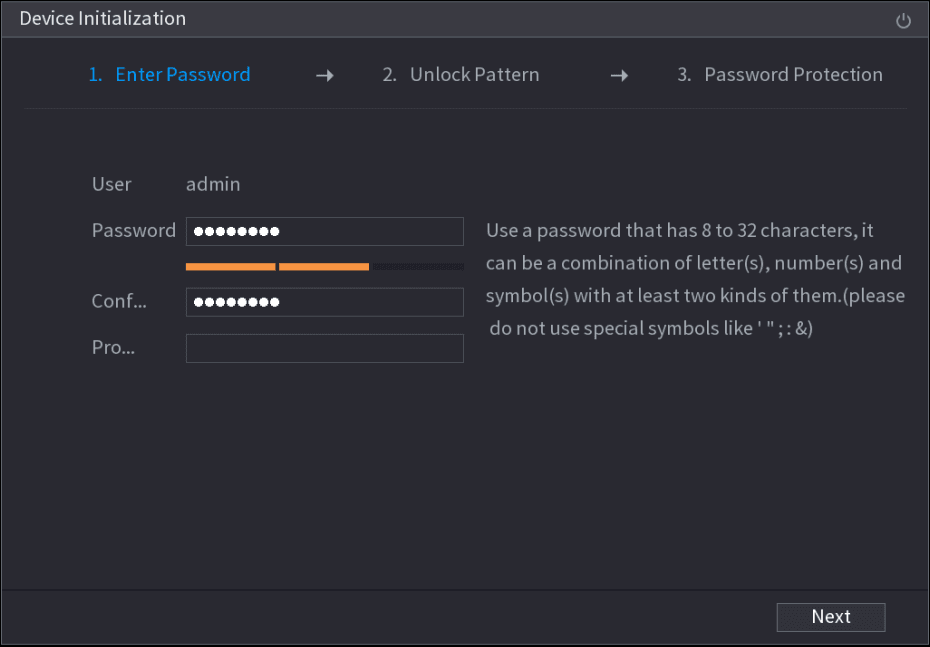
Configure the admin password
Configure the password information for admin. For details, see Table 5-1.
| Parameter | Description |
|---|---|
| User | By default, the user is admin. |
| Password | In the Password box, enter the password for admin. |
| Confirm Password | The new password can be set from 8 characters through 32 characters and contains at least two types from number, letter and special characters (excluding "'", """, ";", ":" and "&"). |
| Prompt Question | In the Prompt Question box, enter the information that can remind you of the password. On the login interface, click the prompt icon, the prompt will display to help you find back the password. |
Click the power-off icon to turn off the Device.
Draw an unlock pattern
Click Next.
The Unlock Pattern setting interface is displayed. See Figure 5-4.
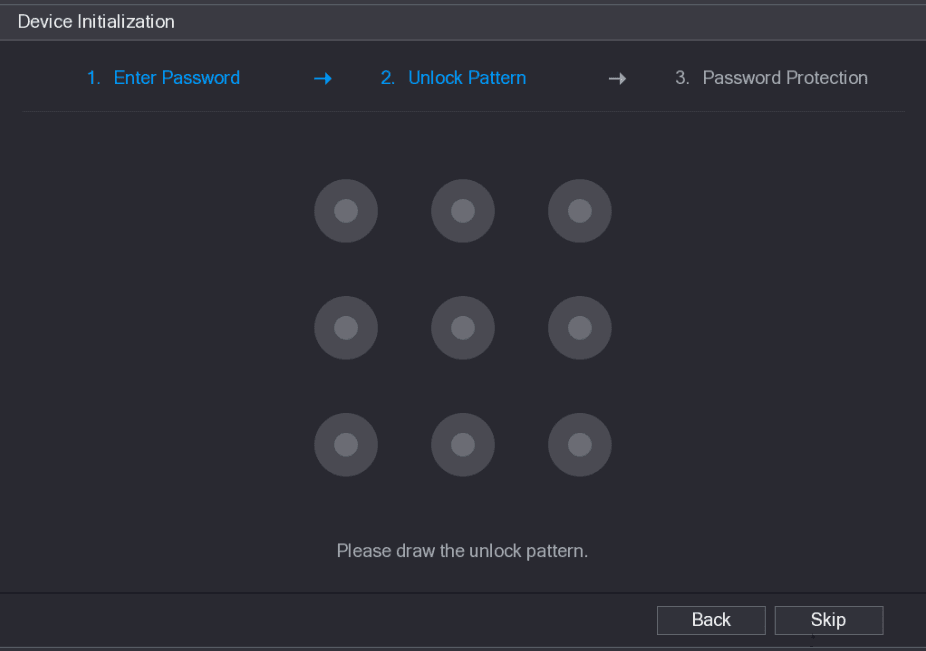
Draw an unlock pattern.
After the setting is completed, the Password Protection interface is displayed. See Figure 5-5.
- The pattern that you want to set must cross at least four points.
- If you do not want to configure the unlock pattern, click Skip.
- Once you have configured the unlock pattern, the system will require the unlock pattern as the default login method. If you skip this setting, enter the password for login.
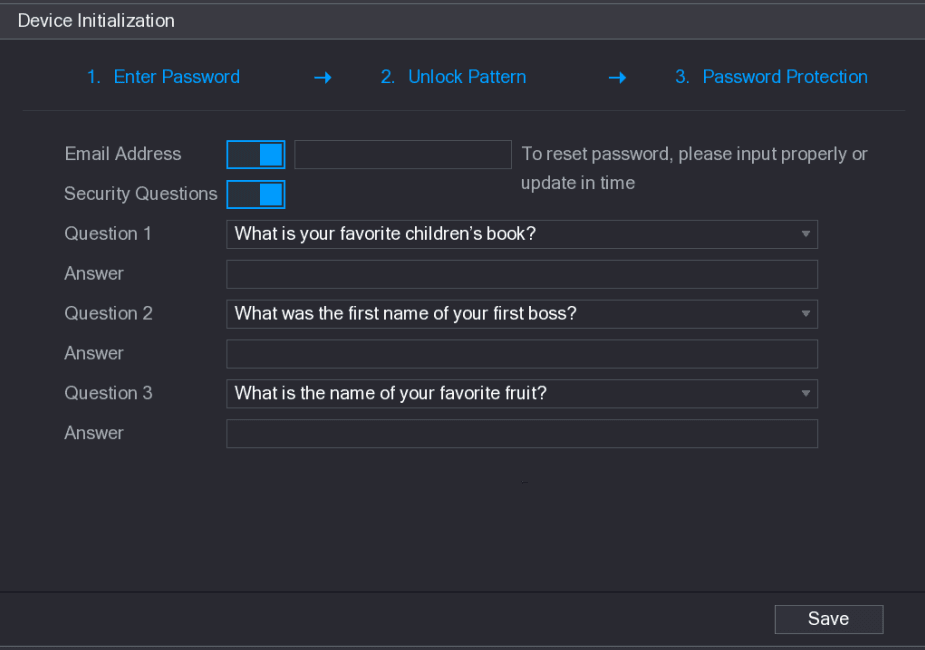
Configure password protection
Configure the protection parameters for password. For details, see Table 5-2.
After configuration, if you forget the password for admin user, you can reset the password through the reserved email address or security questions. For details about resetting the password, see 5.1.3 Resetting Password.
If you do not want to configure the settings, disable the email address and security questions functions on the interface.
| Password Protection Mode | Description |
|---|---|
| Email Address | Enter the reserved email address. In the Email Address box, enter an email address for password reset. If you forget the password, enter the security code that you will get from this reserved email address to reset the password of admin. |
| Security Questions | Configure the security questions and answers. If you forget the password, enter the answers to the questions can make you reset the password. |
If you want to configure the email or security questions function later or you want to change the configurations, select Main Menu > ACCOUNT > USER.
Save and accept the license agreement
Click Save to complete the settings.
The End-User License Agreement interface is displayed.
Select I have read and agree to all terms check box.
Click Next.
The Startup Wizard interface is displayed. For details about quick settings during startup, see 5.1.4 Setting Up with the Startup Wizard.
Resetting Password
You can reset the password by the following methods when you forget the password for admin account.
- If the password reset function is enabled, you can use mobile phone to scan the QR code to reset the password. For details, see 5.1.3.2 Resetting Password on Local Interface.
- If the password reset function is disabled, there are two situations:
- If you configured security questions, you can find back the password by the security questions.
- If you did not configure the security questions, you can only use the reset button on the mainboard to restore the Device to factory default. For details, see 5.1.3.3 Using Reset Button on the Mainboard.
Not all models are provided with reset button.
Enabling Password Reset Function
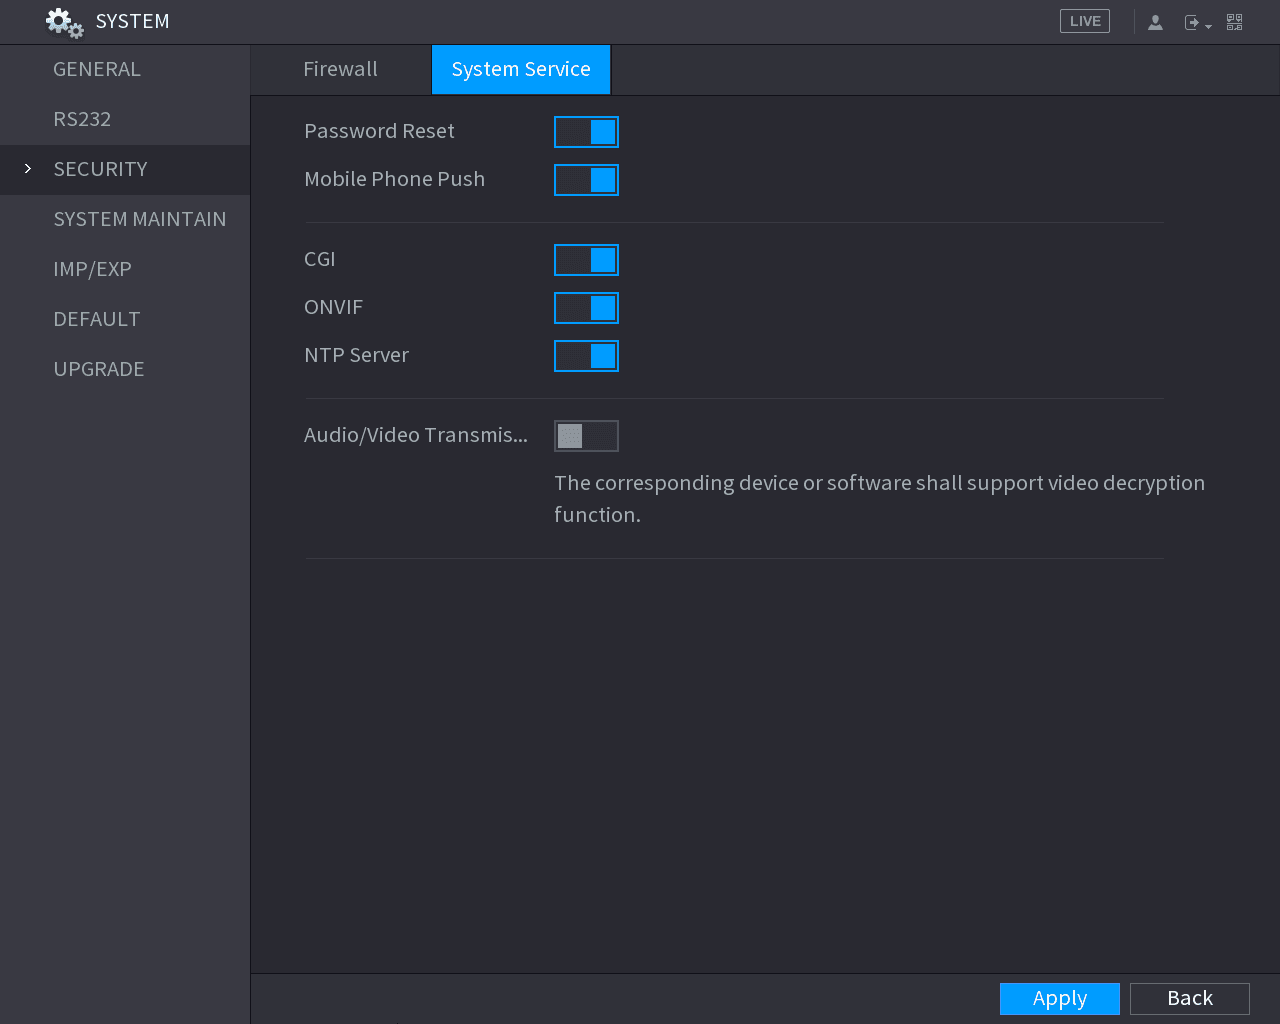
Open System Service
Select Main Menu > SYSTEM > SECURITY > System Service.
The System Service interface is displayed. See Figure 5-6.
Apply
Click Apply to save the settings.
Resetting Password on Local Interface
Enter the login interface
Enter the login interface.
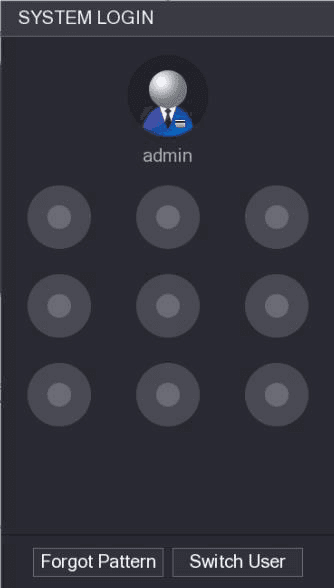
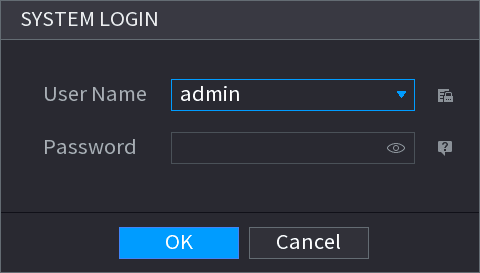
- If you have configured unlock pattern, the unlock pattern login interface is displayed. See Figure 5-7. Click Forgot Pattern, the password login interface is displayed. See Figure 5-8.
- If you did not configure unlock pattern, the password login interface is displayed. See Figure 5-8. Click the eye icon to display the password with plaintext.
To login from other user account, on the unlock pattern login interface, click Switch User; or on the password login interface, in the User Name list, select other users to login.
Start password reset
Click the reset icon.
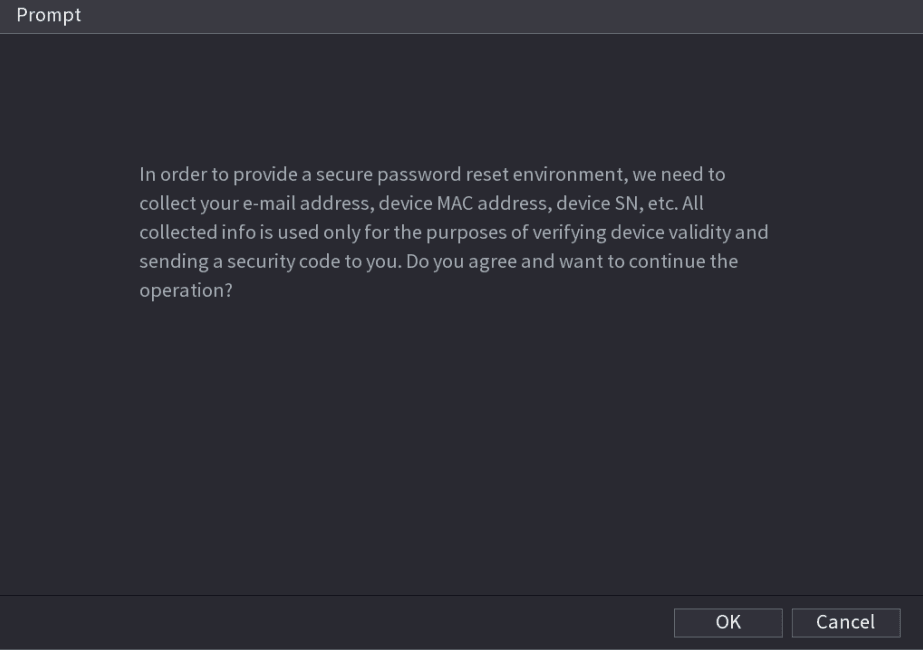
- If you have set the reserved email address, the Prompt message interface is displayed. See Figure 5-9.
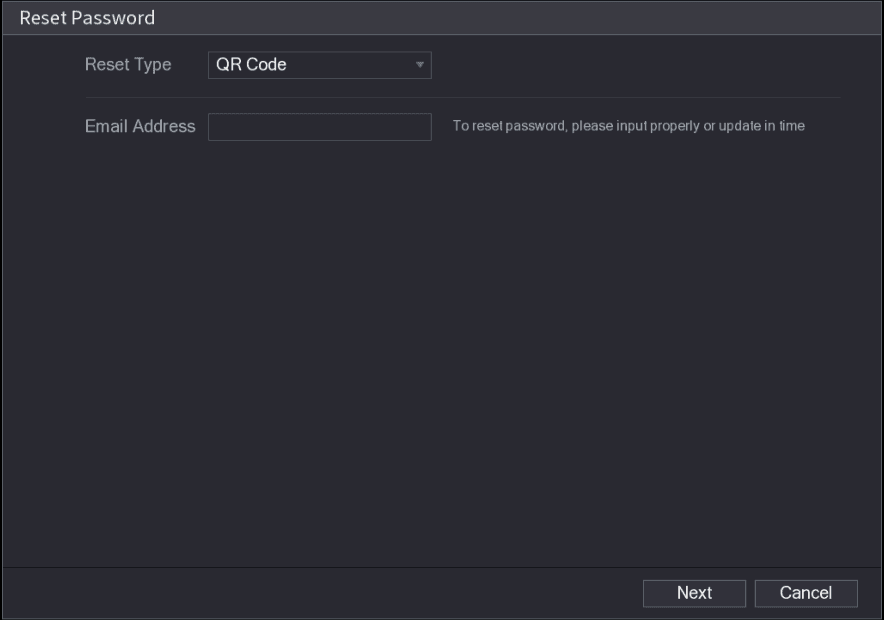
- If you did not set the reserved email address, the email entering interface is displayed. See Figure 5-10. Enter the email address, and then click Next, the Prompt message interface is displayed. See Figure 5-9.
Confirm the prompt
Click OK.
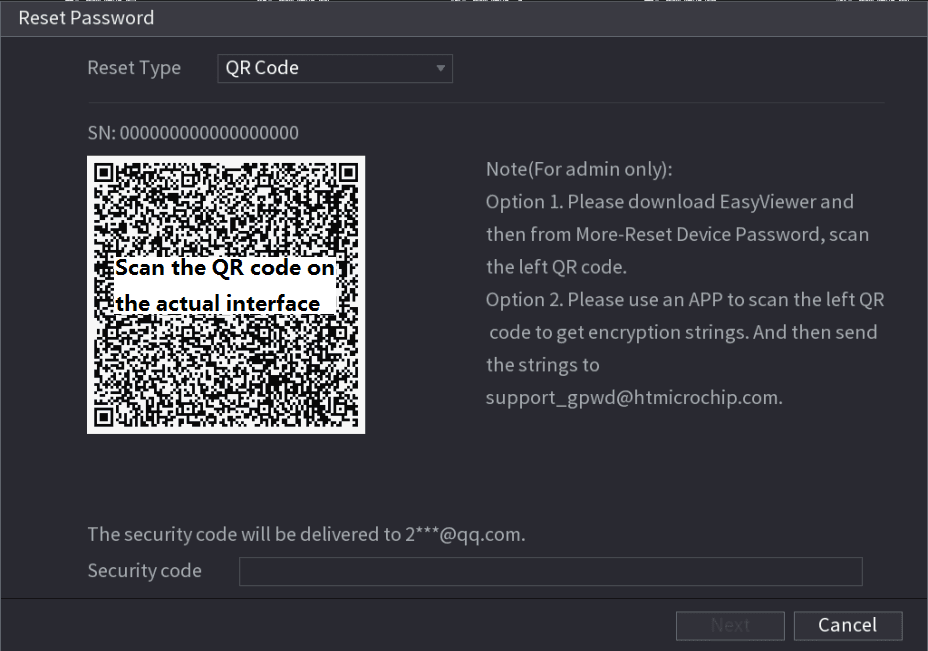
The Reset Password interface is displayed. See Figure 5-11.
After clicking OK, the system will collect your information for password reset, and the information includes but not limited to email address, MAC address, and device serial number. Read the prompt carefully before clicking OK.
Reset the password
Reset the password.
-
QR code
Follow the onscreen instructions to get the security code in your reserved email address. In the Security code box, enter the security code.
- You can get the security code twice by scanning the same QR code. If you need to get the security code once again, refresh the interface.
- Use the security code received in your email box to reset the password within 24 hours; otherwise the security code becomes invalid.
-
Security questions
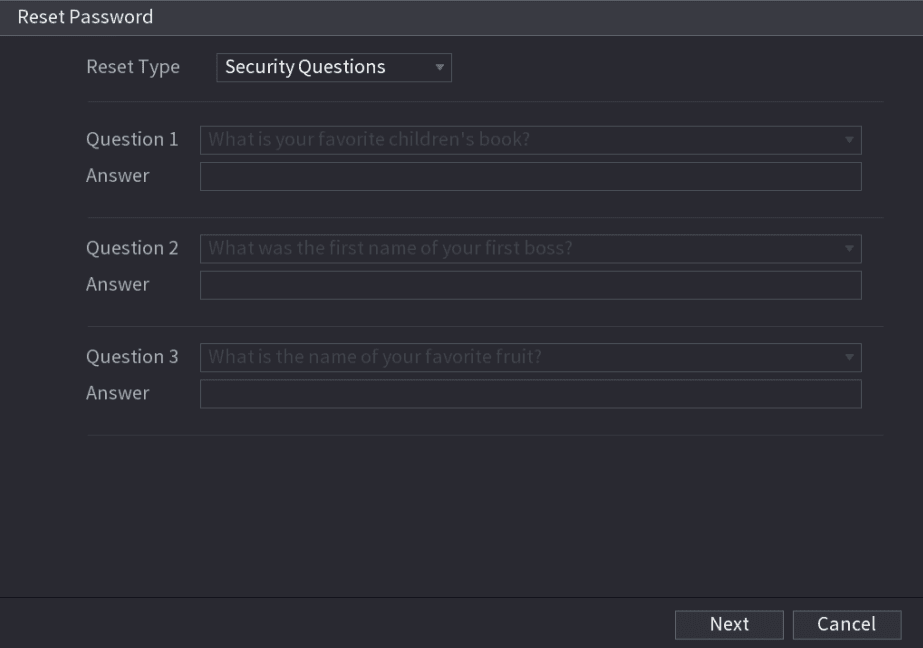
On the Reset password interface as shown in Figure 5-10, in the Reset Type list, select Security Questions, the Security Questions interface is displayed, see Figure 5-12.
If you did not configure the security questions before, in the Reset Type list, there will be no Security Questions.
In the Answer box, enter the correct answers.
Enter the new password
Click Next.
The new password resetting interface is displayed. See Figure 5-13.
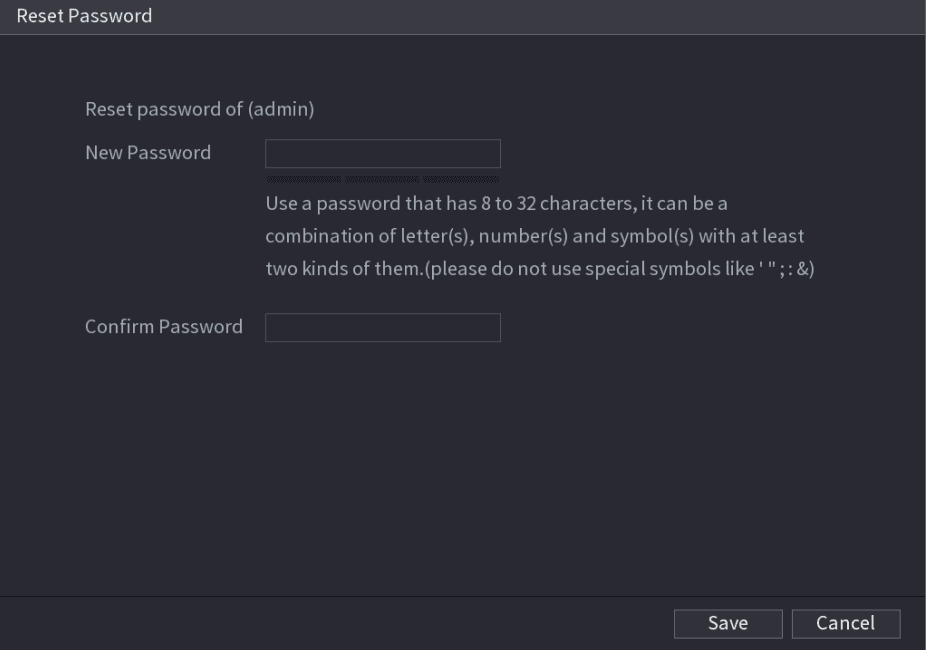
In the New Password box, enter the new password and enter it again in the Confirm Password box.
Save and finish
Click Save. The password resetting is started.
After resetting is completed, a pop-up message is displayed.
Click OK.
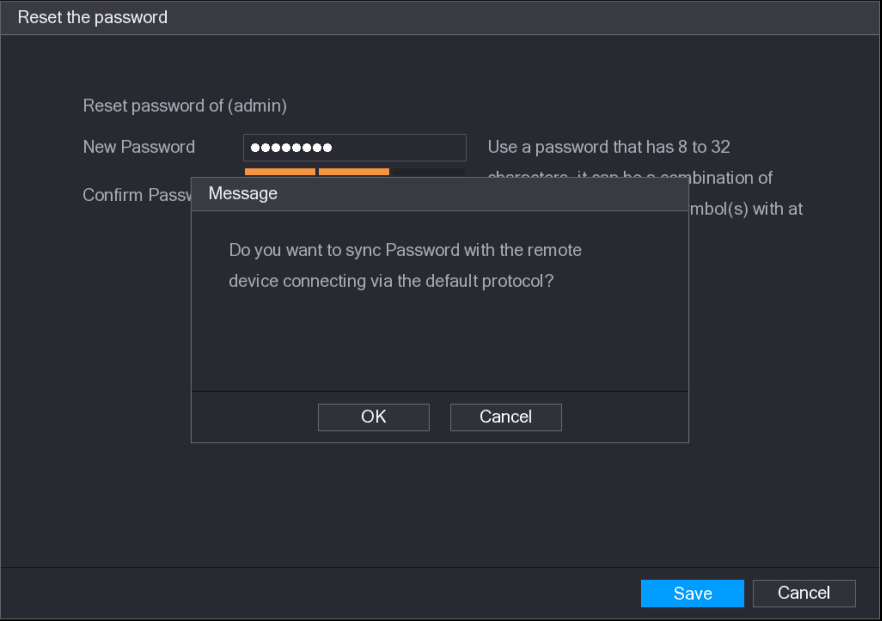
A pop-up message is displayed asking if you want to sync the password with the remote devices, see Figure 5-14.
- Click Cancel, the resetting is finished.
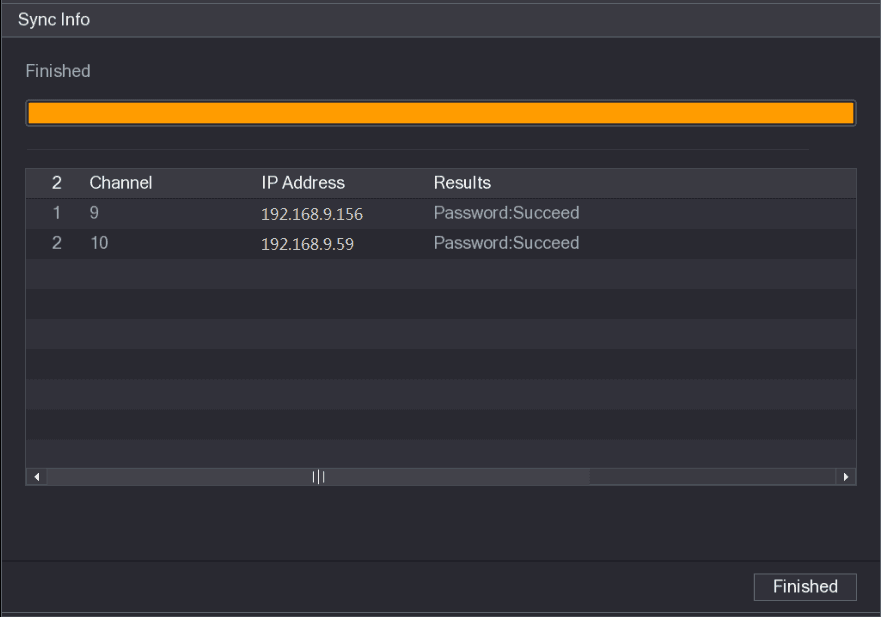
- Click OK, the Sync Info interface is displayed. See Figure 5-15.
This message appears only when there are digital channels instead of only analog channels.
Using Reset Button on the Mainboard
You can always use the reset button on the mainboard to reset the Device to the factory default.
Not all models are provided with reset button.
Open the cover panel
Disconnect the Device from power source, and then remove the cover panel. For details about removing the cover panel, see 2.2 Installing HDD.
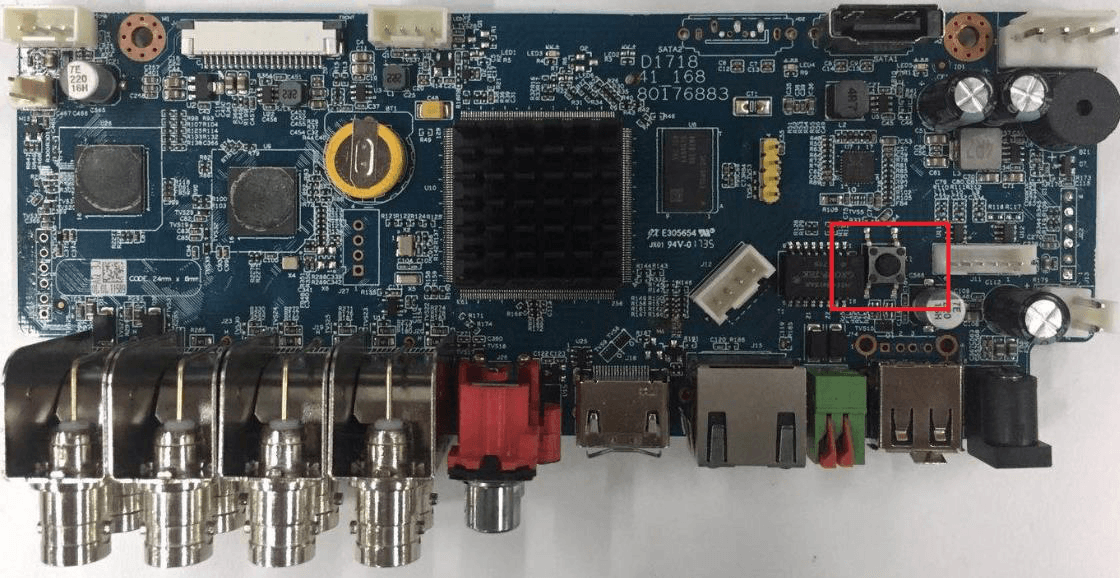
Press the reset button
Find the reset button on the mainboard, and then press and hold the reset button for 5 seconds to 10 seconds. See Figure 5-16 for the location of the reset button.
Reboot the Device
Reboot the Device.
After the Device is rebooted, the settings have been restored to the factory default. You can start resetting the password.
Setting Up with the Startup Wizard
Entering Startup Wizard
The Startup Wizard helps you configure the basic settings to set up the Device.
After you have initialized the Device, the Startup Wizard interface is displayed. See Figure 5-17.
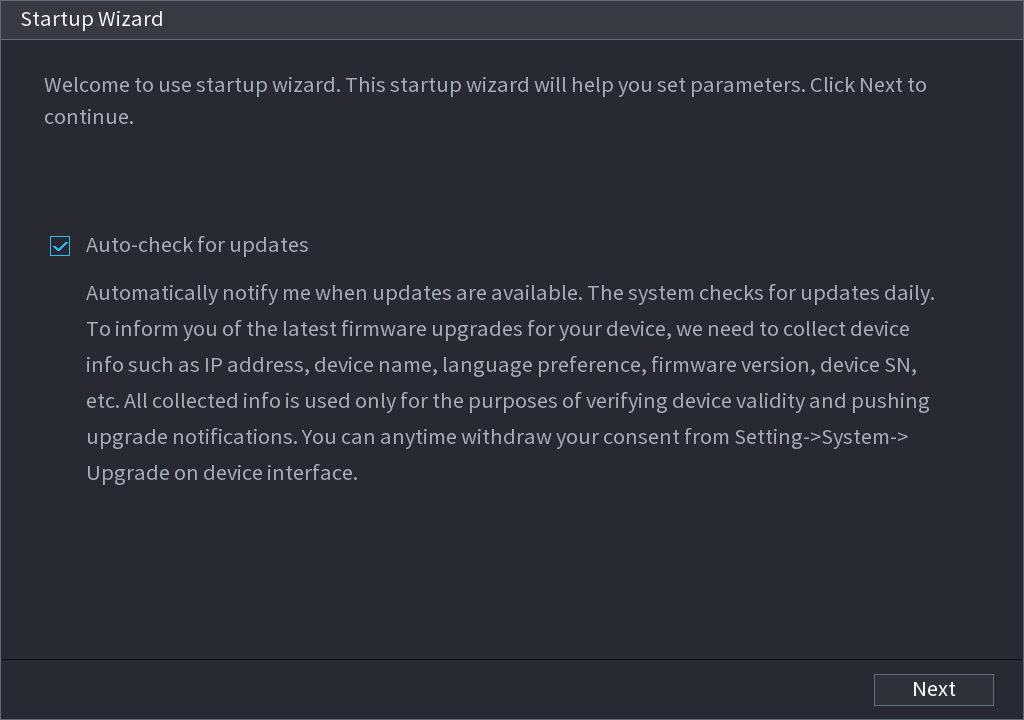
- If you select the Auto-check for updates check box, the system will notify you automatically when updates are available.
- After the auto-check function is enabled, to notify you to update timely, the system will collect the information such as IP address, device name, firmware version, and device serial number. The collected information is only used to verify the legality of the Device and push upgrade notices.
- If you clear the Auto-check for updates check box, the system will not perform automatic checks.
Configuring General Settings
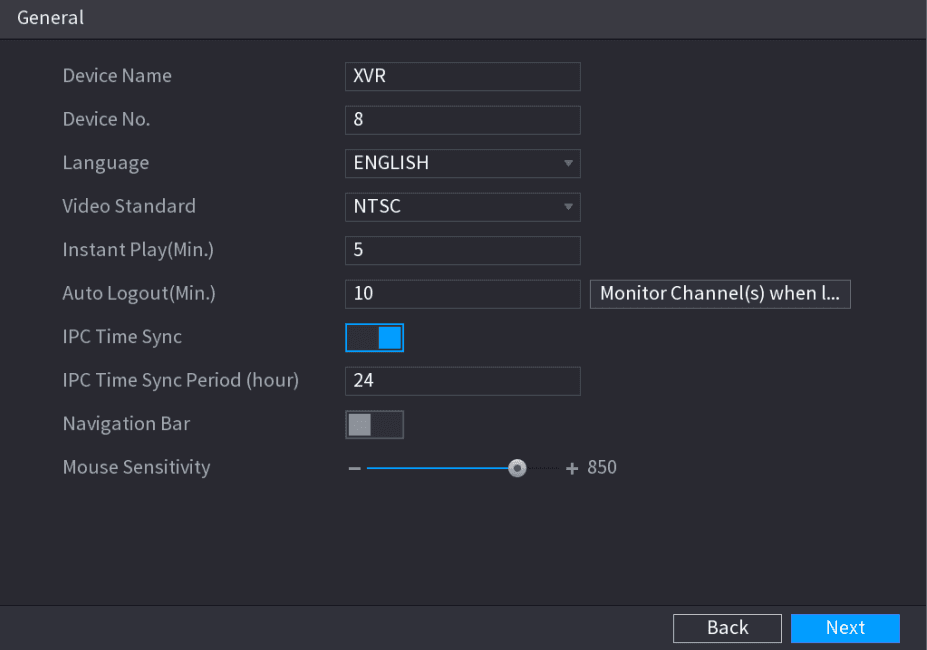
You can configure the general settings for the Device such as Device name, language, and settings for instant playback.
You can also configure general settings by selecting Main Menu > SYSTEM > GENERAL > General.
Open the General interface
On the Startup Wizard interface, click Next.
The General interface is displayed. See Figure 5-18.
Configure the general parameters
Configure the general settings parameters. See Table 5-3.
| Parameter | Description |
|---|---|
| Device Name | In the Device Name box, enter the Device name. |
| Device No. | In the Device No. box, enter a number for the Device. |
| Language | In the Language list, select a language for the Device system. |
| Video Standard | In the Video Standard list, select PAL or NTSC according to your actual situation. |
| Instant Play (Min.) | In the Instant Play box, enter the time length for playing back the recorded video. The value ranges from 5 to 60. On the live view control bar, click the instant playback button to play back the recorded video within the configured time. |
| Auto Logout (Min.) | In the Auto Logout box, enter the standby time for the Device. The Device automatically logs out when it is not working for the configured time period. You need to login the Device again. The value ranges from 0 to 60. 0 indicates there is not standby time for the Device. Click Monitor Channel(s) when logout. You can select the channels that you want to continue monitoring when you logged out. |
| IPC Time Sync | Syncs the Device time with IP camera. |
| IPC Time Sync Period (hour) | In the IPC Time Sync Period box, enter the interval for time sync. |
| Navigation Bar | Enable the navigation bar. When you click on the live view screen, the navigation bar is displayed. |
| Mouse Sensitivity | Adjust the speed of double-click by moving the slider. The bigger the value is, the faster the double-clicking speed must be. |
Configuring Date and Time Settings
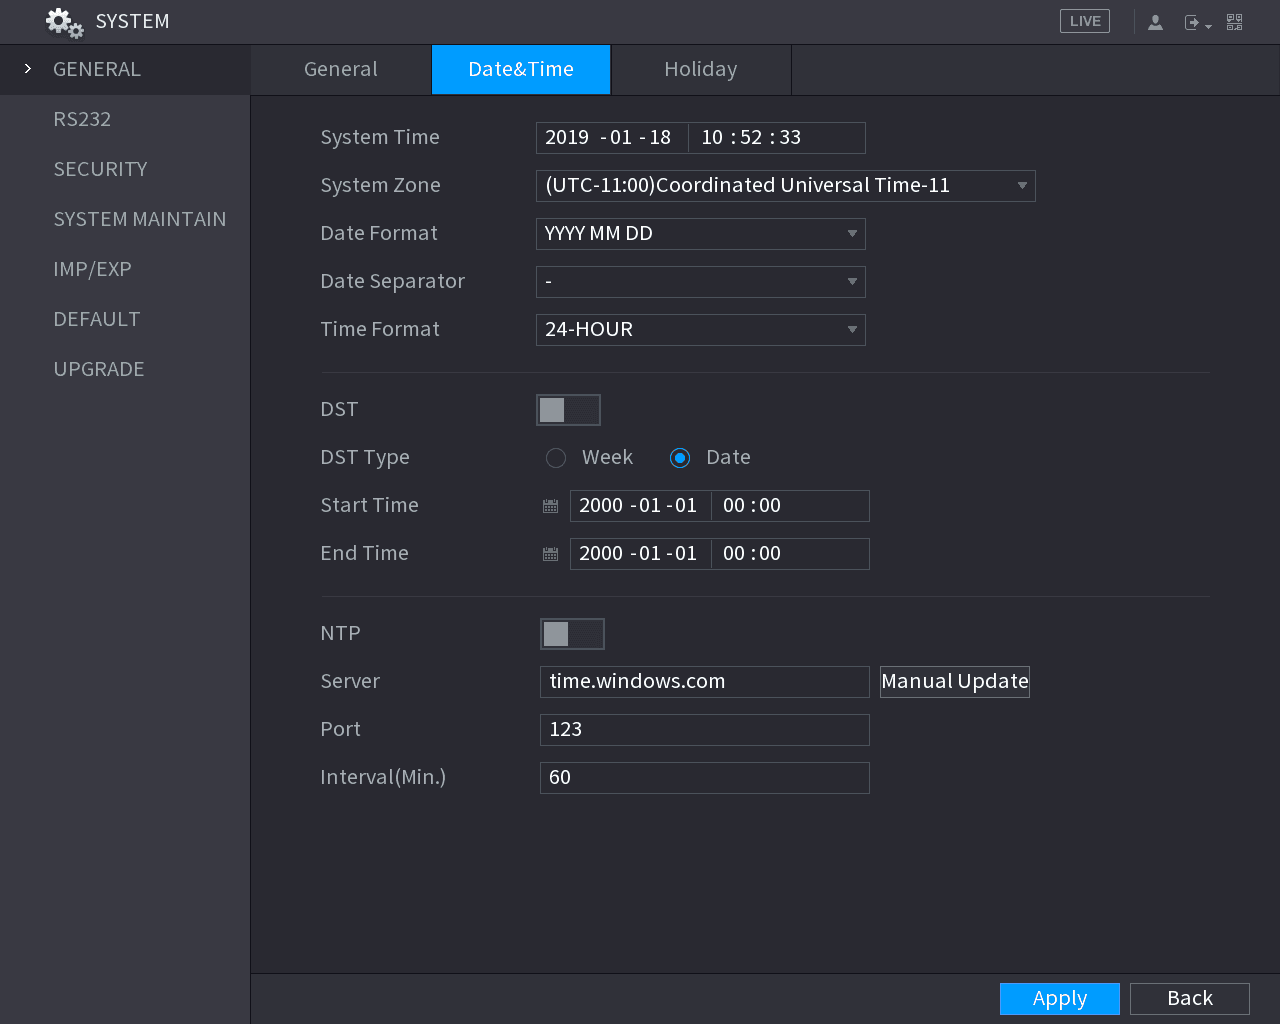
You can configure the system time, choose the time zone, set the daylight saving time, and enable the NTP server.
You can also configure date and time settings by selecting Main Menu > SYSTEM > GENERAL > Date &Time.
Open the Date & Time interface
After you have configured the general settings, on the General interface, click Next.
The Date &Time interface is displayed. See Figure 5-19.
Configure the date and time parameters
Configure the settings for date and time parameters. See Table 5-4.
| Parameter | Description |
|---|---|
| System Time | In the System Time box, enter time for the system. Click the time zone list, you can select a time zone for the system, and the time in adjust automatically. Do not change the system time randomly; otherwise the recorded video cannot be searched. It is recommended to avoid the recording period or stop recording first before you change the system time. |
| System Zone | In the System Zone list, select a time zone for the system. |
| Date Format | In the Date Format list, select a date format for the system. |
| Date Separator | In the Date Separator list, select a separator style for the date. |
| Time Format | In the Time Format list, select 12-HOUR or 24-HOUR for the time display style. |
| DST | Enable the Daylight Saving Time function. Click Week or click Date. |
| Start Time / End Time | Configure the start time and end time for the DST. |
| NTP | Enable the NTP function to sync the Device time with the NTP server. |
| Server | In the Server box, enter the IP address or domain name of the corresponding NTP server. Click Manual Update, the Device starts syncing with the server immediately. |
| Port | The system supports TCP protocol only and the default setting is 123. |
| Interval (Min.) | In the Interval box, enter the amount of time that you want the Device to sync time with the NTP server. The value ranges from 0 to 65535. |
Configuring Network Settings
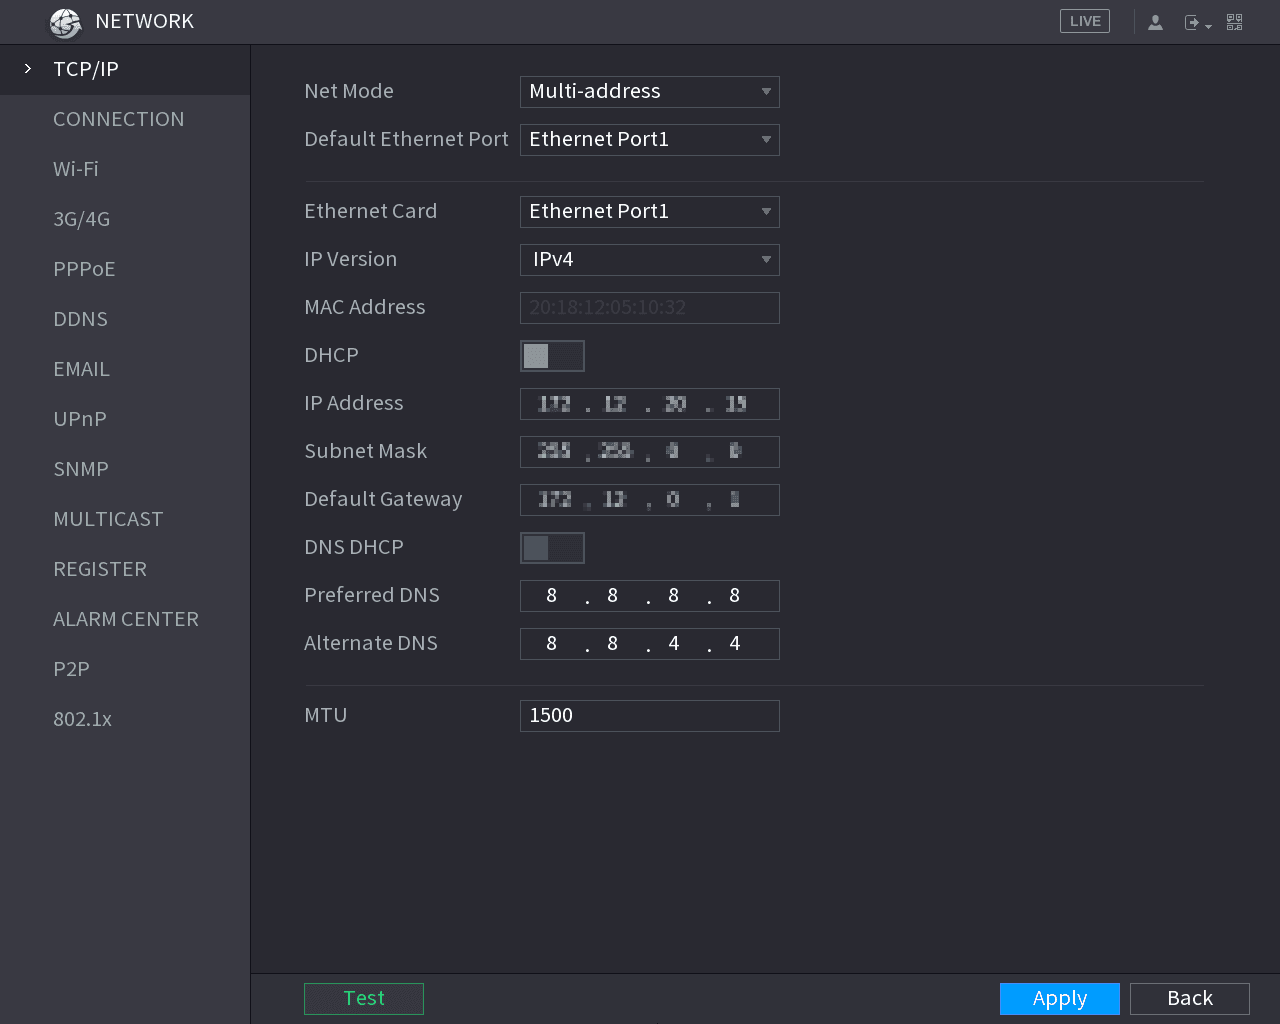
You can configure the basic network settings such as net mode, IP version, and IP address of the Device.
You can also configure network settings by selecting Main Menu > NETWORK > TCP/IP.
Open the NETWORK interface
After you have configured the date and time settings, on the Date &Time interface, click Next.
The NETWORK interface is displayed. See Figure 5-20.
Configure the network parameters
Configure the settings for network parameters. See Table 5-5.
| Parameter | Description |
|---|---|
| Net Mode | Multi-address: Two Ethernet ports work separately through either of which you can request the Device to provide the services such as HTTP and RTSP. You need to configure a default Ethernet port (usually the Ethernet port 1 by default) to request the services from the device end such as DHCP, Email and FTP. If one of the two Ethernet ports is disconnected as detected by networking testing, the system network status is regarded as offline. Fault Tolerance: Two Ethernet ports share one IP address. Normally only one Ethernet port is working and when this port fails, the other port will start working automatically to ensure the network connection. When testing the network status, the network is regarded as offline only when both of the two Ethernet ports are disconnected. The two Ethernet ports are used under the same LAN. Load Balance: Two network cards share one IP address and they are working at the same time to share the network load averagely. If one of them fails, the other can continue working normally. When testing the network status, the network is regarded as offline only when both of the two Ethernet ports are disconnected. The two Ethernet ports are used under the same LAN. |
| Default Ethernet Port | The Device with single Ethernet port does not support this function. In the Ethernet Card list, select an Ethernet port as a default port. This setting is available only when the Multi-address is selected in the Net Mode list. |
| IP Version | In the IP Version list, you can select IPv4 or IPv6. Both versions are supported for access. |
| MAC Address | Displays the MAC address of the Device. |
| DHCP | Enable the DHCP function. The IP address, subnet mask and default gateway are not available for configuration once DHCP is enabled. If DHCP is effective, the obtained information will display in the IP Address box, Subnet Mask box and Default Gateway box. If not, all values show 0.0.0.0. If you want manually configure the IP information, disable the DHCP function first. If PPPoE connection is successful, the IP address, subnet mask, default gateway, and DHCP are not available for configuration. |
| IP Address / Subnet Mask / Default Gateway | Enter the IP address and configure the corresponding subnet mask and default gateway. IP address and default gateway must be in the same network segment. |
| DNS DHCP | Enable the DHCP function to get the DNS address from router. |
| Preferred DNS | In the Preferred DNS box, enter the IP address of DNS. |
| Alternate DNS | In the Alternate DNS box, enter the IP address of alternate DNS. |
| MTU | In the MTU box, enter a value for network card. The value ranges from 1280 byte through 1500 byte. The default is 1500. The suggested MTU values are as below. 1500: The biggest value of Ethernet information package. This value is typically selected if there is no PPPoE or VPN connection, and it is also the default value of some routers, network adapters and switches. 1492: Optimized value for PPPoE. 1468: Optimized value for DHCP. 1450: Optimized value for VPN. |
| Test | Click Test to test if the entered IP address and gateway are interworking. |
Configuring P2P Settings
You can add the Device into your cell phone client or the platform to manage.
You can also configure P2P function by selecting Main Menu > NETWORK > P2P.
Make sure the DVR is connected into the Internet, and if yes, in the Status box of the P2P interface, it shows Online.
Open the P2P interface
After you have configured the network settings, on the NETWORK interface, click Next.
The P2P interface is displayed. See Figure 5-21.
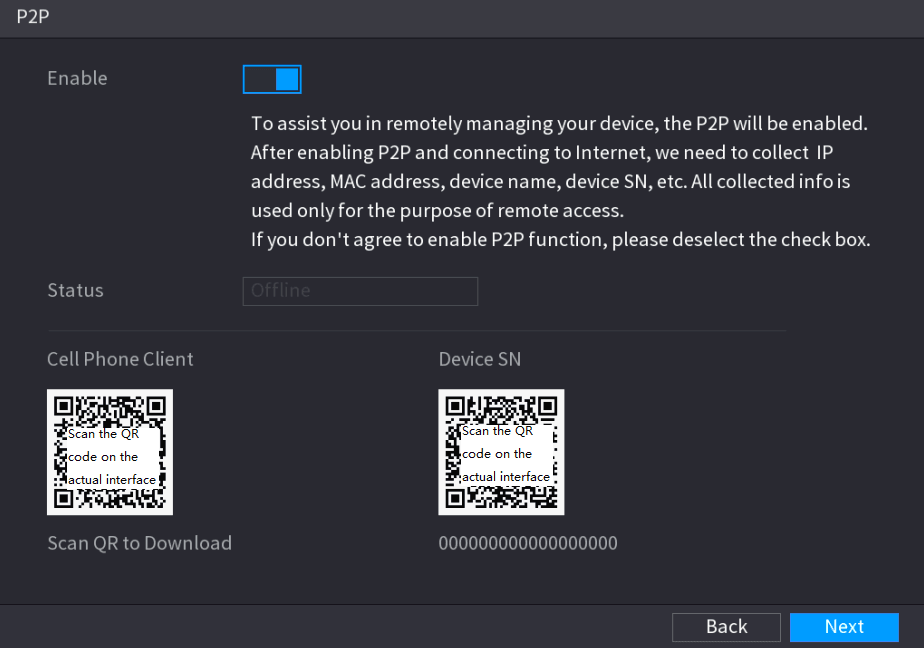
Enable P2P
Enable the P2P function.
After the P2P function is enabled and connected to the Internet, the system will collects your information for remote access, and the information includes but not limited to email address, MAC address, and device serial number.
Add the device
You can start adding the device.
- Cell Phone Client: Use your mobile phone to scan the QR code to add the device into the Cell Phone Client, and then you can start accessing the Device.
- Platform: Obtain the Device SN by scanning the QR code. Go to the P2P management platform and add the Device SN into the platform. Then you can access and manage the device in the WAN. For details, refer to the P2P operation manual.
- You can also enter the QR code of Cell Phone Client and Device SN by clicking the QR code icon on the top right of the interfaces after you have entered the Main Menu.
- If selection of this function is canceled, the Message interface is displayed. See Figure 5-22. Choose to enable it or not according to your actual need.
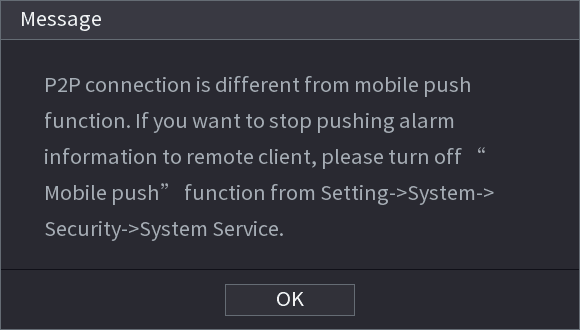
To use this function, take adding device into Cell Phone Client as an example.
Adding Device into Cell Phone Client
Download the application
Use your cell phone to scan the QR code under Cell Phone Client to download the application.
Open the menu
On your cell phone, open the application, and then tap the menu icon.
The menu is displayed. You can start adding the device.
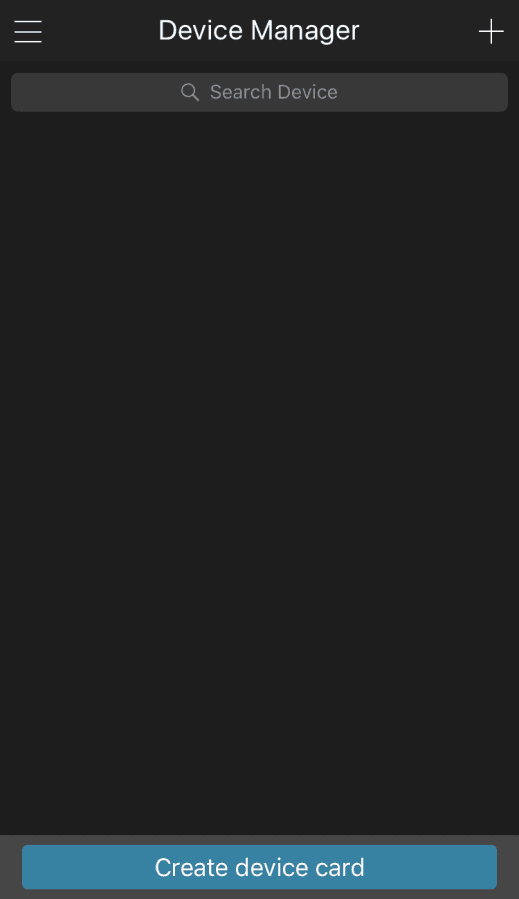
Confirm initialization
Tap the add icon on the top right corner.
The interface requiring device initialization is displayed. A pop-up message reminding you to make sure the Device is initialized is displayed.
Tap OK.
- If the Device has not been initialized, Tap Device Initialization to perform initializing by following the onscreen instructions.
- If the Device has been initialized, you can start adding it directly.
Add Device
Tap Add Device.
The Add Device interface is displayed. See Figure 5-24.
You can add wireless device or wired device. The Manual takes adding wired device as an example.
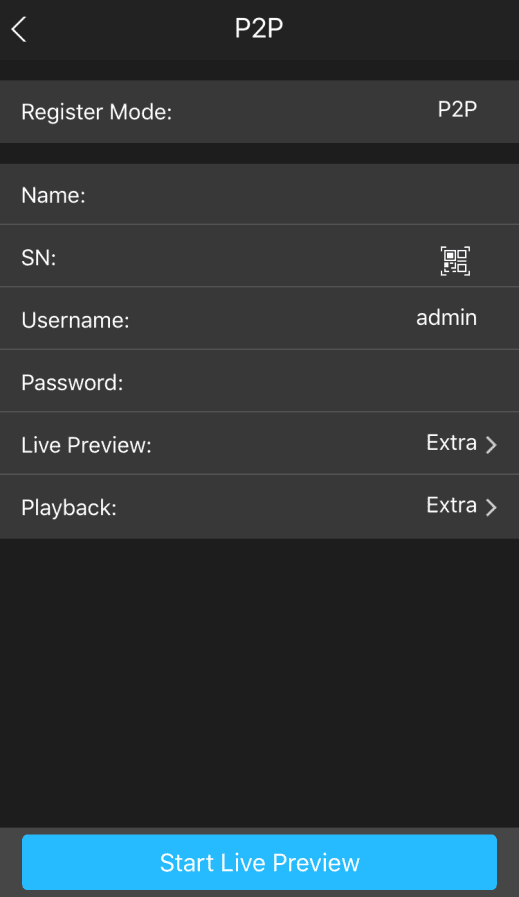
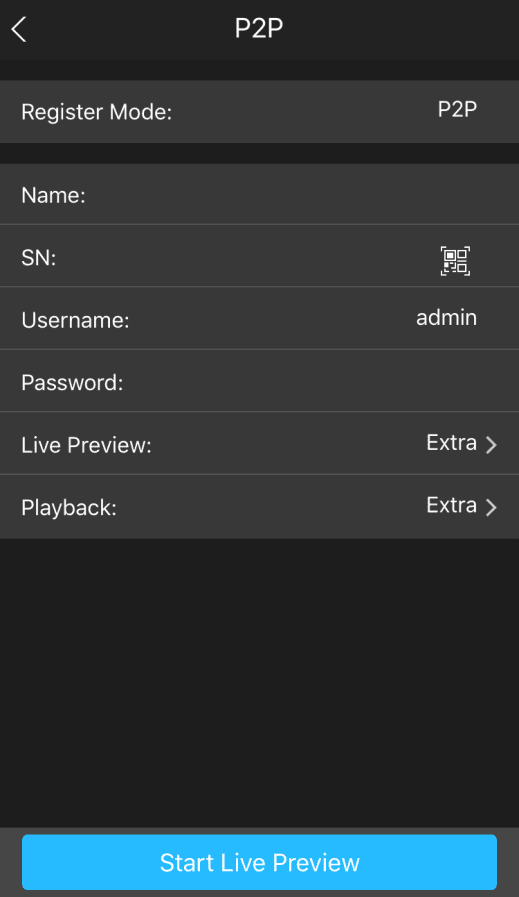
Start live preview
Enter a name for the DVR, the username and password, scan the QR code under Device SN.
Tap Start Live Preview.
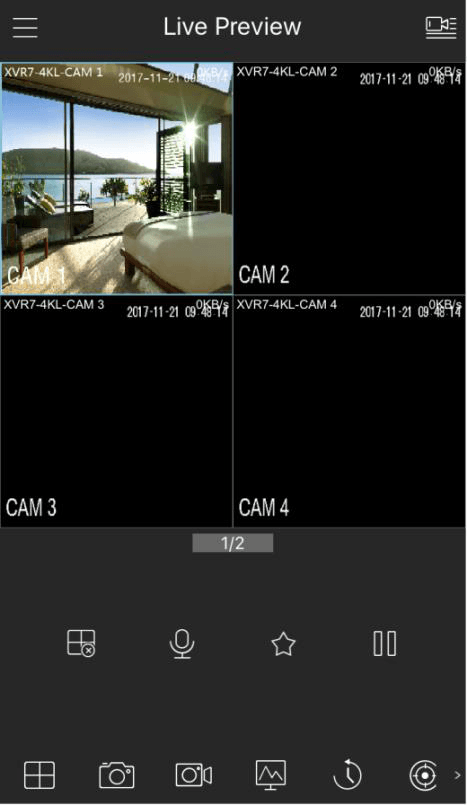
The Device is added and displayed on the live view interface of the cell phone. See Figure 5-26.
Configuring Encode Settings
You can configure the settings of main stream and sub stream for the Device.
You can also configure encode settings by selecting Main Menu > CAMERA > ENCODE > Encode.
Open the Encode interface
After you have configured the P2P settings, on the P2P interface, click Next.
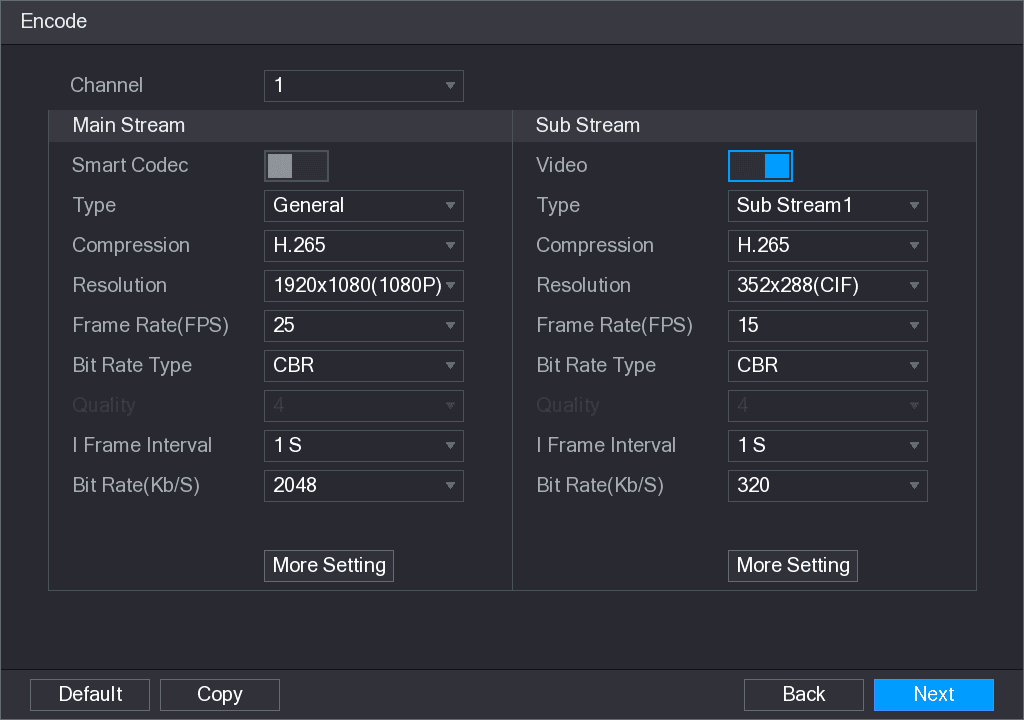
The Encode interface is displayed. See Figure 5-27.
Configure the encode parameters
Configure the settings for the main/sub streams parameters. See Table 5-6.
| Parameter | Description |
|---|---|
| Channel | In the Channel list, select the channel that you want to configure the settings for. |
| Smart Codec | Enable the smart codec function. This function can reduce the video bit stream for non-important recorded video to maximize the storage space. |
| Type | Main Stream: In the Type list, select General, MD (Motion Detect), or Alarm. Sub Stream: This setting is not configurable. |
| Compression | In the Compression list, select the encode mode. H.265: Main profile encoding. This setting is recommended. H.264H: High profile encoding. Low bit stream with high definition. H.264: Main profile encoding. H.264B: Baseline profile encoding. This setting requires higher bit stream compared with other settings for the same definition. |
| Resolution | In the Resolution list, select resolution for the video. The maximum video resolution might be different dependent on your device model. |
| Frame Rate (FPS) | Configure the frames per second for the video. The higher the value is, the clearer and smoother the image will become. Frame rate changes along with the resolution. Generally, in PAL format, you can select the value from 1 through 25; in NTSC format, you can select the value from 1 through 30. However, the actual range of frame rate that you can select depends on the capability of the Device. |
| Bit Rate Type | In the Bit Rate Type list, select CBR (Constant Bit Rate) or VBR (Variable Bit Rate). If you select CBR, the image quality cannot be configured; if you select VBR, the image quality can be configured. |
| Quality | This function is available if you select VBR in the Bit Rate List. The bigger the value is, the better the image will become. |
| I Frame Interval | The interval between two reference frames. |
| Bit Rate (Kb/S) | In the Bit Rate list, select a value or enter a customized value to change the image quality. The bigger the value is, the better the image will become. |
| Video | Enable the function for sub stream. |
| Audio Encode | Click More Setting, the More Setting interface is displayed. Audio Encode: This function is enabled by default for main stream. You need to manually enable it for sub stream 1. Once this function is enabled, the recorded video file is composite audio and video stream. |
| Audio Source | Audio Source: In the Audio Source list, you can select LOCAL and HDCVI. LOCAL: The audio signal is input from Audio In port. HDCVI: The audio signal is input from HDCVI camera. |
| Audio Format | Audio Format: In the Audio Format list, select a format that you need. |
Configuring Snapshot Settings
You can configure the basic snapshot settings such as quantity of snapshot each time, channel(s) to take snapshot, and image size and quality of snapshot.
You can also configure general settings by selecting Main Menu > CAMERA > ENCODE > Snapshot.
For more information about snapshot settings, see 5.8 Configuring Snapshot Settings.
Open the SNAPSHOT interface
After you have configured the encode settings, on the Encode interface, click Next.
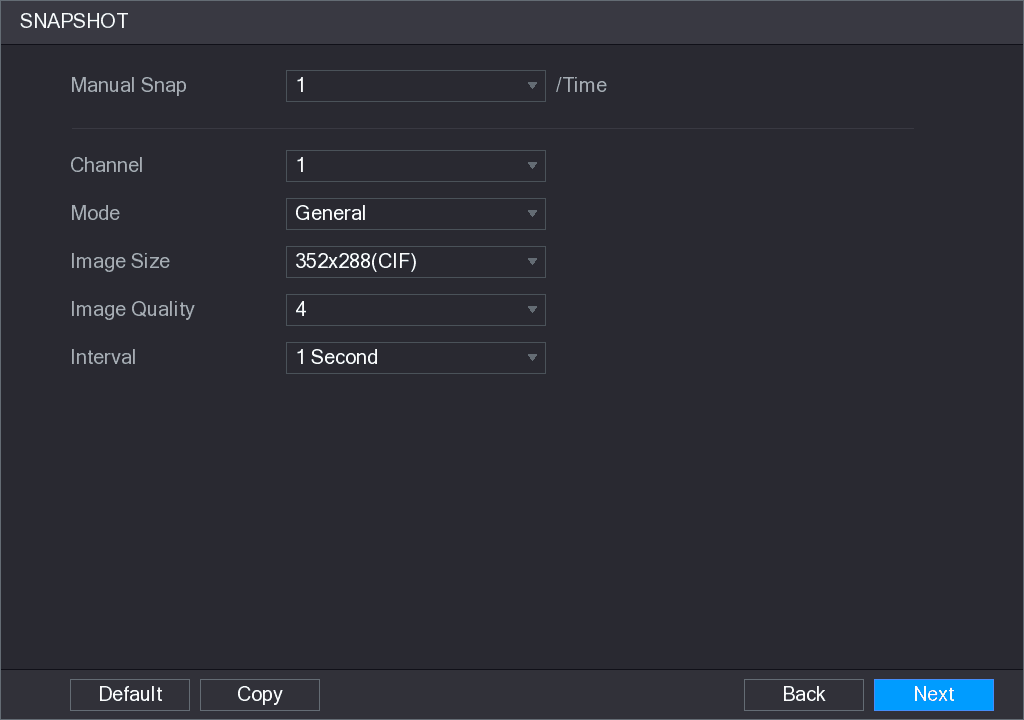
The SNAPSHOT interface is displayed. See Figure 5-28.
Configure the snapshot parameters
Configure the settings for the snapshot parameters. See Table 5-7.
| Parameter | Description |
|---|---|
| Manual Snap | In the Manual Snap list, select how many snapshots you want to take each time. |
| Channel | In the Channel list, select the channel that you want to configure the settings for. |
| Mode | In the Mode list, you can select Human Face, Event, or General as the event type for which you want to take a snapshot. General: The snapshot is taken during the scheduled period. Event: The snapshot is taken when there is an alarm event occurs, such as motion detection event, video loss, and local alarms. Human Face: The snapshot is taken when the face is detected. The face detection function is support only with the Channel 1. |
| Image Size | In the Image Size list, select a value for the image. The bigger the value is, the better the image will become. |
| Image Quality | Configure the image quality by 6 levels. The higher the level is, the better the image will become. |
| Interval | Configure or customize the snapshot frequency. |
Configuring Basic Storage Settings
You can configure the settings for the situations when HDD is full, file length and time length of recorded video, and the settings if to auto-delete the old files.
You can also configure basic storage settings by selecting Main Menu > STORAGE > BASIC.
Open the BASIC interface
After you have configured the encode settings, on the SNAPSHOT interface, click Next.
The BASIC interface is displayed. See Figure 5-29.
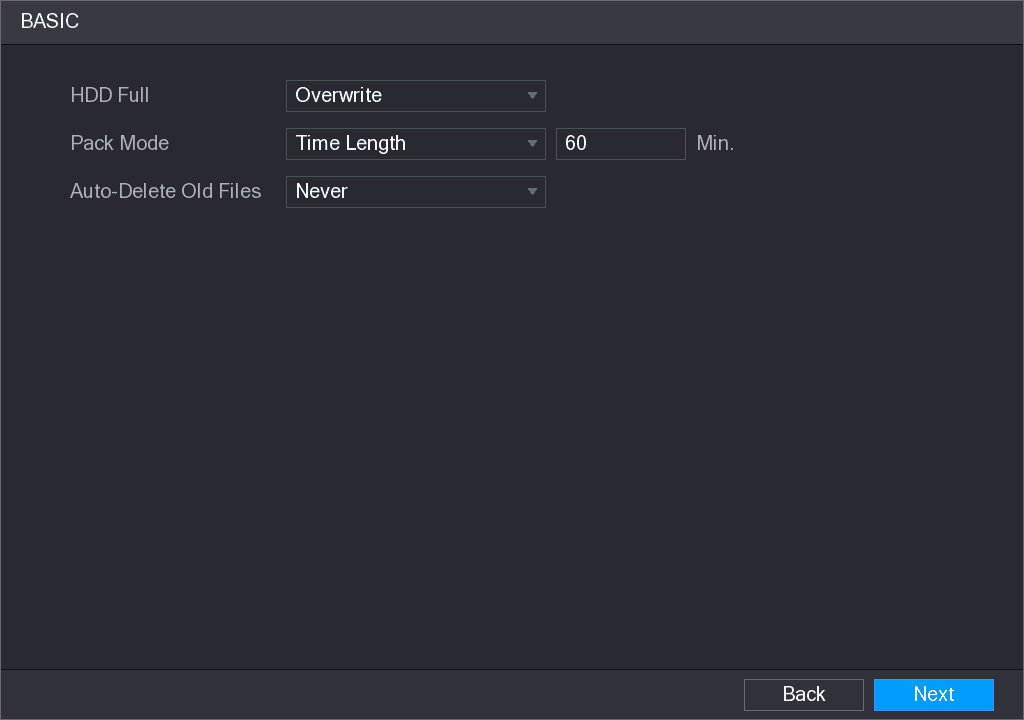
Configure the basic storage parameters
Configure the basic storage settings parameters. See Table 5-8.
| Parameter | Description |
|---|---|
| HDD Full | Configure the settings for the situation when all the read/write discs are full, and there are no more free discs. Select Stop Record to stop recording. Select Overwrite to overwrite the recorded video files always from the earliest time. The locked recorded video files will not be overwritten. |
| Pack Mode | Configure the time length and file length for each recorded video. |
| Auto-Delete Old Files | Configure whether to delete the old files and if yes, in the Auto-Delete Old Files list, select Customized to configure the time length for how long you want to keep the old files. |
Configuring Recorded Video Storage Schedule
You can configure the schedule for the recorded video such as channels to record, alarm settings, and the armed period.
You can also configure recorded video storage settings by selecting Main Menu > STORAGE > SCHEDULE > Record.
Open the Record interface
After you have configured the basic storage settings, on the BASIC interface, click Next.
The Record interface is displayed. See Figure 5-30.
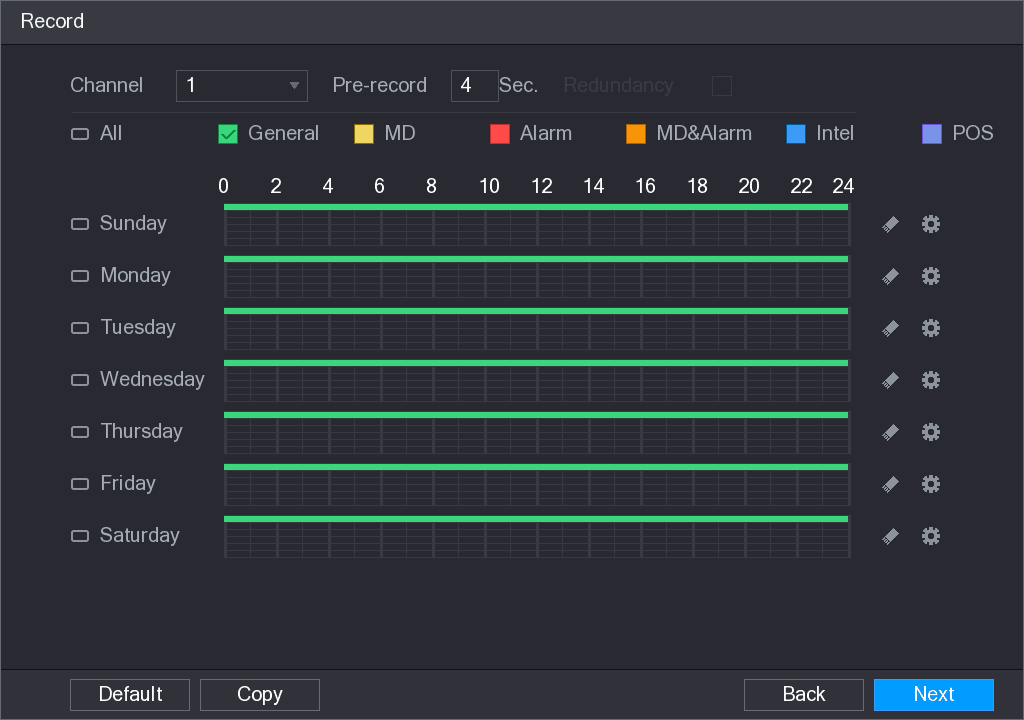
Configure the record parameters
Configure the record settings parameters. See Table 5-9.
| Parameter | Description |
|---|---|
| Channel | In the Channel list, select a channel to record the video. |
| Pre-record | In the Pre-record list, enter the amount of time that you want to start the recording in advance. |
| Redundancy | If there are several HDDs installed to the Device, you can set one of the HDDs as the redundant HDD to save the recorded files into different HDDs. In case one of the HDDs is damaged, you can find the backup in the other HDD. Select Main Menu > STORAGE > HDD MANAGER, and then set a HDD as redundant HDD. Select Main Menu > STORAGE > SCHEDUE > Record, and then select the Redundancy check box. If the selected channel is not recording, the redundancy function takes effect next time you record no matter you select the check box or not. If the selected channel is recording, the current recorded files will be packed, and then start recording according to the new schedule. Not all models support this function. The redundant HDD only back up the recorded videos but not snapshots. |
| Event type | Select the check box of the event type which includes General, MD (motion detect, video loss, tempering, diagnosis), Alarm (IoT alarms, local alarms, alarms from alarm box, IPC external alarms, IPC Offline alarms), MD&Alarm, Intel (IVS events, face detection), and POS. |
| Period | Define a period during which the configured recording setting is active. The system only activates the alarm in the defined period. |
| Copy | Click Copy to copy the settings to other channels. |
Define the recording period
Define the video recording period by drawing or editing. By default, it is active all the time.
-
Define the period by drawing.
Select the check box of event type. See Figure 5-31.

Define a period. The system supports maximum six periods.
- Define for the whole week: Click the checkbox next to All, all the icon switches to selected, you can define the period for all the days simultaneously.
- Define for several days of a week: Click the checkbox before each day one by one, the icon switches to selected. You can define the period for the selected days simultaneously.
On the timeline, drag to define a period. The Device starts recording the selected event type in the defined period. See Figure 5-32.
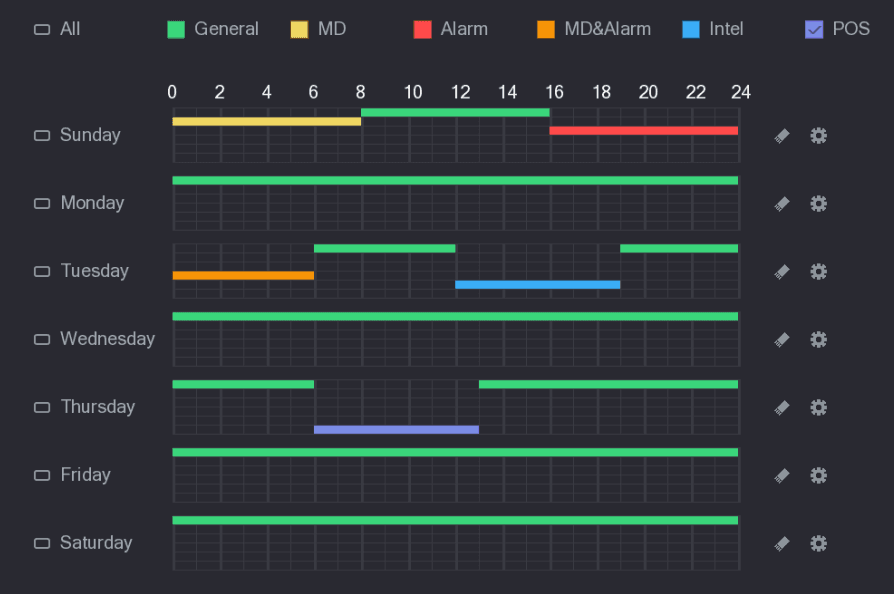
The color bar indicates the event type that is effective in a defined period:
- Recording priority in case of event types are overlapped: MD&Alarm > Alarm > Intel > MD > General.
- Select the check box of event type, and then click the eraser icon to clear the defined period.
- When selecting MD&Alarm, the MD and Alarm check boxes will be cleared respectively.
-
Define the period by editing. Take Sunday as an example.
Click the edit icon.
The Period interface is displayed. See Figure 5-33.
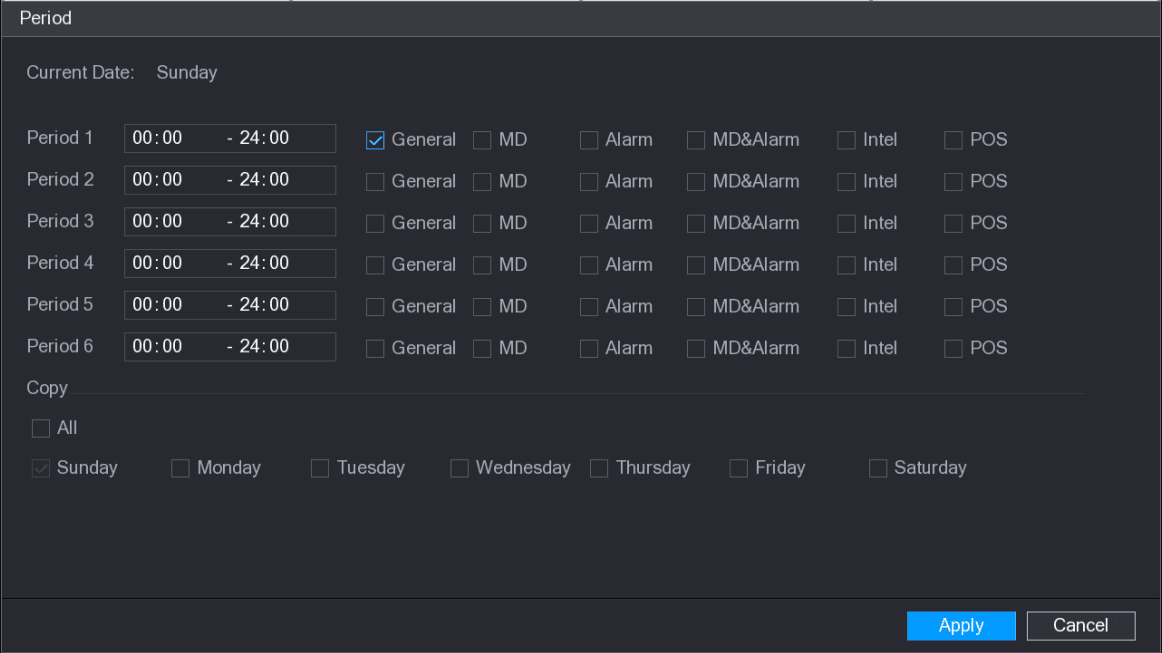
Enter the time frame for the period and select the event check box.
- There are six periods for you to set for each day.
- Under Copy, select All to apply the settings to all the days of a week, or select specific day(s) that you want to apply the settings to.
Click Apply to save the settings.
Apply
Click Apply to complete the settings.
- Click Copy to copy the settings to other channels.
- After configuring the recording schedule settings, you need to perform the following operations to start recording according to the defined schedule.
- Enable the alarm event and configure the settings for the recording channel. For details, see 5.10 Alarm Events Settings.
- You need to enable the recording function, see 5.9.1 Enabling Record Control.
Configuring Snapshot Storage Schedule
You can configure the storage schedule for the snapshot such as channels to take snapshot, alarm settings, and the armed period.
You can also configure snapshot storage settings by selecting Main Menu > STORAGE > SCHEDULE > Snapshot.
Open the SNAPSHOT interface
After you have configured the video recording settings, on the Record interface, click Next.
The SNAPSHOT interface is displayed. See Figure 5-34.
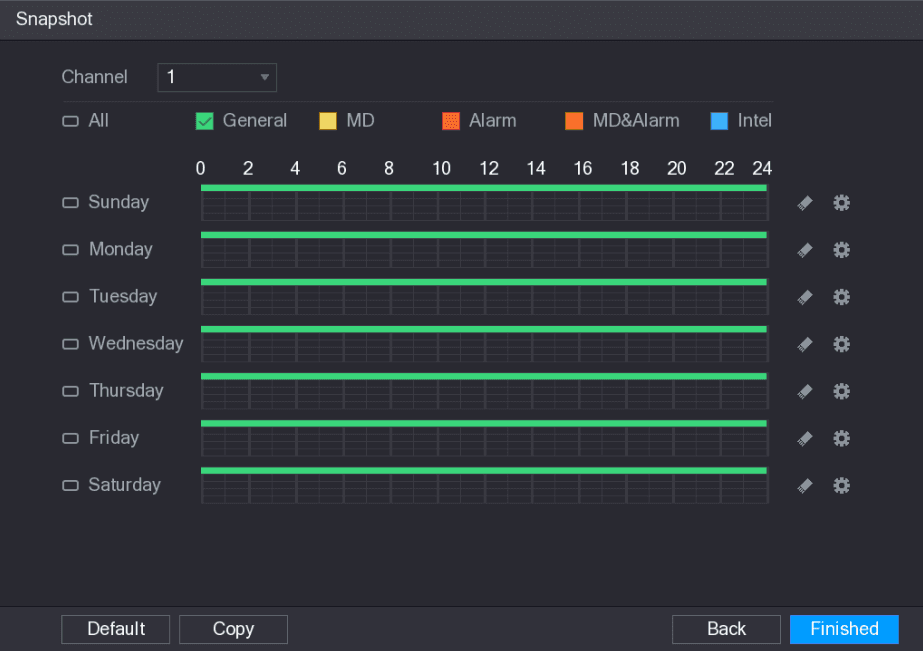
Configure the snapshot schedule parameters
Configure the snapshot settings parameters. See Table 5-10.
| Parameter | Description |
|---|---|
| Channel | In the Channel list, select a channel to take a snapshot. |
| Event type | Select the check box of the event type which includes General, MD, Alarm, MD&Alarm, Intel, and POS. |
| Period | Define a period during which the configured snapshot setting is active. For details about defining a period, see 5.1.4.9 Configuring Recorded Video Storage Schedule. |
| Copy | Click Copy to copy the settings to other channels. |
Finish the wizard
Click Finished.
A pop-up message is displayed.
Click OK.
The live view screen is displayed. The setting up with startup wizard is completed. You can start using the Device.
Connecting Basics
Typical connection diagrams and port connections for the Sapphire Series CVI DVR, covering video and audio input/output, alarm input/output, relay parameters, and the RS-485 port.
Live View
How to use the Live View screen, control bar, navigation bar, shortcut menu, color and display settings, and tour on the Sapphire Series CVI DVR, and how to enter the Main Menu.