 Center za pomoč LTS Connect
Controlling PTZ Cameras
Configure the PTZ connection, operate the basic and expanded PTZ control panels, set up and call presets, tours, patterns, AutoScan, AutoPan, and AUX functions, and call the OSD menu of a coaxial camera on the Sapphire Series CVI DVR.
Controlling PTZ Cameras
PTZ is a mechanical platform that carries a camera and a protective cover and performs overall control remotely. A PTZ can move in both horizontal and vertical direction to provide all-around view to the camera.
Before operating PTZ, ensure the network connection between PTZ and the Device.
Configuring PTZ Connection Settings
You need to configure the PTZ connection settings before use.
- Local connection: RS-485 Port for connecting Speed Dome or coaxial cable for connecting coaxial camera.
- Remote connection: local area network.
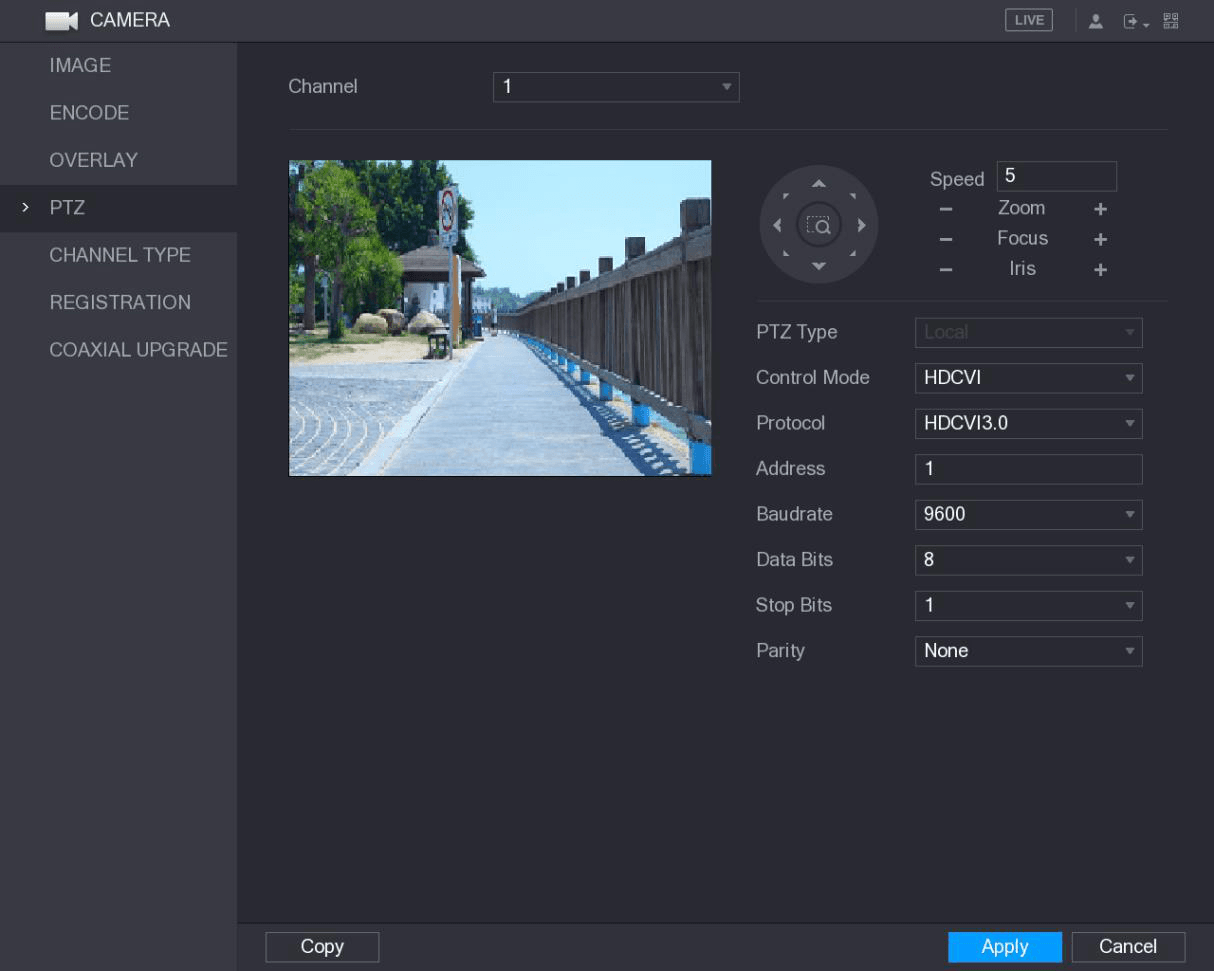
Configure the PTZ connection parameters
Configure the settings for the PTZ connection parameters. See the following table.
| Parameter | Description |
|---|---|
| Channel | In the Channel list, select the channel that you want to connect the PTZ camera to. |
| PTZ Type |
|
| Control Mode | In the Control Mode list, select Serial or HDCVI. For HDCVI series product, select HDCVI. The control signal is sent to the PTZ through the coaxial cable. For the serial mode, the control signal is sent to the PTZ through the RS-485 port. |
| Protocol | In the Protocol list, select the protocol for the PTZ camera, for example, select HDCVI3.0. |
| Address | In the Address box, enter the address for PTZ camera. The default is 1. The entered address must be the same with the address configured on the PTZ camera; otherwise the PTZ camera cannot be controlled from the Device. |
| Baudrate | In the Baudrate list, select the baudrate for the PTZ camera. The default is 9600. |
| Data Bits | The default is 8. |
| Stop Bits | The default is 1. |
| Parity | The default is NONE. |
Apply the settings
Click Apply to save the settings.
Click Copy to copy the settings to other channels.
Working with PTZ Control Panel
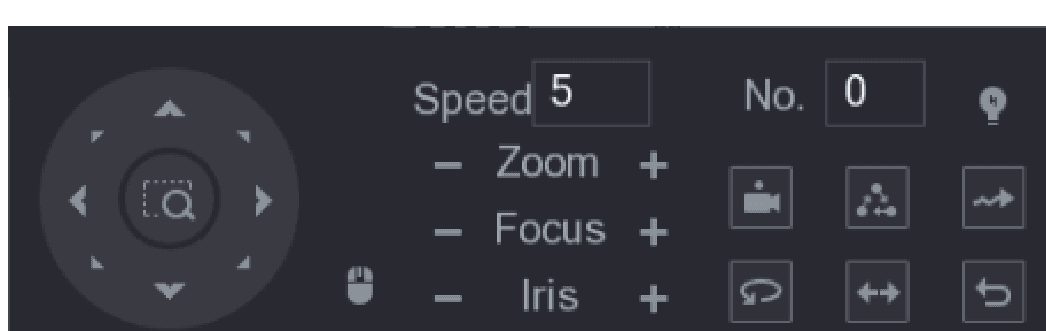
PTZ control panel performs the operations such as directing camera in eight directions, adjusting zoom, focus and iris settings, and quick positioning.
Basic PTZ Control Panel
Right-click on the live view screen and then select PTZ. The PTZ control panel is displayed.
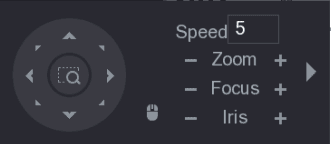
The functions with buttons in gray are not supported by the system.
| Parameter | Description |
|---|---|
| Speed | Controls the movement speed. The bigger the value is, the faster the movement will be. |
| Zoom |
|
| Focus |
|
| Iris |
|
| PTZ movement | Supports eight directions. |
| Fast positioning button |
|
| Mouse control | Not all models support this function and can only be controlled through mouse operations. Click the mouse control icon, you can control the four directions (left, right, up, and down) PTZ movement through mouse operation. |
| Expand | Click the expand arrow to open the expanded PTZ control panel. |
Expanded PTZ Control Panel
On the basic PTZ control panel, click the expand arrow to open the expanded PTZ control panel to find more options.
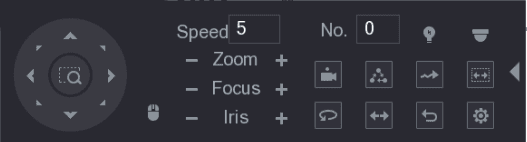
- The functions with buttons in gray are not supported by the system.
- Right-click once to return to the interface of PTZ basic control panel.
| Icon | Function | Icon | Function |
|---|---|---|---|
| Preset | Preset | Auto Pan | Auto Pan |
| Tour | Tour | Flip | Flip |
| Pattern | Pattern | Reset | Reset |
| Autoscan | Autoscan | AUX Config | Click the AUX Config icon to open the PTZ functions settings interface. |
| AUX Switch | AUX Switch | Enter Menu | Click the Enter Menu icon to open the MENU OPERATION interface. |
Configuring PTZ Functions
Configuring Presets
Open the Preset interface
On the Expanded PTZ Control Panel, click the Preset icon.
The Preset interface is displayed.
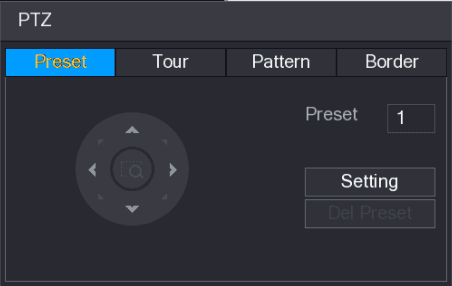
Position the camera
Click the direction arrows to the required position.
Enter the preset value
In the Preset box, enter the value to represent the required position.
Save the preset
Click Setting to complete the preset settings.
Configuring Tours
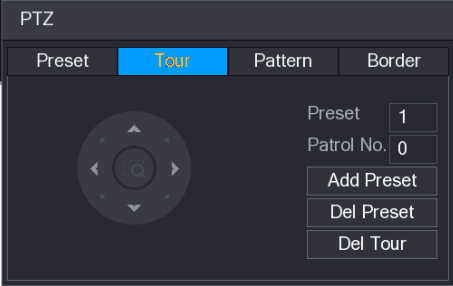
Open the Tour tab
On the Expanded PTZ Control Panel, click the Tour icon.
The PTZ interface is displayed.
Click the Tour tab.
The Tour tab is displayed.
Enter the tour route number
In the Patrol No. box, enter the value for the tour route.
Enter the preset value
In the Preset box, enter the preset value.
Add the preset
Click Add Preset.
A preset will be added for this tour.
- You can repeat adding more presets.
- Click Del Preset to delete the preset for this tour. This operation can be repeated to delete more presets. Some protocols do not support deleting.
Configuring Patterns
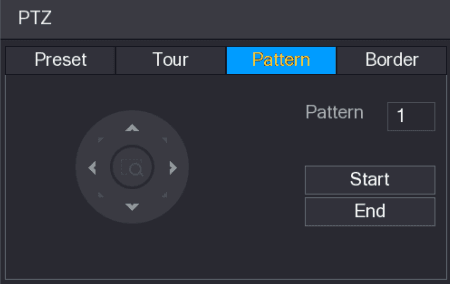
Open the Pattern tab
On the Expanded PTZ Control Panel, click the Pattern icon.
The PTZ interface is displayed.
Click the Pattern tab.
The Pattern interface is displayed.
Enter the pattern value
In the Pattern box, enter the value for pattern.
Record the pattern
Click Start to perform the directions operations. You can also go to the PTZ Control Panel to perform the operations of adjusting zoom, focus, iris, and directions.
Complete the settings
On the PTZ interface, click End to complete the settings.
Configuring AutoScan
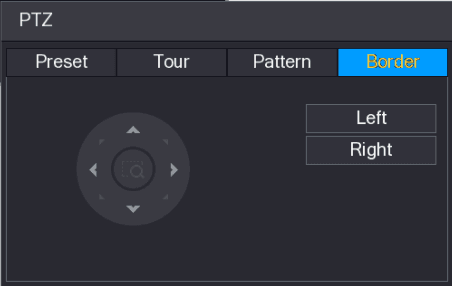
Open the Border tab
On the Expanded PTZ Control Panel, click the Autoscan icon.
The PTZ interface is displayed.
Click the Border tab.
The Border interface is displayed.
Position the borders
Click the direction arrows to position the left and right borders.
Calling PTZ Functions
After you have configured the PTZ settings, you can call the PTZ functions for monitoring from the Expanded PTZ Control Panel.
Calling Presets
Enter the preset value
On the Expanded PTZ Control Panel, in the No. box, enter the value of the preset that you want to call.
Call the preset
Click the Preset icon to call the preset.
Click the Preset icon again to stop calling the preset.
Calling Tours
Enter the tour value
On the Expanded PTZ Control Panel, in the No. box, enter the value of the tour that you want to call.
Call the tour
Click the Tour icon to call the tour.
Click the Tour icon again to stop calling the tour.
Calling Patterns
Enter the pattern value
On the Expanded PTZ Control Panel, in the No. box, enter the value of the pattern that you want to call.
Call the pattern
Call the Pattern icon to call the pattern.
The PTZ camera moves according to the configured pattern repeatedly.
Click the Pattern icon again to stop calling the pattern.
Calling AutoScan
Enter the border value
On the Expanded PTZ Control Panel, in the No. box, enter the value of the border that you want to call.
Call AutoScan
Click the Autoscan icon.
The PTZ camera performs scanning according to the configured borders.
Click the Autoscan icon again to stop auto scanning.
Calling AutoPan
Start moving
On the Expanded PTZ Control Panel, click the Auto Pan icon to start moving in horizontal direction.
Stop moving
Click the Auto Pan icon again to stop moving.
Using AUX Button
On the Expanded PTZ Control Panel, click the AUX Switch icon, the AUX setting interface is displayed.
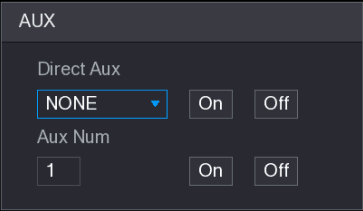
- In the Direct Aux list, select the option that corresponds to the applied protocol.
- In the Aux Num box, enter the number that corresponds to the AUX switch on the decoder.
Calling OSD Menu
For the coaxial camera, you can call the OSD menu through the Expanded PTZ Control Panel.
Open the MENU OPERATION interface
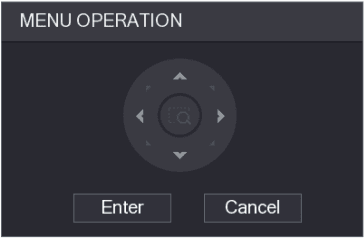
On the Expanded PTZ Control Panel, click the Enter Menu icon.
The MENU OPERATION interface is displayed.
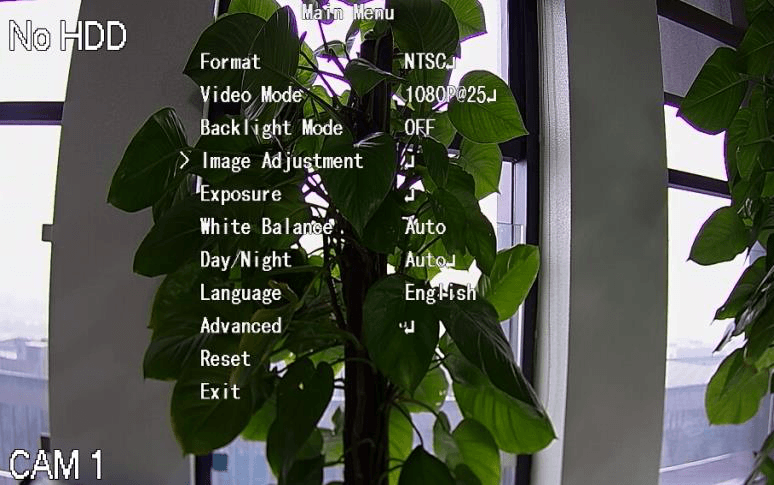
Select the onscreen parameters
On the MENU OPERATION interface, click the arrow button to select the onscreen parameters.
Complete the settings
Click Enter to complete the settings.
Live View
How to use the Live View screen, control bar, navigation bar, shortcut menu, color and display settings, and tour on the Sapphire Series CVI DVR, and how to enter the Main Menu.
Camera Settings
Configure image, encode, snapshot, overlay, covered area, channel type, and coaxial camera upgrade settings for each connected camera on the Sapphire Series CVI DVR.