 ศูนย์ช่วยเหลือ LTS Connect
Camera Settings
Configure OSD overlays, privacy masks, video parameters, day/night switch, and advanced camera parameters such as exposure, backlight, and image enhancement on the Turbo HD DVR GUI 4.0.
Configure OSD Settings
Purpose: You can configure the OSD (On-screen Display) settings for the camera, including date/time, camera name, etc.
Open Camera Management
Click  on the main menu bar.
Open Display settings
Click Display.
Select the camera
Select the camera from the drop-down list.
Edit camera name
Edit the name in the Camera Name text field.
Enable OSD information
Check the checkbox of the Display Name, Display Date and Display Week if you want to show the information on the image.
Set date and time format
Set the date format, time format, and display mode.
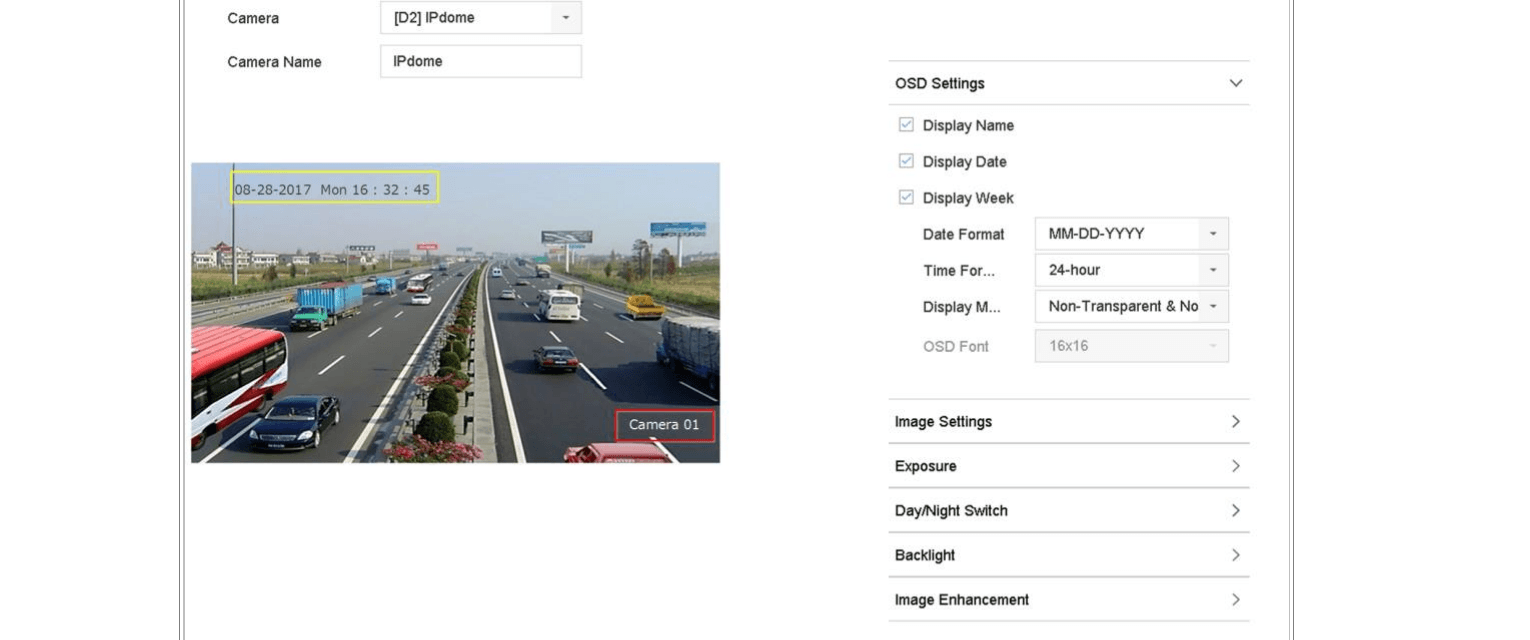
Figure 4-1 OSD Configuration Interface
You can use the mouse to click and drag the text frame on the preview window to adjust the OSD position.
Apply
Click the Apply button to apply the settings.
Configure Privacy Mask
Purpose: The privacy mask can be used to protect personal privacy by concealing parts of the image from view or recording with a masked area.
Open Camera Management
Click on the main menu bar.
Open Privacy Mask settings
Click Privacy Mask.
Select the camera
Select the camera to set privacy mask.
Enable the feature
Click the checkbox of Enable to enable this feature.
Draw zones
Use the mouse to draw a zone on the window. The zones will be marked with different frame colors.
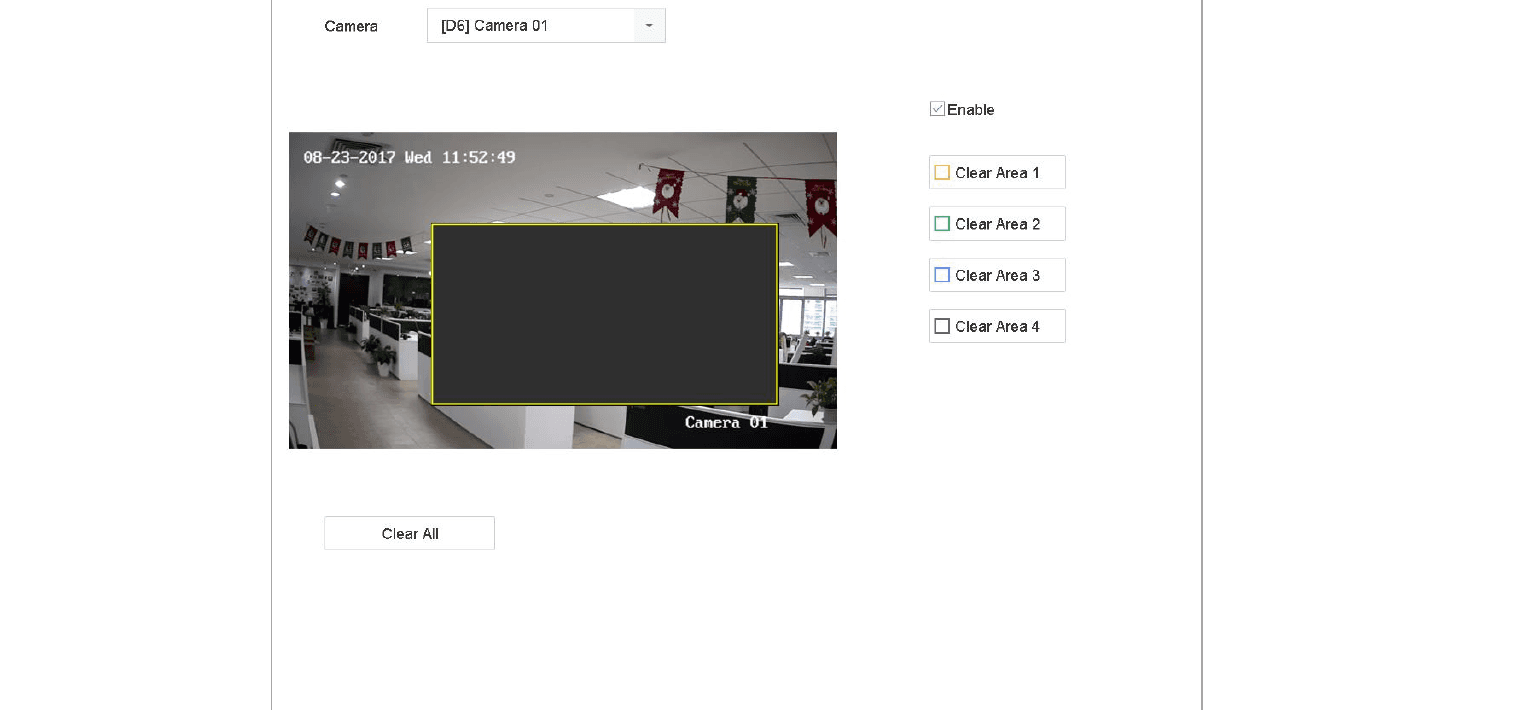
Figure 4-2 Privacy Mask Settings Interface
Up to 4 privacy mask zones can be configured and the size of each area can be adjusted.
Clear zones if needed
The configured privacy mask zones on the window can be cleared by clicking the corresponding Clear Zone1–Clear Zone4 icons on the right side of the window, or click Clear All to clear all zones.
Apply
Click Apply to save the settings.
Configure the Video Parameters
Purpose: You can customize the image parameters including the brightness, contrast, saturation for the live view and recording effect.
Open Camera Management
Click on the main menu bar.
Open Display settings
Click Display.
Select the camera
Select the camera from the drop-down list.
Adjust image parameters
Adjust the slider or click on the up/down arrow to set the value of the brightness, contrast or saturation.
Apply
Click Apply to save the settings.
Configure the Day/Night Switch
The camera can be set to day, night or auto switch mode according to the surrounding illumination conditions.
Open Camera Management
Click on the main menu bar.
Open Display settings
Click Display.
Select the camera
Select the camera from the drop-down list.
Set the day/night mode
Select Day/Night Switch to Day, Night, Auto or Auto-Switch.
- Auto: The camera switches between the day mode and the night mode according to the illumination automatically. The sensitivity ranges from 0 to 7, and the higher sensitivity results in the more easily to trigger the mode switch. The switch time refers to the interval time between the day/night switch. You can set it from 5 sec to 120 sec.
- Auto-Switch: The camera switches the day mode and the night mode according to the start time and end time you set.
Apply
Click the Apply to save the settings.
Configure Other Camera Parameters
For the connected camera, you can configure the camera parameters including the exposure mode, backlight and image enhancement.
Open Camera Management
Click on the main menu bar.
Open Display settings
Click Display.
Select the camera
Select the camera from the drop-down list.
Configure the camera parameters
Configure the camera parameters:
- Exposure: Set the exposure time (1/10000 to 1 sec) of camera. The larger exposure value results in the brighter image.
- Backlight: Set the wide dynamic range (0 to 100) of the camera. When the surrounding illumination and the object have larger difference in brightness, you should set the WDR value.
- Image Enhancement: For optimized image contrast enhancement.
Apply
Click the Apply to save the settings.
Camera Management
Add IP cameras manually or via auto-search, connect PoC cameras, configure analog and IP signal input channels, enable 5 MP long distance transmission, enable H.265 auto switch, and remotely upgrade IP cameras on the Turbo HD DVR.
Live View
How to start live view, use digital zoom and live view strategy, detect targets, configure live view settings and layout, set up auto-switch of cameras, enable channel-zero encoding, and operate an auxiliary monitor on the Turbo HD DVR GUI 4.0.