 LTS Connect Help Center
Add Device
How to add devices to LTS Platinum Partner using LAN scan, serial number, IP/domain, batch import, or LTS Connect account synchronization.
LTS Platinum Partner accesses devices by two modes: LTS Connect (P2P) and Device IP Address / Domain Name. The former provides securer data communication (between LTS Platinum Partner and devices) and full access to features based on the LTS Connect service, such as device handover and exception notification; the latter provides faster data communication but no access to the features based on LTS Connect service.
Device Adding Methods
The table below shows the device adding methods for the two access modes respectively.
| Access Mode | Device Adding Method |
|---|---|
| LTS Connect (P2P) | Add Detected LAN Device |
| Add Device by Entering Serial No. | |
| Synchronize Devices with LTS Connect Account | |
| Add Devices Without Support for the LTS Connect Service | |
| Device IP Address/Domain Name | Add Devices by IP Address or Domain Name |
| Batch Add Devices |
Following Operations
After adding devices to the Portal, you can perform the following operations if required.
| Operation | Description |
|---|---|
| Configure Linkage Rule | Click the linkage rule icon to configure a linkage rule for the device. For details, see Add Custom Linkage Rule. |
| Activate Health Monitoring Service | Click Activate Service on the adding result page. Or hover the cursor onto the health monitoring icon on the device card on the site details page, and then click Activate Service. For details, see Activate the Health Monitoring Service for Devices and Health Monitoring Service. |
| Delete Device | Click the more options icon → delete icon to delete the device. Deleting a device (except devices added by IP/domain) is not supported if the site is authorized. |
| Upgrade Device Firmware | When device adding completes, the platform will start detecting whether the device firmware version is compatible. Some functions (including health monitoring, linkage rule, and remote configuration) are unavailable if the device is not compatible with the LTS Platinum Partner. For incompatible devices: 1. Select Upgrade to Compatible Version on the Upgrade or Not column, then click Add and Upgrade. 2. Enter the device username and password to add and upgrade the device. |
| Set Type for Unknown Device | If the LTS Platinum Partner cannot recognize a device's type after you add it, you can manually set a device type for it. Click Set Device Type and select a device type from the drop-down list. You can edit it again after the selection. |
| Unbind Device from Its Current Account | If the adding result page shows that a device fails to be added and has been added to another account, you can click the unbind icon to unbind it. When the device is unbound, you can add it to your account. For details, see Unbind a Device from Its Current Account. |
Add Device(s) after Batch Configuring Them
After batch configuring devices, you can add the device(s) to the existing site or a new site.
Select one of the following ways to enter the Add Device page:
-
After batch configuring device(s), click Add Device in the prompt box.
For details about batch configuring devices, refer to Batch Configure Devices on LAN.
-
On the Home page, click Add Device.
-
On the navigation pane, click Site & Device → Customer Site:
- In Device Mode of the Customer Site page, click Add Device on the top.
- In Site Mode of the Customer Site page: 1) click Add Device on the top of the site list; 2) click the add icon in the Operation column of the site list; 3) click the site name to enter the site details page, and then go to Device → Add Device.
Select Scan for Devices on LAN, Enter Serial no., Enter IP Address / Domain, Batch Import, or Synchronize devices from LTS Connect as the adding method.
Select the device(s) to be added, then perform one of the following two ways to add the device(s) to the site:
-
Select Existing Site and then click the site in the drop-down list.
-
Select New Site and edit the following parameters to create a new site.
Site Name — The name of the site, which can describe the site location, function, etc.
Time Zone — Select the time zone in the drop-down list according to the location the site belongs to.
Scene — Select the scene of the site in the drop-down list according to the usage scene, such as house, department, villa, and store.
Site Address — Enter the site address, such as street and number, apartment suite, unit, building, floor, etc.
City — Enter the city of the site.
State — Enter the state of the site.
Sync Time & Time Zone to Device — After checking, the time and time zone will be synchronized to the device from the site.
Click Next and perform the operations according to the prompts on the page. For more details, refer to Add Detected LAN Device.
Add Detected LAN Device
The Portal can detect available devices connected to the same network with the Portal, which makes the devices' information (e.g., IP address) about themselves recognized by the Portal. Based on the information, you can add the devices quickly.
- Make sure the devices you are going to use are correctly installed and connected to the network as specified by the manufacturers.
- You can add up to 15 detected LAN devices simultaneously.
Select one of the following ways to enter the Add Device page:
- On the Home page, click Add Device.
- On the navigation pane, click Site & Device → Customer Site:
- In Device Mode of the Customer Site page, click Add Device on the top.
- In Site Mode of the Customer Site page: 1) click Add Device on the top of the site list; 2) click the add icon in the Operation column of the site list; 3) click the site name to enter the site details page, and then go to Device → Add Device.
On the Add Device page, click Scan for Devices on LAN. The device(s) connected to the same LAN with the Portal will be displayed on the device list. You can view information including device serial no., device IP address, activation status (activated or not), LTS Connect status (connected to LTS Connect service or not), etc.
Check the LAN device(s) to be added and click Next. Perform part or all the following 4 steps based on the status of the selected devices before you can add them.
Table — Step Description
| Step | Description |
|---|---|
| 1. Activate Device | If there are device(s) not activated, activate them. See Activate Device for details. If a device is activated, the platform will automatically assign a fixed IP address for it. |
| 2. Enter Device Password | Enter admin password of the device. See Enter Device Password for details. |
| 3. Automatically Connect to LTS Connect Service | Connect device(s) to the LTS Connect service. See Connect to LTS Connect Service for details. |
| 4. Set Device Verification Code | If a device is connected to the LTS Connect service successfully, the platform will automatically get the device verification code from the device. If not, you need to set verification code for it. See Set Device Verification Code for details. |
Activate Device
If there are inactivated device(s) in the selected devices, create a device admin password for all the inactivated device(s) on the pop-up window to activate them.
Enter Device Password
For devices which are activated but not connected to the LTS Connect service, you should enter its admin password on the pop-up window. The admin password is created when you activate the device.
If multiple devices share the same password, enable Batch Enter Admin Password to enter the password for all the devices in a batch. If any device passwords are incorrect, a notification will appear showing these device(s) for you to enter the correct password(s).
Before entering admin password, you should make sure that no repeated device IP address exists, or one of the devices with the same IP address will fail to be added. You can click the edit icon in the Operation column, and then edit the device IP address.
Connect to LTS Connect Service
After entering device admin passwords, the platform will automatically start connecting the device(s) to the LTS Connect service. Devices that fail to be connected to the LTS Connect service cannot be added.
Make sure that no repeated device IP address exists and that the IP addresses of the to-be-connected devices are in the same network segment with the PC running LTS Platinum Partner, or connection exception will occur. You can click the edit icon in the Operation column, and then edit the device IP address.
Set Device Verification Code
- If a device is connected to the LTS Connect service successfully, the platform will automatically get device verification code from the device. If the platform failed to get the verification codes from any devices, you need to manually enter their verification codes. If multiple devices share the same verification code, enable Batch Enter Verification Code and enter the verification code for all of them.
- If the device(s) fail(s) to be connected to the LTS Connect service, set a shared device verification code for multiple devices, or set verification codes for each device. After completing device verification settings, the device(s) will be connected to the LTS Connect service.
Add Device by Entering Serial No.
If a device is connected to the LTS Connect service, you can manually add it to a site by entering the device serial number and device verification code.
Before You Start
- Make sure the devices you are going to use are correctly installed and connected to the network as specified by the manufacturers.
- Make sure the device has been activated and connected to LTS Connect service.
Enter the Add Device page
Select one of the following ways to enter the Add Device page:
- On the Home page, click Add Device.
- On the navigation pane, click Site & Device → Customer Site:
- In Device Mode of the Customer Site page, click Add Device on the top.
- In Site Mode of the Customer Site page: 1) click Add Device on the top of the site list; 2) click the add icon in the Operation column of the site list; 3) click the site name to enter the site details page, and then go to Device → Add Device.
Select adding mode
Select Enter Serial No. as the adding mode.
Enter device details
Enter the device serial number and device verification code.
The device serial number and the default device verification code are usually on the device label. If no device verification code is found, enter the verification code you created when enabling LTS Connect service.
Click Next
Click Next.
LTS Platinum Partner will start detecting whether the device firmware version is compatible with the LTS Platinum Partner. Some functions (including health monitoring, linkage, and remote configuration) cannot be used if the device is not compatible with the LTS Platinum Partner. Firmware version detection will not happen if a site is authorized. For devices incompatible with the LTS Platinum Partner, you need to upgrade them:
- Select Upgrade to Compatible Version on the Upgrade or Not column, then click Add and Upgrade.
- Enter device username and password to add and upgrade the device.
Check and add devices
Check the device(s) to be added.
Complete
Click Add.
Add Devices by IP Address or Domain Name
If you know the IP address or domain name of a device, you can add it to LTS Platinum Partner by specifying its IP address/domain name, username, password, etc. Once a device is added in this way, LTS Platinum Partner will generate a QR code containing the device information. After completing device setup, you can share the QR code with your customer. Your customer can then scan the QR code via the LTS Connect Mobile Client to add the device to her/his LTS Connect account.
Before You Start
Make sure the devices you are going to use are correctly installed and connected to the network as specified by the manufacturers.
- Devices added in this mode do NOT support the device handover process. If you need to hand over a device to your customer after completing the device setup work, please add it using one of the following two methods: Add Detected LAN Device or Add Device by Entering Serial No..
- Only encoding devices mapped in WAN support this function.
- Ask your customers to download or update the LTS Connect Mobile Client (V 4.15.0 or later). You can send the QR code or download link shown in the banner on the Home page to them.
Enter the Add Device page
Select one of the following ways to enter the Add Device page:
- On the Home page, click Add Device.
- On the navigation pane, click Site & Device → Customer Site:
- In Device Mode of the Customer Site page, click Add Device on the top.
- In Site Mode of the Customer Site page: 1) click Add Device on the top of the site list; 2) click the add icon in the Operation column of the site list; 3) click the site name to enter the site details page, and then go to Device → Add Device.
Select adding mode
Select Enter IP Address / Domain as the adding mode.
Enter device information
Enter the device's name, IP address/domain name, port number, username, and password.
The password strength of the device can be automatically checked. We highly recommend you change the password of your own choosing (using a minimum of 8 characters, including at least three kinds of the following categories: upper case letters, lower case letters, numbers, and special characters) to increase the security of your product. And we recommend you change your password regularly, especially in the high security system, changing the password monthly or weekly can better protect your product.
Proper configuration of all passwords and other security settings is the responsibility of the service provider and/or end-user.
Click Add
Click Add.
A QR code containing the device information will be generated and displayed in the device card on the site details page.
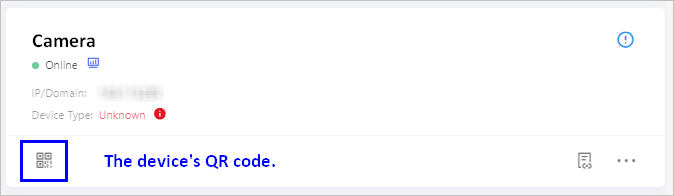
Figure 6-7 The QR Code of the Added Device
Batch Add Devices
You can batch-add multiple devices to LTS Platinum Partner by entering the device parameters in a predefined template.
Before You Start
Make sure the devices you are going to use are correctly installed and connected to the network as specified by the manufacturers.
- The devices added in this mode cannot be handed over to your customer. If you need to hand over a device to your customer after completing the device setup work, please add it by LTS Connect (P2P). For details, see Add Detected LAN Device or Add Device by Entering Serial No..
- Only encoding devices mapped in WAN support this function.
Enter the Add Device page
Select one of the following ways to enter the Add Device page:
- On the Home page, click Add Device.
- On the navigation pane, click Site & Device → Customer Site:
- In Device Mode of the Customer Site page, click Add Device on the top.
- In Site Mode of the Customer Site page: 1) click Add Device on the top of the site list; 2) click the add icon in the Operation column of the site list; 3) click the site name to enter the site details page, and then go to Device → Add Device.
Select adding mode
Select Batch Import as the adding mode.
Download the template
Click Download Template to save the predefined template (CSV file) on your PC.
Fill in the template
Open the downloaded template file and enter the required information of the devices to be added in the corresponding column.
Upload the template
Click Upload Template to upload the edited template to LTS Platinum Partner.
Optional: Perform post-add operations
After adding the devices, you can optionally perform the following operations.
| Operation | Description |
|---|---|
| Encrypt Device QR Code | A QR code will be generated and displayed in the device information area. If an end user did not add the device to his/her LTS Connect account, he/she can add it to the LTS Connect account by scanning this QR code using LTS Connect. 1. Click the QR code icon to display the QR code. 2. Enter a password to encrypt the QR code, and then click Save. |
| Activate Health Monitoring Service | Hover the cursor onto the health monitoring icon on the device card on the site details page, and then click Activate Service. For details, see Activate the Health Monitoring Service for Devices and Health Monitoring Service. |
| View and Edit Device Information | Click the device's IP address or domain name to view the device basic information. If the device's information changed, or a network exception occurs, you can edit its information accordingly. Select a device, then click the more options icon → edit icon to edit the device's name, IP address/domain name, port number, username, and password. |
| Set Type for Unknown Device | If the LTS Platinum Partner cannot recognize a device's type after you add it, you can manually set a device type for it. Click Set Device Type and select a device type from the drop-down list. You can edit it again after the selection. |
| Delete Device | Click the more options icon → delete icon. Deleting a device (except devices added by IP/domain) is not supported if the site is authorized. |
- We highly recommend encrypting the device QR code for security reasons.
- Please inform your end users to download or update the LTS Connect Mobile Client (V 4.15.0 or later). You can send the QR code or download link shown in the banner on the Home page to them.
Synchronize Devices with LTS Connect Account
You can synchronize devices in your LTS Connect account with devices in the LTS Platinum Partner account. After synchronization, the devices are still managed in your LTS Connect account and you can continue to use LTS Connect service.
In the following two cases, you will need to synchronize devices in the LTS Connect account with devices in the LTS Platinum Partner account:
- Case 1: Before using LTS Platinum Partner, you managed the devices for the customer by the LTS Connect Mobile Client after the customer shares her/his devices to your LTS Connect account.
- Case 2: Before using LTS Platinum Partner, you already had an LTS Connect account and added device(s) to it.
Under the above two circumstances, you can synchronize these devices (including the ones the customers shared to you, or the ones added in your LTS Connect account) with the LTS Platinum Partner account for quick and convenient device adding and better device management and maintenance.
There are three entries:
- On the Customer Site page, click Synchronize Devices from LTS Connect on the top.
- On the Add Device page, click Synchronize Devices from LTS Connect.
- Click the username in the upper-right corner, click Link with LTS Connect Account in the drop-down menu, and click Link with Account.
Log In to LTS Connect
First, you need to log into LTS Connect by entering your account or by scanning a QR code.
Optionally, check Get Your Account and Device Information to allow LTS Platinum Partner to get this information.
Check Authorize Automatic Device Synchronization from Your Account to the Current LTS Platinum Partner Account to authorize automatic device synchronization. After authorization, devices newly added to LTS Connect will be automatically synchronized to LTS Platinum Partner.
Select Device for Synchronization
Secondly, you need to select the devices for synchronization.
After logging in, the devices added to your LTS Connect account, as well as the ones others shared to you, will be displayed in the device list.
You can filter the devices by selecting Show All Devices, Show My Devices Only (the devices added to your LTS Connect account), or Show Others' Devices Only (the devices shared to your LTS Connect account from the customer) in the drop-down list.
Select the devices you want to synchronize with the LTS Platinum Partner account, then click Next.
Configure Site for My Devices
Thirdly, you need to set the site information in LTS Platinum Partner for your devices to be synchronized.
For the devices added in your LTS Connect account (displayed in My Devices list), you can add them to different sites or to the same site according to your actual needs.
Add to Different Sites
If your devices are shared with different customers, select this option and you can add them to different sites.
For the devices which have been shared to the customers, the system will automatically create sites by the usernames of the customers, and then add the devices to these sites. If there already exists a site the site owner of which is the customer, the information of this site (site name and time zone) will be displayed, and the corresponding devices will be added to this site automatically.
For the devices which are not shared to anyone, the system will automatically create a site named after your LTS Connect account username, and then assign them to this site.
You can hover over the site name and click the edit icon to edit the site name.
Add to the Same Site
You can also add these devices to the same site. The system will automatically create a site named after your LTS Connect account username, and then add all these selected devices to this site.
You can hover over the site name and click the edit icon to edit the site name.
By default, after synchronization, you will have site authorization permission of the automatically created site(s), and configuration as well as live view permission of the devices in My Devices list.
Configure Site and Permissions for Others' Devices
Fourthly, you need to set the site information in LTS Platinum Partner and set the device permission for the devices shared to you.
For the devices shared to you by others, usually customers, (displayed in Others' Devices list), they will be added to different sites. The system will automatically create sites named after the usernames of the customers, and then add all these selected devices to this site. If there already exists a site the site owner of which is the customer, the information of this site (site name and time zone) will be displayed, and the corresponding devices will be added to this site automatically.
You can hover over the site name and click the edit icon to edit the site name.
In the Apply for Permission list, you need to select the permissions that you want to apply from the customers for the devices. By default, you will have site authorization permission of the automatically created site(s). After synchronization, the customers will receive a notification on LTS Connect Mobile Client. After authorization by the customers, you can manage the devices on LTS Platinum Partner.
Set Time Zone
Fifthly, you can set the time zone of the devices if needed.
Batch Configure Devices on LAN
Activate devices, assign IP addresses, link channels to NVR/DVR, create parameter templates, and batch-apply settings to multiple devices on the same LAN.
Move Devices and Manage Device Permissions
Move devices between sites using the Device Movement feature, and apply for or release device permissions on the LPP Web Portal.