 LTS Connect Help Center
Batch Configure Devices on LAN
Activate devices, assign IP addresses, link channels to NVR/DVR, create parameter templates, and batch-apply settings to multiple devices on the same LAN.
You can batch configure online devices on the same Local Area Network (LAN) with the PC on which the LTS Platinum Partner Portal runs. The available configurations include batch device activation and device IP address assignment, batch linking channels to NVR/DVR, and batch setting parameters for devices via templates. These functions allow you to complete basic configurations for multiple devices with much less effort compared with configuring devices one by one.
- For entering the device batch configuration page for the first time, a video tutorial about how to batch configure devices on LAN will pop up and automatically play in the down-left corner.
- The functionality is only available to certain models of cameras, NVRs, and DVRs.
- Before batch configuring devices, make sure you have connected them to the same LAN with the PC on which the LTS Platinum Partner Portal runs.
The flow chart for batch configuration of devices is shown below.
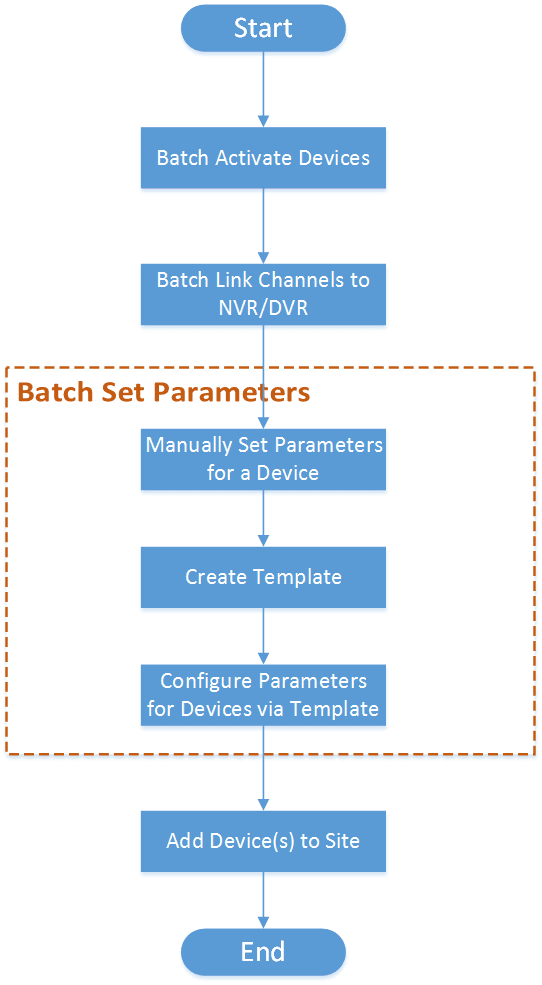
Figure 6-1 Flow Chart
Table 6-1 Flow Chart Description
| Step | Sub-step | Description |
|---|---|---|
| Batch Activate Devices | N/A | Batch activate online devices in the same Local Area Network (LAN) both the PC and LTS Platinum Partner Portal run, and assign IP addresses for activated devices. See Batch Activate Devices and Assign IP Addresses for Them for details. |
| Batch Link Channels to NVR/DVR | N/A | If the activated devices include NVRs or DVRs, link channels to NVR or DVR. See Batch Link Channels to NVR and DVR for details. |
| Batch Set Device Parameters | Manually Set Parameters for a Device | Select an activated device and set its parameters manually. See Create Template for Setting Parameters for details. |
| Batch Set Device Parameters | Create Template | Create a template based on manually configured devices. See Create Template for Setting Parameters for details. |
| Batch Set Device Parameters | Configure Parameters for Devices via Template | Batch configure parameters for multiple devices via a selected template. See Batch Set Parameters for Devices via Template for details. |
| Add Device(s) to Site | N/A | If required, add the activated and configured device(s) to a Site. See Add Detected LAN Device for details. |
Batch Activate Devices and Assign IP Addresses for Them
The Portal can detect available devices connected to the same network with the Portal, then you can activate devices and assign an IP address for them.
Before You Start: Make sure the devices you are going to use are correctly installed and connected to the network as specified by the manufacturers.
Go to Site & Device
Move your cursor to the Site & Device tab.
Open batch device configuration
Click Install & Config → On-Site Config to enter the batch device configuration page.
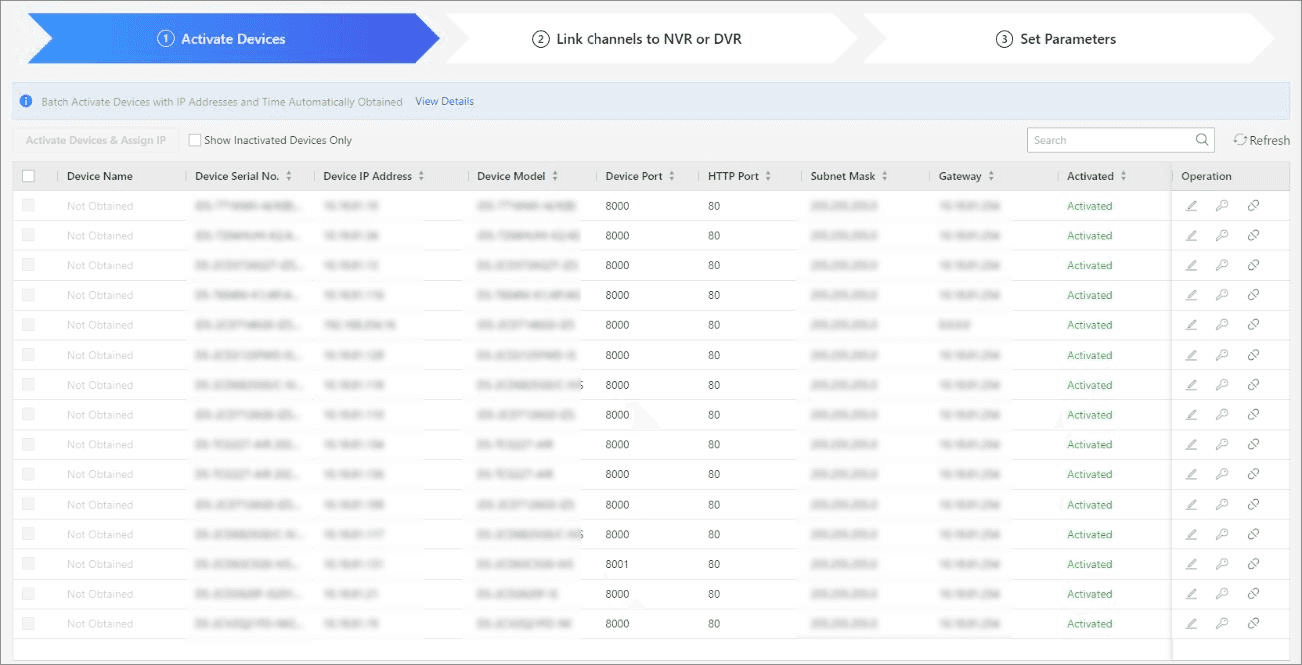
Figure 6-2 Batch Device Configuration
Select devices to activate
Select the detected online devices to be activated.
Open the activation window
Click Activate Devices & Assign IP to open the Activate Devices & Assign IP window.
Set admin password
Enter the device admin password and confirm the password.
Activate
Click Activate Devices & Assign IP.
- The non-activated devices and activated devices with no assigned IP address will be displayed as Not Obtained in the Device Name column.
- For activated devices and those assigned with an IP address, hovering the mouse over the IP address will display a note that the IP address has been automatically assigned.
The devices are activated, and the device IP addresses are assigned by the Portal. The time of the computer will be synchronized to the activated devices.
Optional: After the devices are activated, you can perform the following operations.
| Operation | Description |
|---|---|
| Edit Device Network Parameters | Click  to edit the device network parameters, including IP address, device port, HTTP port, subnet mask, gateway, device admin password and then click OK. |
| Reset Device Admin Password | Click  to reset the admin password of the device. |
| Unbind Device | Click  and then enter the device password and verification code to unbind the device from its current account. After unbinding, the device can be added to another account. |
What to do next: After activating the devices, you should batch-add channels to NVRs or DVRs. For details, refer to Batch Link Channels to NVR and DVR.
Batch Link Channels to NVR and DVR
If there are online NVRs, DVRs, and network cameras on the same LAN, you can batch link the network camera to the NVR and DVR as channels. After linking, you can manage the linked channels according to your needs.
Before You Start: Make sure you have activated the NVRs, DVRs, and/or network cameras. See Batch Activate Devices and Assign IP Addresses for Them for details.
If there is no online NVR or DVR on the same LAN, skip this task.
Select an NVR or DVR
On the Link Channel page, select an NVR or DVR on the left.
If you have not logged in to the device, enter the password to log in.
Proceed to channel view
Click Next.
Channels that have been linked will be displayed in the middle.
If a linked channel is offline,  will be displayed beside the channel name. Hover the cursor on the icon to view the reason for being offline. You can click Set Parameters to change channel parameters to try again.
Open the Link Channel panel
Click Link Channel to open the Link Channel panel.
Log in to a device (optional)
Select a device and click  to log in to the device and get device information.
Link the device
Click + to link the device.
Optional: Perform the following operations after linking.
| Operation | Description |
|---|---|
| Edit NVR / DVR / Channel Name | Click  to edit the NVR / DVR / channel name. |
| Sort Channels | Click  or  to sort the channels. |
| Replace Device | Click Replace Device to unlink this channel and link a new device. |
| Unlink Device | Click  to unlink the channel. |
What to do next: Click Next to batch set parameters for devices. See Batch Set Parameters for Devices via Template for details.
Create Template for Setting Parameters
Before batch configuring parameters for devices, you should create a template. After creating a template, you can batch apply it to devices.
Before You Start: Make sure you have activated devices and linked channels to any NVR or DVR. See Batch Activate Devices and Assign IP Addresses for Them and Batch Link Channels to NVR and DVR for details.
Enter remote configuration
Click a device name or Set Parameters to enter the remote configuration page.
Set device parameters
On the remote configuration page, set parameters for the device.
Save as template
Click Save as Template on the top right.
Configure template name and content
Set a template name and check the parameters you want to save in the template.
Save
Click Save to save the parameters as a template.
Optional: Add a new template based on a device with configured parameters.
- Click Manage Template → +
- Enter the template name.
- Select the device type.
- In the template content field, select a device.
- Click Save.
Optional: Click  to delete a template.
Batch Set Parameters for Devices via Template
To configure devices with high efficiency, you can batch-apply parameters in an existing template to devices.
Before You Start: Make sure you have created at least one template for setting parameters. See Create Template for Setting Parameters for details.
Select devices and open template settings
Check the device(s) and click Set Parameters by Template.
Before setting parameters for an NVR or DVR, you can tap Format to format the disk of the selected device. Batch formatting is not supported.
Select a template
Select a template.
Apply parameters
Click Apply Parameters to apply the configured parameters to devices.
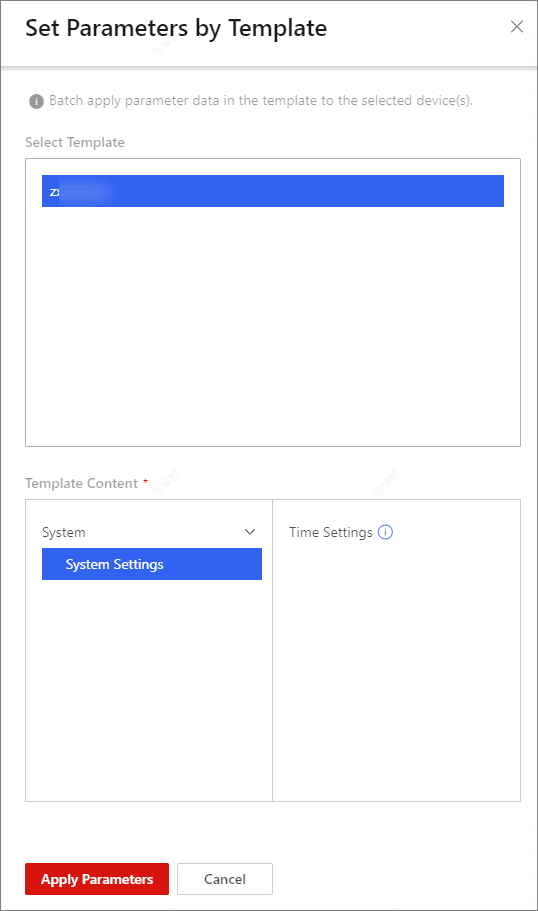
Figure 6-6 Set Parameters by Template
Device Management
Manage devices in the LTS Platinum Partner Web Portal — batch LAN configuration, adding devices, moving devices and permissions, linkage and exception rules, password reset, remote logs, live video and playback, and other operations.
Add Device
How to add devices to LTS Platinum Partner using LAN scan, serial number, IP/domain, batch import, or LTS Connect account synchronization.